MH25 V2
• USB-C Rechargeable
• Powered by a 21700 Battery
• Tactical Mode and Daily Mode Available
Next Generation 21700
Dual Fuel Long Range Flashlight
(English) MH25 V2 (Deutsch) MH25 V2
(Francais)
MH25 V2Features
Specications
Accessories
Battery Options
Technical Data
Battery Installation
Charging Function
• Utilizes a high performance LED with a max output of 1,300 lumens
• Max peak beam intensity of 57,000cd and max throw of 475 meters
• An optical system combined with crystal coating and “Precision Digital
Optics Technology” (PDOT)
• Powered by a 21700 high capacity Li-ion battery while compatible with
18650 and CR123 batteries, to provide a runtime up to 1,500 hours
• Tactical Mode and Daily Mode available
• The tactical tail switch and the metal side switch control 4 brightness
levels and 3 special modes
•
STROBE Mode uses randomly changing frequencies for stronger dizzying eects
• A power indicator beneath the side switch indicates the remaining battery
power
• The power indicator can display the battery voltage (±0.1V)
• Intelligent Li-ion battery charging circuit with a USB-C charging port
• NITECORE 21700 Li-ion battery included (NL2150 5,000mAh)
• Highly ecient constant current circuit provides a stable output
• Incorporated Advanced Temperature Regulation (ATR) module
(Patent No. ZL201510534543.6)
• Electronic reverse polarity protection
• Optical lenses with double-sided scratch resistant coating
• Constructed from aero grade aluminum alloy
• HA III military grade hard-anodized nish
• Waterproof and dustproof rating in accordance with IP68
(2 meters submersible)
• Impact resistant to 2 meters
• Tail stand capability
Length: 157.2mm (6.19")
Head Diameter: 40mm (1.57”)
Tube Diameter: 25.4mm (1”)
Tail Diameter: 27.2mm (1.07”)
Weight: 137g (4.83oz)
NITECORE 21700 Rechargeable
Li-ion Battery (NL2150 5,000mAh),
USB-C Charging Cable, Clip,
Lanyard, Spare O-ring,
18650/CR123 Battery Magazine,
Holster
Type
Nominal
Voltage
Compatibility
21700 Rechargeable Li-ion Battery 21700 3.6V/3.7V Y (Recommended)
18650 Rechargeable Li-ion Battery 18650 3.6V/3.7V Y (Compatible)
Primary Lithium Battery* CR123 3V Y (Compatible)
Rechargeable Li-ion Battery* RCR123 3.6V/3.7V Y (Compatible)
Note: DO NOT attempt to use the MH25 V2 to charge CR123/RCR123
batteries.
FL1
STANDARD
HIGH MID LOW ULTRALOW STROBE BEACON SOS
1,300
Lumens
300
Lumens
50
Lumens
1
Lumen
1,300
Lumens
1,300
Lumens
1,300
Lumens
3h 8h 30min 50h 1,500h ─ ─ ─
475m 210m 87m 11m ─ ─ ─
57,000cd 11,300cd 1,900cd 30cd ─ ─ ─
2m (Impact Resistance)
IP68, 2m (Waterproof and Submersible)
Note: The stated data is measured in accordance with the international
ashlight testing standards ANSI/PLATO FL 1-2019, using 1 x 21700 Li-ion
battery (5,000mAh) under laboratory conditions. The data may vary in real
world use due to dierent battery usage or environmental conditions.
Warranty Service
All NITECORE
®
products are warranted for quality. Any DOA /
defective product can be exchanged for a replacement through a local
distributor/dealer within 15 days of purchase. After that, all defective
/ malfunctioning NITECORE
®
products can be repaired free of charge
within 60 months from the date of purchase. Beyond 60 months, a
limited warranty applies, covering the cost of labor and maintenance,
but not the cost of accessories or replacement parts.
The warranty will be nullied if
1. the product(s) is/are broken down, reconstructed and/or modied by
unauthorized parties;
2. the product(s) is/are damaged due to improper use; (e.g. reversed
polarity installation)
3. the product(s) is/are damaged due to battery leakage.
For the latest information on NITECORE
®
products and services, please
contact a local NITECORE
®
distributor or send an email to service@
nitecore.com
※ All images, text and statements specied herein this user manual are
for reference purpose only. Should any discrepancy occur between
this manual and information specied on www.nitecore.com, Sysmax
Innovations Co., Ltd. reserves the rights to interpret and amend the
content of this document at any time without prior notice.
Charging Function
The MH25 V2 is equipped with an intelligent charging system. As illustrated,
after inserting the battery and tightening the tail cap, use the USB cable to
connect an external power supply (e.g. a USB adapter or other USB charging
devices) to the charging port to begin the charging process.
• During the charging process, the power indicator will ash slowly to inform
the user.
• When the battery is fully charged, the MH25 V2 will cease the charging
process and the power indicator will become steadily turned on to inform
the user.
• When the light is on, connecting to a power source will automatically
turn the light o. The light will return to its previous status when it is
disconnected from the power source.
• The charging time for a 21700 Li-ion battery (5,000mAh) is approx. 3
hours 45 minutes. (Charged via the 5V/2A adapter)
Operating Instructions
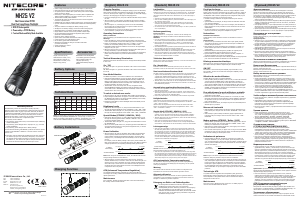
Battery Installation
Insert the battery(s) as illustrated and screw to tighten the tail cap.
Warnings:
1. Ensure the battery(s) is/are inserted with the positive end towards the
head. The product will not work if the battery(s) is/are incorrectly inserted.
2. Please use the battery magazine when using 1 x 18650 / 2 x CR123
batteries to avoid battery rattling and to ensure a stable contact.
3. CAUTION! Possible dangerous radiation! Don't look into the light! Maybe
dangerous for your eyes.
4. When the power level is low, please stop using the product and replace or
recharge the battery to prevent damage to the battery.
5. When the product is kept in a backpack or left unused for prolonged time,
please remove all batteries to prevent accidental activation or battery
leakage.
Tactical Momentary Illumination
Half press and hold the Tail Switch to turn on the light momentarily. Release
to turn it o.
On / O
On: When the light is o, press the Tail Switch until a click sound is heard to
turn it on.
O: When the light is on, press the Tail Switch until a click sound is heard to
turn it o.
User Mode Selection
The MH25 V2 provides 2 user modes for dierent users and situations.
• Daily Mode (Default Setting): In this user mode, there are 4 brightness
levels and 3 special modes (STROBE, BEACON and SOS) available. The
MH25 V2 will memorize and re-access any of the 4 brightness levels or
STROBE Mode (BEACON and SOS excluded) when reactivated, unless it
has been switched to the other user mode.
• Tactical Mode: In this user mode, there are only 4 brightness levels
and STROBE Mode available. The MH25 V2 will only memorize and re-
access HIGH Level or STROBE Mode when reactivated, unless it has been
switched to the other user mode.
To select a desired user mode:
1. When the light is o, click the Tail Switch while holding the Mode Button.
2. Keep holding the Mode Button for approx. 3 seconds, and the main LED of
the ashlight will indicate a user mode selected by ashing once for Daily
Mode and ashing twice for Tactical Mode.
3. Release the Mode Button, and the ashlight will be automatically turned
on after this process.
Brightness Levels
• Daily Mode: When the light is on, short press the Mode Button to cycle
through the following brightness levels: ULTRALOW – LOW – MID – HIGH.
• Tactical Mode: When the light is on, short press the Mode Button to cycle
through the following brightness levels: HIGH – MID – LOW – ULTRALOW.
Special Modes (STROBE / BEACON / SOS)
• Daily Mode: When the light is on, keep holding the Mode Button to cycle
through the following special modes: STROBE – BEACON – SOS. Release
to select the desired special mode.
• Tactical Mode: When the light is on, long press the Mode Button to access
the STROBE Mode.
• When one of the special modes is on, short/long press the Mode Button to
exit special modes and return to the previous brightness level; or click the
Tail Switch to turn o the light.
Power Indication
• When the light is o, click the Tail Switch while holding the Mode Button
and then quickly release both buttons to access Power Indication. The
power indicator beneath the Mode Button will ash to show the battery
voltage (±0.1V). The ashlight will be automatically turned on after this
process.
For example, when the battery voltage is at 4.2V, the power indicator will
ash 4 times followed by a 1.5-second pause and 2 more ashes. Dierent
voltages represent the corresponding remaining battery power levels:
1×18650/
21700 battery
2×CR123 batteries
Note: When using two CR123/RCR123 in series, the indicator will show the
average voltage between the two batteries.
• When the light is on and the power level is close to 50%, the power
indicator will ash every 2 seconds to inform the user. When the light is on
and the power is close to depleted, the power indicator will ash quickly
and continuously to inform the user. The batteries should be replaced or
recharged when the output appears to be dim or the ashlight becomes
unresponsive due to low power.
ATR (Advanced Temperature Regulation)
The integrated ATR technology regulates the output of the MH25 V2
according to the working condition and ambient environment to maintain the
optimal performance.
Maintenance
Every 6 months, threads should be wiped with a clean cloth followed by a
thin coating of silicon-based lubricant.
3.5V 3.7V 3.9V 4.2V
Low power Full power
Ladefunktion
Die MH25 V2 ist mit einem intelligenten Ladesystem ausgestattet. Schrauben Sie die
Endkappe nach dem Einlegen der Akkus fest und schließen Sie dann - wie abgebildet
- ein externes Netzteil (z. B. einen USB-Adapter, einen Computer oder andere USB-
Ladegeräte) über das USB-Kabel an den USB-Anschluss an, um den Ladevorgang zu
beginnen.
• Während des Ladevorgangs blinkt die Ladeanzeige langsam.
• Wenn der Akku vollständig geladen ist, beendet die MH25 V2 den Ladevorgang und
die Ladeanzeige leuchtet stetig.
• Wenn das Licht eingeschaltet ist, wird es beim Anschluss an eine Stromquelle
automatisch ausgeschaltet. Die Lampe kehrt in den vorherigen Zustand zurück,
wenn sie wieder von der Stromquelle getrennt wird.
• Die Ladezeit für einen 2170 Lithium-Ionen-Akku beträgt ca. 3h 45min. (Geladen mit
einem 5V/2A Adapter).
Bedienungsanleitung
Einsetzen der Akkus
Legen Sie die Akkus ein - wie dargestellt – und drehen Sie die Heckkappe fest.
HINWEIS:Vor dem Einlegen der Batterien bitte den Silikat-Beutel entnehmen!
WARNUNG:
1. Legen Sie die Batterien mit dem positiven (+) Ende in Richtung des Lampenkopfes
ein. Mit falsch eingesetzten Batterien/Akkus wird die MH25 V2 nicht funktionieren!
2. Bitte verwenden Sie bei Verwendung von 1 x 18650 / 2 x CR123 Batterien das
Batteriemagazin, um ein Klappern der Batterie zu vermeiden und einen stabilen
Kontakt zu gewährleisten.
3. ACHTUNG! Möglicherweise gefährliche optische Strahlung! Bei Betrieb nicht direkt in
das Licht blicken. Dies kann für die Augen gefährlich sein!
4. Wenn der Ladestand niedrig ist, verwenden Sie bitte die Taschenlampe nicht mehr
und entfernen Sie den Akku, um eine Beschädigung des Akkus zu vermeiden.
5.
Wenn Sie die Taschenlampe in einem Rucksack aufbewahren oder für längere Zeit
nicht benutzten, entfernen Sie bitte alle Akkus, um eine versehentliche Aktivierung der
Lampe oder ein Auslaufen der Akkus zu vermeiden.
Taktisches Momentlicht
Drücken Sie den Schalter der Heckkappe halb durch, um das Licht einzuschalten. Zum
Ausschalten die Taste einfach loslassen.
Ein-/Ausschalten
Einschalten: Drücken Sie den Heckschalter ganz durch, bis Sie ein "Click" hören.
Ausschalten: Drücken Sie den Heckschalter erneut ganz durch, bis Sie den "Click" hören.
Zwei verschiedenen Benutzer-Modi
Die MH25 V2 bietet für verschiedene Benutzer und Situationen zwei verschiedene Modi.
1. Täglicher-Mode (Werkseinstellung): Dieser Mode bietet vier Helligkeitsstufen und
3 Spezial-Modi. (STROBE, BEACON und SOS). Die MH25 V2 speichert jede der 4
Helligkeitsstufen oder auch den STROBE-Mode und greift erneut darauf zu, wenn sie
wieder aktiviert wird - außer es wird zum anderen Benutzer-Mode gewechselt.
2. Taktischer-Mode: Dieser Mode bietet nur die vier Helligkeitsstufen und den STROBE-
Mode. Beim Wiedereinschalten der Taschenlampe wird entweder in den HIGH- oder
den STROBE-Mode geschaltet.
Auswahl eines gewünschten Benutzer-Mode
1. Wenn das Licht ausgeschaltet ist, klicken Sie auf den Heckschalter, während Sie die
Mode-Taste gedrückt halten.
2. Halten Sie die Mode-Taste ca. 3 Sekunden lang gedrückt, und die Haupt-LED der
Taschenlampe zeigt einen gewählten Benutzer-Modus an, indem sie einmal für den
Daily-Mode und zweimal für den Taktik-Mode blinkt.
3. Lassen Sie die Mode-Taste los. Die Taschenlampe wird automatisch eingeschaltet.
Helligkeitsstufen
Täglicher-Mode: Bei eingeschalteter MH25 V2 drücken Sie wiederholt den Mode-
Schalter, um nacheinander fortlaufend durch die Helligkeitsstufen "ULTRALOW" - "LOW"
- "MID" - "HIGH" zu schalten.
Taktischer-Mode: Bei eingeschalteter MH25 V2 drücken Sie wiederholt den Mode-
Schalter, um nacheinander fortlaufend durch die Helligkeitsstufen "HIGH" - "MID" -
"LOW" - "ULTRALOW" zu schalten.
Spezial-Modi (STROBE / BEACON / SOS)
• Täglicher Mode: Wenn das Licht eingeschaltet ist, halten Sie die Mode-Taste
gedrückt, um durch die folgenden Spezial-Modi zu schalten: STROBE - BEACON -
SOS. Lassen Sie die Taste los, um den gewünschten Spezial-Mode auszuwählen.
• Taktischer Mode: Wenn das Licht eingeschaltet ist, drücken Sie die Mode-Taste lange,
um den STROBE-Mode aufzurufen.
• Wenn einer der Spezial-Modi eingeschaltet ist, drücken Sie kurz/lang auf die
Mode-Taste, um die Spezial-Modi zu verlassen und zur vorherigen Helligkeitsstufe
zurückzukehren, oder klicken Sie auf den Heck-Schalter, um das Licht auszuschalten.
Leistungsanzeige
• Wenn das Licht ausgeschaltet ist, klicken Sie auf den Heck-Schalter, während Sie
die Mode-Taste gedrückt halten. Lassen Sie dann beide Tasten schnell los, um auf
die Stromanzeige zuzugreifen. Die Betriebsanzeige unter dem Mode-Schalter blinkt,
um die Akkuspannung (auf ±0,1 V genau) anzuzeigen. Nach dieser Anzeige wird
die Taschenlampe eingeschaltet. Wenn die Spannung beispielsweise 4,2 V beträgt,
blinkt die Betriebsanzeige viermal, gefolgt von einer Pause von einer Sekunde
und zwei weiteren Blinksignalen. Unterschiedliche Spannungen repräsentieren die
entsprechenden verbleibenden Leistungspegel:
1×18650/
21700 battery
2×CR123 batteries
Hinweis: Wenn Sie zwei CR123 / RCR123 in Reihe verwenden, zeigt die Anzeige
die durchschnittliche Spannung der beiden Akkus/Batterien an.
• Wenn das Licht eingeschaltet ist und der Leistungspegel nahe bei 50% liegt, blinkt
die Leistungsanzeige alle 2 Sekunden. Wenn das Licht eingeschaltet und die Leistung
fast erschöpft ist, blinkt die Leistungsanzeige schnell. Die Batterien sollten ersetzt
oder die Akkus aufgeladen werden, wenn die Leistung zu schwach erscheint oder die
Taschenlampe aufgrund von geringer Leistung nicht mehr reagiert.
ATR (automatische Temperaturregulierung)
Die automatische Temperaturregulierung (ATR) steuert die Ausgangsleistung
der MH25 V2 entsprechend den Bedingungen der Umgebung, um eine optimale
Leistung zu gewährleisten.
Wartung
Alle 6 Monate sollte das Gewinde mit einem sauberen Tuch abgewischt und
anschließend mit einer dünnen Schicht Silikonfett geschmiert werden.
Allgemeine Hinweise
Altbatterien gehören nicht in den Hausmüll. Sie können gebrauchte Batterien
unentgeltlich an unser Versandlager zurückgeben. Als Verbraucher sind Sie zur
Rückgabe von Altbatterien gesetzlich verpichtet.
Entsorgung von Elektro- und Elektronikgeräten
Die durchgestrichene Mülltonne bedeutet, dass Sie gesetzlich
verpichtet sind, diese Geräte einer vom unsortierten
Siedlungsabfall getrennten Erfassung zuzuführen. Die Entsorgung
über die Restmülltonne oder die gelbe Tonne ist untersagt.
Enthalten die Produkte Batterien oder Akkus, die nicht fest verbaut
sind, müssen diese vor der Entsorgung entnommen und getrennt
als Batterie entsorgt werden.
3.5V 3.7V 3.9V 4.2V
Low power Full power
Fonction de charge
La lampe MH25 V2 est équipée d’un circuit de charge intelligent. Comme
indiqué, après avoir insérer les batteries et verrouiller le capuchon, utiliser le
câble USB pour connecter une source d'alimentation externe (par exemple,
un adaptateur USB ou d'autres périphériques de chargement USB) au port
de charge pour commencer le processus de charge.
• Pendant la charge, l’indicateur va clignoter lentement pour informer
l’utilisateur.
• Quand la batterie est chargée, la charge s’arrête et l’indicateur reste xe
pour informer l’utilisateur.
• Quand la lampe est allumée et que vous la rechargez, elle s’éteindra. La
lampe reviendra au niveau précédent une fois déconnectée de sa source
d’alimentation.
• La durée de charge pour une batterie Li-ion 21700 (5,000mAh) est
d’environ 3 heures 45. (charge avec adaptateur 5V/ /2A).
Instructions
Installation des batteries
Comme illustré, Insérez la batterie comme sur l’illustration et serrer le
capuchon.
Avertissements:
1. 1Assurez-vous que la batterie est insérée avec le pôle positif pointant
vers la tête de la lampe. La lampe ne fonctionnera pas si la batterie est
installée de façon incorrecte.
2. Merci d’utiliser le support de batterie pour les batteries 1 x 18650 / 2 x
CR123 batteries pour éviter les vibrations de la batterie et assurer un
contact stable.
3. ATTENTION! Rayonnement dangereux possible! Ne regardez pas la
lumière directement! Peut-être dangereux pour vos yeux.
4. Quand la batterie est faible, arrêter d’utiliser le produit, remplacer ou
recharger la batterie pour éviter de l’endommager.
5. Retirer les batteries si la lampe reste inutilisée pendant une longue période
pour éviter toute activation accidentelle ou fuite de batteries..
Eclairage momentané tactique
Rester appuyé sur le bouton l’interrupteur jusqu’à mi-course et maintenez
pour allumer la lampe. Relâchez simplement pour éteindre la lampe.
ON/OFF
Pour allumer : Pressez l’interrupteur ON/OFF jusqu’à entendre un clic.
Pour éteindre : Pressez une nouvelle fois l’interrupteur ON/OFF jusqu’à
entendre un clic.
Sélection du mode utilisateur
La lampe MH25 V2 propose 2 modes d’utilisations :
• Mode quotidien (mode par défaut): Dans ce mode, 4 niveaux de luminosité
3 modes spéciaux (STROBE, Balise et SOS) disponible. possède une
fonction mémoire qui lui permet de revenir dans l’un de ses niveaux ou
dans le mode STROBE quand elle est réactivée (Balise et SOS sont exclus)
• Mode tactique: Dans ce mode, il y a 4 niveaux de luminosité et le mode
STROBE. La lampe MH25 V2 mémorisera et n'accèdera de nouveau qu’au
mode HIGH ou STROBE s'il est réactivé.
Pour sélectionner le mode utilisateur souhaité:
1. Lorsque la lumière est éteinte, cliquez sur l'interrupteur arrière tout en
maintenant le bouton Mode.
2. Maintenez le bouton Mode enfoncé pendant env. 3 secondes, et la LED
principale de la lampe de poche indiquera un mode utilisateur sélectionné
en clignotant une fois pour le mode quotidien et en clignotant deux fois
pour le mode tactique.
3. relâchez le bouton de mode, et la lampe de poche sera automatiquement
allumée après ce processus
Niveaux de luminosité
• Mode Quotidien: Quand la lampe est allumée, appuyer rapidement sur le
bouton mode pour naviguer entre les niveaux: ULTRALOW – LOW – MID –
HIGH.
• Mode Tactique: Quand la lampe est allumée, appuyer rapidement sur
le bouton mode pour naviguer entre les niveaux: HIGH – MID – LOW –
ULTRALOW.
Modes spéciaux (STROBE / Balise / SOS)
• Mode quotidien: Quand la lampe est allumée, rester appuyé sur le bouton
MODE pour naviguer entre les modes spéciaux: STROBE – Balise – SOS.
Relâcher pour sélectionner le mode désiré.
• Mode tactique: Quand la lampe est allumée, rester appuyé sur le bouton
Mode pour accéder au mode STROBE.
• Dans l’un des modes spéciaux, un appui court ou long sur le bouton MODE
permettra de sortir du mode special et revenir à la luminosité précédente.
Ou éteindre la lampe par l’interrupteur arrière.
Indicateur de puissance
• Quand la lampe est allumée, l’indicateur va clignoter pour indiquer le
voltage de la batterie. (±0.1V). Par exemple, quand la puissance est à
4.2V, la lampe clignotera 4 fois de suite suivi de 2 ashes. La lampe s’éteint
après ce process. Diérentes tensions représentent les niveaux de charge
restants de la batterie:
1×18650/
21700 battery
2×CR123 batteries
Note: lorsque vous utilisez 2 piles CR123 ou batteries CR123 en série,
l’indicateur indique la puissance moyenne entre les 2 batteries.
• Lorsque la lampe est allumée et que le niveau de puissance est proche de
50%, l’interrupteur clignote toutes les 2 secondes pour informer l'utilisateur.
Lorsque la lumière est allumée et que l'alimentation est presque épuisée,
l’interrupteur clignote rapidement et en continu pour informer l'utilisateur.
Les piles /batteries doivent être remplacées ou rechargées lorsque la
sortie semble faible ou que la lampe ne répond plus en raison d'une faible
puissance.
Technologie ATR
Le système avancé de régulation de la température (ATR) permet à la
lampe d’ajuster de façon dynamique son niveau d’éclairage en fonction
de sa température. Cela permet d’éviter toute surchaue de la lampe et
d’augmenter sa durée de vie.
Maintenance
Tous les six mois, le letage doit être essuyé avec un chion propre et
recouvert d’un lubriant à base de silicone.
3.5V 3.7V 3.9V 4.2V
Low power Full power
SYSMAX Innovations Co., Ltd.
TEL: +86-20-83862000
FAX: +86-20-83882723
E-mail: info@nitecore.com
Web: www.nitecore.com
Address: Unit6355,5/F,
No.1021GaopuRoad,
TianheDistrict,Guangzhou,
510653,Guangdong,China
Please nd us on facebook : NITECORE Flashlight
Thanks for purchasing NITECORE!
MH25052522
Made in China
(Русский) MH25 V2
Функция зарядки
MH25 V2 оснащен интеллектуальной системой зарядки. Установите
аккумулятор и закрутите крышку в торце фонаря, как показано на
рисунке, а затем используйте USB-кабель для подключения внешнего
источника питания (например, USB-адаптера или других USB-устройств
для зарядки) к порту зарядки, чтобы начать процесс зарядки.
• В процессе зарядки индикатор питания будет медленно мигать, тем
самым оповещая пользователя.
• Когда аккумулятор полностью зарядится, MH25 V2 прекратит процесс
зарядки, а индикатор питания будет включен постоянно, тем самым
оповещая пользователя.
• Если фонарь включен, то при подсоединении к источнику питания он
автоматически отключится. Индикатор вернется в прежнее состояние
при отключении от источника питания.
•
Время зарядки для литий-ионной аккумуляторной батареи 21700 (5 000 мAч)
составляет приблизительно 3 ч 45 мин. (При зарядке от адаптера 5В/2A)
Инструкция по эксплуатации
Установка батарей
Вставьте аккумулятор(-ы), как показано на рисунке, и закрутите
торцевую крышку.
Предупреждения:
1. Убедитесь в том, что положительный(-е) терминал(-ы) аккумулятора(-
ов) при вставке направлен(-ы) в сторону головной части. Устройство
не будет работать, если аккумулятор(-ы) вставлен(-ы) неправильно.
2. Просьба использовать аккумуляторный магазин при применении
батарей 1 x 18650/2 x CR123, чтобы батареи не дребезжали и
обеспечивался стабильный контакт.
3. ВНИМАНИЕ! Возможно опасное излучение! Не смотрите на световой
луч! Это может быть опасным для глаз.
4.
При низком уровне заряда просьба прекратить использование изделия и
заменить или зарядите аккумулятор, чтобы предотвратить его повреждение.
5. Если устройство хранится в рюкзаке или не используется длительное
время, необходимо извлечь все аккумуляторы, чтобы предотвратить
случайное включение изделия и утечку электролита.
Тактическое мгновенное освещение
Нажмите торцевой выключатель до половины и удерживайте для мгновенного
включения света. Отпустите выключатель, чтобы отключить свет.
Включение/Выключение
Включение: При выключенном свете нажмите торцевой выключатель до
щелчка, чтобы включить свет.
Выключение: При включенном свете нажмите торцевой выключатель до
щелчка, чтобы выключить свет.
Выбор пользовательского режима
Изделие МН12 V2 имеет 2 пользовательских режима для разных
пользователей и ситуаций.
•
Режим повседневного пользования (установка по умолчанию): В этом
пользовательском режиме доступно 4 уровня яркости и 3 специальных
режима (СТРОБОСКОП, МАЯК и SOS). НОВЫЙ P12 запомнит и повторно
получит доступ к любому из 4 уровней яркости или режима СТРОБОСКОП
(за исключением режимов МАЯК и SOS) при повторной активации, если
только он не был переключен в другой пользовательский режим.
• Тактический режим: В этом пользовательском режиме доступно
только 4 уровня яркости и режим СТРОБОСКОП. НОВЫЙ МН12 V2
запоминает и снова открывает доступ к ВЫСОКОМУ уровню или
режиму СТРОБОСКОП только после повторной активации, если только
он не был переключен в другой пользовательский режим.
Чтобы выбрать желаемый режим пользователя:
1. Когда свет выключен, нажмите на задний переключатель, удерживая
кнопку режима.
2. Удерживайте кнопку режима в течение прибл. 3 секунды, и
главный светодиод фонарика будет указывать выбранный режим
пользователя, мигая один раз для ежедневного режима и дважды
мигая для тактического режима.
3. Отпустите кнопку «Mode», и фонарик автоматически включится после
этого процесса.
Уровни яркости
• Режим повседневного пользования: При включенном свете
осуществляйте кратковременное нажатие на кнопку «Режим» для
того, чтобы последовательно переключать следующие уровни
яркости: СВЕРХНИЗКИЙ – НИЗКИЙ – СРЕДНИЙ – ВЫСОКИЙ.
• Тактический режим: При включенном свете осуществляйте
кратковременное нажатие на кнопку «Режим» для того, чтобы
последовательно переключать следующие уровни яркости: ВЫСОКИЙ
– СРЕДНИЙ – НИЗКИЙ – СВЕРХНИЗКИЙ.
Специальные режимы
(СТРОБОСКОПИЧЕСКИЙ/МАЯК/SOS)
•
Режим повседневного пользования: При включенном режиме
СТРОБОСКОП длительным нажатием кнопки «Режим» можно
последовательно переключать следующие особые режимы: СТРОБОСКОП
- МАЯК - SOS. Отпустите кнопку чтобы установить специальный режим.
• Тактический режим: При включенном свете нажмите и удерживайте
кнопку «Режим», чтобы активировать режим СТРОБОСКОП.
• Если один из специальных режимов включен, кратковременное
нажатие кнопки «Режим» позволит отключить специальный режим и
вернуться к предыдущему сохраненному уровню яркости; кроме того,
нажатие торцевого выключателя позволит выйти из специальных
режимов и выключить свет.
Индикация питания
•
Когда индикатор не горит, нажмите Торцевой переключатель,
удерживая кнопку "Режим", а затем быстро отпустите обе кнопки для
доступа к Индикации питания. Синий индикатор питания под кнопкой
"Режим" будет мигать, показывая напряжение батареи (± 0,1 В). Фонарь
автоматически включится по окончании этого процесса. Например,
если напряжение аккумулятора составляет 4,2 В, лампочка индикатора
питания мигнет 4 раза, за этим последует пауза в одну секунду, после
чего лампочка мигнет еще 2 раза. Различные значения напряжения
указывают на уровни оставшегося заряда аккумулятора, соответственно:
1×18650/
21700 battery
2×CR123 batteries
Примечание: При использовании двух установленных последовательно
аккумуляторов CR123/RCR123 фонарь покажет только среднее значение
напряжения двух аккумуляторов.
• Если свет включен, а уровень заряда близок к 50%, лампочка
индикатора питания будет мигать через каждые 2 секунды. Если
свет включен, а уровень заряда близок к нулю, лампочка индикатора
питания будет мигать быстро и непрерывно. Батареи необходимо
зарядить, если свет становится тусклым, или если фонарь перестает
реагировать на нажатия кнопок по причине низкого уровня заряда.
ATR (Усовершенствованный модуль
регулировки по температуре)
Интегральная технология ATR регулирует уровень яркости MH25 V2 в
соответствии с условиями работы и условиями окружающей среды, что
обеспечивает оптимальную производительность изделия.
Техническое обслуживание
Каждые 6 месяцев резьбовые соединения следует протирать чистой
тканью и наносить на них тонкий слой смазки на силиконовой основе.
3.5V 3.7V 3.9V 4.2V
Low power Full power
Mode Button

Praat mee over dit product
Laat hier weten wat jij vindt van de Nitecore MH25 V2 Zaklamp. Als je een vraag hebt, lees dan eerst zorgvuldig de handleiding door. Een handleiding aanvragen kan via ons contactformulier.