UT32
•CoaxialDualReectorDesign
•TrueVisionCoolWhiteFlood
•PenetratingWarmWhiteThrow
UltraCompact
DualOutputHeadlamp
FeaturesOperation Diagram
• Dual output headlamp specially designed for the unpredictable weather and harsh outdoor
environment in trail running
• Primary Cool White Beam uses a CREE XP-L2 V6 LED (5700K) for a max output of 1,100
lumens and a max throw of 80 meters, combined with an OP reector for 100° wide range
ood illumination with uniform and soft light
• Auxiliary Warm White Beam uses a CREE XP-L V6 LED (3000K) for a max output of 920
lumens and a max throw of 117 meters, combined with an optical system with crystal
coating and “Precision Digital Optics Technology” (PDOT) for better penetrating ability in
rain, snow or fog
• High eciency constant circuit provides a stable output of 18 hours
• 4 brightness levels and 2 special modes available for both beams
• Both LEDs can indicate the battery power by displaying the battery voltage (±0.1V)
• Incorporated Advanced Temperature Regulation (ATR) module (Patent No.
ZL201510534543.6)
• Specially designed lightweight and breathable headband included
• Optical lenses with double-sided scratch resistant coating
• Constructed from aero grade aluminum alloy
• HA III military grade hard-anodized nish
• Rating in accordance with IP68 (2 meters submersible)
• Impact resistant to 1 meter
Specications
Accessories
Length: 95.9mm (3.78”)
Head Dimensions: 27.6mm×26.8mm (1.09”×1.06”)
Tail Diameter: 23.8mm (0.94”)
Weight: 82.5g (2.91oz) (Bracket and Headband Included, Battery Not Included)
48g (1.69oz) (Bracket, Headband and Battery Not Included)
Spare O-ring, Spare Switch Covers, Clip, Headband, Bracket
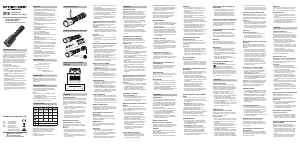
Type Nominal Voltage Compatibility
18650 Rechargeable Li-ion Battery
(Button Topped)
18650 3.6V/3.7V Y (Compatible)
18650 Rechargeable Li-ion Battery
(Flat Topped)
18650 - N (Incompatible)
Primary Lithium Battery CR123 3V Y (Compatible)
Rechargeable Li-ion Battery RCR123 3.6V/3.7V Y (Compatible)
Battery Options
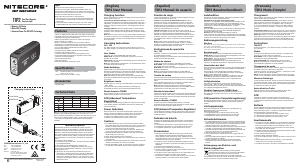
Battery Installation
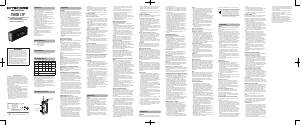
Technical Data
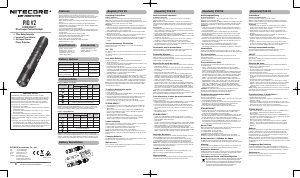
Primary Cool White Beam:
FL1 STANDARD
TURBO HIGH MID LOW BEACON SOS
1,100
Lumens
410
Lumens
200
Lumens
70
Lumens
1,100
Lumens
1,100
Lumens
*1h 30min 3h 45min 8h 18h ─ ─
80m 49m 33m 23m ─ ─
1,600cd 600cd 270cd 130cd ─ ─
1m (Impact Resistance)
IP68, 2m (Waterproof and Submersible)
Note: The stated data is measured in accordance with the international ashlight testing standards
ANSI/NEMA FL1, using 1 x 18650 Li-ion battery (3,500mAh) under laboratory conditions. The data
may vary in real world use due to dierent battery usage or environmental conditions.
* The runtime for TURBO mode is tested with fan cooling, as a simulation of the trail running
environment.
200
0
400
600
800
1000
1200
1 4 8
18
Runtime (hour)
Output (Lumen)
Runtime Graph of the Cool White Beam
TURBO
HIGH
MID
LOW
Auxiliary Warm White Beam:
FL1 STANDARD
TURBO HIGH MID LOW BEACON SOS
920
Lumens
370
Lumens
170
Lumens
60
Lumens
920
Lumens
920
Lumens
*1h 30min 3h 45min 8h 18h ─ ─
117m 75m 46m 31m ─ ─
3,460cd 1,400cd 530cd 250cd ─ ─
1m (Impact Resistance)
IP68, 2m (Waterproof and Submersible)
Note: The stated data is measured in accordance with the international ashlight testing standards
ANSI/NEMA FL1, using 1 x 18650 Li-ion battery (3,500mAh) under laboratory conditions. The data
may vary in real world use due to dierent battery usage or environmental conditions.
* The runtime for TURBO mode is tested with fan cooling, as a simulation of the trail running
environment.
1 4 8 18
Runtime Graph of the Warm White Beam
200
0
400
600
800
1000
1200
Output (Lumen)
Runtime (hour)
TURBO
HIGH
MID
LOW
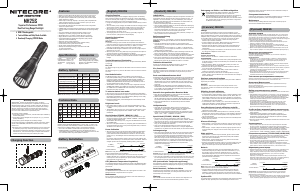
Button B
for controlling the
Warm White Beam
Button A
for controlling the Cool White Beam
(on the opposite side of Button B and
designed with a bump in the center)
All NITECORE
®
products are warranted for quality. Any DOA / defective product can be exchanged for
a replacement through a local distributor/dealer within 15 days of purchase. After that, all defective /
malfunctioning NITECORE
®
products can be repaired free of charge within 60 months from the date of
purchase. Beyond 60 months, a limited warranty applies, covering the cost of labor and maintenance,
but not the cost of accessories or replacement parts.
The warranty will be nullied if
1. the product(s) is/are broken down, reconstructed and/or modied by unauthorized parties;
2. the product(s) is/are damaged due to improper use; (e.g. reversed polarity installation)
3. the product(s) is/are damaged due to battery leakage.
For the latest information on NITECORE
®
products and services, please contact a local NITECORE
®
※ All images, text and statements specied herein this user manual are for reference purpose only.
Should any discrepancy occur between this manual and information specied on www.nitecore.
com, Sysmax Innovations Co., Ltd. reserves the rights to interpret and amend the content of this
document at any time without prior notice.
Warranty Service
SYSMAX Innovations Co., Ltd.
TEL: +86-20-83862000
FAX: +86-20-83882723
Web: www.nitecore.com
Address: 24/F,TCLPlaza,
No.18HaizhouRoad,
HaizhuDistrict,Guangzhou,
510335,Guangdong,China
Please find us on facebook : NITECORE Flashlight
Thanks for purchasing NITECORE!
UT22023222
Made in China
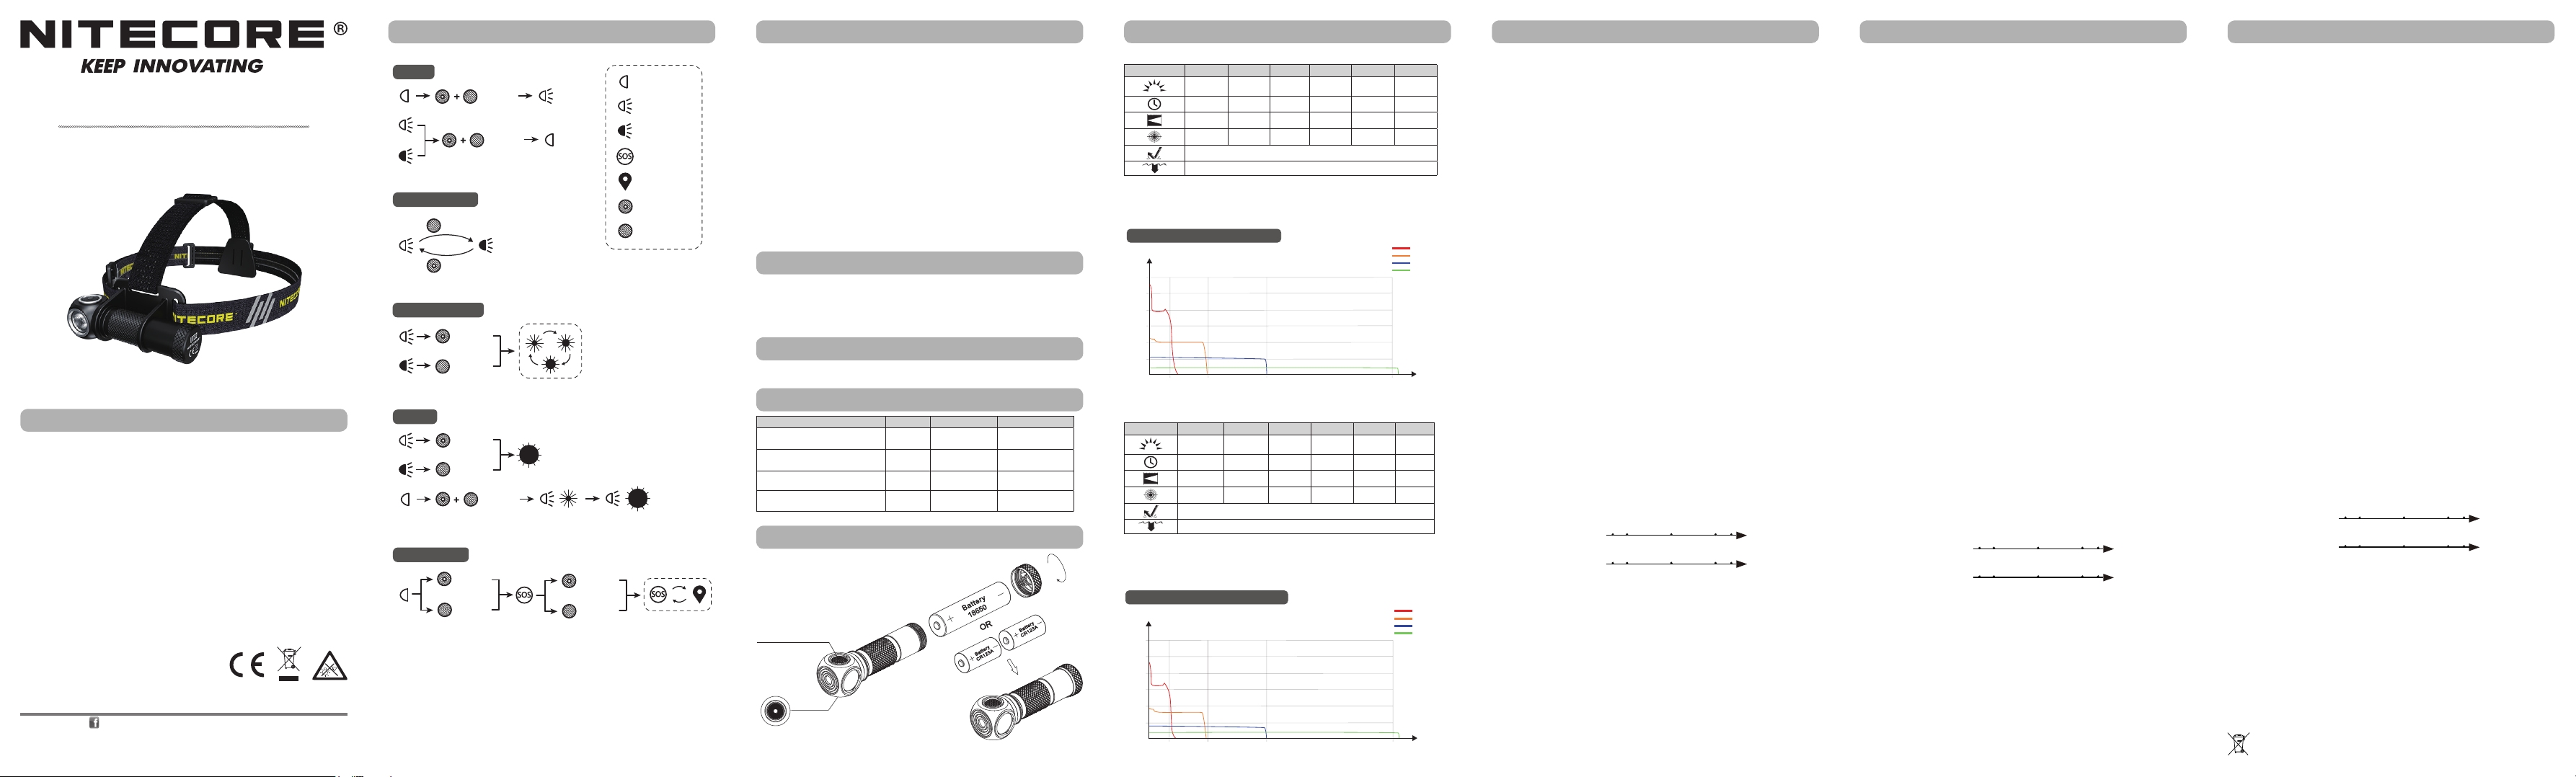
CW BEAM
OFF
WW BEAM
BUTTON A
BUTTON B
On/Off
(Long Press)
(Long Press)
(Long Press)
(Long Press)
(Long Press)
TURBO
(Auto Exit in 30s)
(Exit Manually)
Brightness Levels
Special Modes
Triple Press
Triple Press
SOS
BEACON
Beam Switching
(Short Press)
(Short Press)
(Short Press)
(Short Press)
(Short Press)
(Short Press)
(English) UT32 (Español) UT32 (Deutsch) UT32
Operating Instructions
Battery Installation
Insert the battery(s) as illustrated and screw to tighten the tail cap.
Note: After the battery insertion, the LEDs will ash to indicate the battery voltage. Please refer to the
“Power Indication” section of this manual for more details.
Warnings:
1. Ensure the battery(s) is/are inserted with the positive end towards the head. The product will not
work if the battery(s) is/are incorrectly inserted.
2. CAUTION! Possible dangerous radiation! Don't look into the light! Maybe dangerous for your eyes.
3. When the product is kept in a backpack or left unused for prolonged time, please remove all
batteries to prevent accidental activation or battery leakage.
On / O
The UT32 has dual power buttons for independently controlling the two beams as illustrated. (Button
A is designed with a bump in the center.)
On: When the light is o, long press both buttons to turn it on and access the LOW level of the Cool
White Beam.
O: When the light is on, long press both buttons to turn it o.
Beam Switching
When any brightness level or special mode of the Cool White Beam is on, short press Button B to
switch to the corresponding brightness level or special mode of the Warm White Beam.
When any brightness level or special mode of the Warm White Beam is on, short press Button A to
switch to the corresponding brightness level or special mode of the Cool White Beam.
(Note: Both beams cannot be turned on at the same time.)
Brightness Levels
Cool White Beam: When the Cool White Beam is on, short press Button A to cycle through the
following brightness levels of the Cool White Beam: LOW – MID – HIGH.
Warm White Beam: When the Warm White Beam is on, short press Button B to cycle through the
following brightness levels of the Warm White Beam: LOW – MID – HIGH.
TURBO Activation
Search Mode: The headlamp will automatically return to the previous brightness level after accessing
TURBO for 30 seconds when using this access, suitable for signpost searching.
• When the Cool White Beam is on, long press Button A to access TURBO of the Cool White Beam.
• When the Warm White Beam is on, long press Button B to access TURBO of the Warm White Beam.
Constant-on Mode: When the light is o, long press both buttons to access TURBO of the Cool
White Beam after accessing LOW of the Cool White Beam. You will need to exit TURBO manually when
using this access.
Special Modes (SOS / BEACON)
Cool White Beam: When the light is o, triple press Button A to access the SOS Mode of the Cool
White Beam. When the SOS Mode is on, short press Button A to switch between the BEACON and SOS
modes. Long press Button A or both buttons to exit special modes and turn o the light.
Warm White Beam: When the light is o, triple press Button B to access the SOS Mode of the Warm
White Beam. When the SOS Mode is on, short press Button B to switch between the BEACON and SOS
modes. Long press Button B or both buttons to exit special modes and turn o the light.
Power Indication
When the battery is inserted and the tail cap is tightened, the LEDs will ash to show the battery
voltage (±0.1V). For example, when the battery voltage is at 4.2V, the power indicator will ash 4
times followed by a 1.5-second pause and 2 more ashes. The headlamp will be turned o after this
process. Dierent voltages represent the corresponding remaining battery power levels:
1×18650 battery
2×CR123 batteries
Note:
1. When using two CR123/RCR123 in series, the LEDs will show the average voltage between the two
batteries.
2. If it fails to display the voltage correctly, please press and hold both buttons for over 1 second with
the tail cap loosened to ensure the headlamp is totally power o, and then tighten the tail cap
again.
ATR (Advanced Temperature Regulation)
The integrated ATR technology regulates the output of the UT32 according to the working condition
and ambient environment to maintain the optimal performance.
Changing Batteries
The batteries should be replaced when the output appears to be dim or the headlamp becomes
unresponsive due to low power.
Maintenance
Every 6 months, threads should be wiped with a clean cloth followed by a thin coating of silicon-based
lubricant.
3.5V 3.7V 3.9V 4.2V
Low power Full power
Instrucciones de operación
Instalación de baterías
Inserte la(s) batería(s) como se muestra en la imagen y atornille para apretar la tapa trasera.
Nota: Después de insertar las baterías, los LEDs parpadearán para indicar el voltaje de la batería. Por
favor consulte la sección “Indicador de batería” de este manual para mayores detalles.
Precauciones:
1. Asegúrese que la(s) batería(s) está(n) insertada(s) con el polo positivo hacia la cabeza de la
linterna. El producto no funcionará si la(s) batería(s) está(n) insertada(s) incorrectamente.
2. NO apunte el haz directamente a los ojos.
3. Cuando deje el producto en una mochila o no se utilice por periodos prolongados de tiempo, por
favor remueva todas las baterías para prevenir activación accidental o fugas en las baterías.
Encendido / Apagado
La UT32 tiene 2 botones de encendido para un control independiente de los 2 haces como se muestra
en la imagen. (El botón A está diseñado con una protuberancia en el centro.)
Encendido: Cuando la luz está apagada, mantenga presionados ambos botones para encender y
acceder al nivel BAJO del haz Blanco Frío.
Apagado: Cuando la luz está encendida, mantenga presionados ambos botones para apagar.
Cambio de haces
Cuando está encendido cualquier nivel de intensidad o modo especial del haz Blanco Frío, presione
ligeramente el botón B para cambiar al nivel de intensidad correspondiente o modo especial del haz de
luz cálido. Cuando está encendido cualquier nivel de intensidad o modo especial del haz Blanco Cálido,
presione ligeramente el botón A para cambiar al nivel de intensidad correspondiente o modo especial
del haz de luz Blanco Frío. (Nota: Ambos haces no se pueden encender al mismo tiempo.)
Niveles de intensidad
Haz Blanco Frío: Cuando el Haz Blanco Frío está encendido, presione ligeramente el botón A para
cambiar entre los siguientes niveles de intensidad del Haz Blanco Frío: BAJO – MEDIO - ALTO.
Haz Blanco Cálido: Cuando el Haz Blanco Cálido está encendido, presione ligeramente el botón B
para cambiar entre los siguientes niveles de intensidad del Haz Blanco Cálido: BAJO – MEDIO - ALTO.
Activación de TURBO
Modo de búsqueda: La linterna automáticamente regresará al nivel de intensidad previo después de acceder
al modo TURBO durante 30 segundos cuando se utiliza este acceso, adecuado para búsqueda de señales.
• Cuando el haz Blanco Frío está encendido, mantenga presionado el botón A para acceder al modo
TURBO del haz Blanco Frío.
• Cuando el haz Blanco Cálido está encendido, mantenga presionado el botón B para acceder al modo
TURBO del haz Blanco Cálido.
Modo de encendido constante: Cuando la luz está apagada, mantenga presionados ambos botones
para acceder al modo TURBO del haz Blanco Frío después de acceder al modo BAJO del haz Blanco
Frío. Es necesario salir del modo TURBO manualmente al usar este acceso.
Modos especiales (SOS / BALIZA)
Haz Blanco Frío: Cuando la luz está apagada, presione tres veces el botón A para acceder al modo
SOS del haz Blanco Frío. Cuando el modo SOS está encendido, presione ligeramente el botón A para
cambiar entre los modos BALIZA y SOS. Mantenga presionado el botón A o ambos botones para salir
de los modos especiales y apagar la luz.
Haz Blanco Cálido: Cuando la luz está apagada, presione tres veces el botón B para acceder al
modo SOS del haz Blanco Cálido. Cuando el modo SOS está encendido, presione ligeramente el botón
B para cambiar entre los modos BALIZA y SOS. Mantenga presionado el botón B o ambos botones
para salir de los modos especiales y apagar la luz.
Indicador de batería
Cuando la batería es insertada y la tapa trasera apretada, los LEDs parpadearán para mostrar el
voltaje de la batería (±0.1V). Por ejemplo, cuando el voltaje de la batería es de 4.2V, el indicador
de batería parpadeará 4 veces seguido de una pausa de 1.5 segundos y parpadeará 2 veces más.
Los diferentes voltajes correspondientes al nivel de batería restante se representan de la siguiente
manera:
1×18650 battery
2×CR123 batteries
Nota:
1. Cuando utilice dos baterías CR123/RCR123 en serie, el indicador mostrará el voltaje promedio entre
las dos baterías.
2. Si falla al mostrar el voltaje correcto, por favor presione y mantenga presionados ambos
botones por más de 1 segundo con la tapa trasera aojada para asegurar que la linterna está
completamente apagada, y después apriete la tapa trasera nuevamente.
ATR (Regulación Avanzada de Temperatura)
La tecnología ATR integrada regula la potencia de la UT32 de acuerdo a las condiciones de trabajo y
medio ambiente para mantener un rendimiento óptimo.
Cambio de baterías
Las baterías deben ser reemplazadas cuando la intensidad de la luz sea débil, o la linterna no
responda debido a la batería baja.
Mantenimiento
Cada 6 meses se deberán limpiar las juntas con un paño limpio, seguido a esto, debe aplicarse una
na capa de lubricante a base de silicón.
3.5V 3.7V 3.9V 4.2V
Low power Full power
Bedienungsanleitung
Einsetzen der Batterien
Legen Sie die Batterien/Akkus ein - wie auf dem Bild dargestellt - und schrauben sie die Endkappe fest.
HINWEIS: Nach dem Einlegen der Batterie blinkt die Stromanzeige unter dem Schalter, um die Batteriespannung
anzuzeigen. Weitere Informationen nden Sie im Abschnitt „Stromanzeige“ dieses Handbuchs.
WARNUNG:
1. Stellen Sie sicher, dass die Batterien/Akkus mit dem positiven Pol (+) zum Lampenkopf zeigen. Die UT32
funktioniert mit falsch eingelegten Batterien/Akkus nicht.
2. ACHTUNG! Möglicherweise gefährliche optische Strahlung! Bei Betrieb nicht direkt in das Licht blicken. Kann
für die Augen gefährlich sein.
3. Wenn das Produkt in einem Rucksack aufbewahrt oder längere Zeit nicht benutzt wird, entfernen Sie bitte alle
Akkus/Batterien, um eine versehentliche Aktivierung oder ein Auslaufen der Akkus/Batterien zu verhindern.
Ein-/Ausschalten
Die UT32 verfügt über zwei Ein-/Aus-Tasten zur unabhängigen Steuerung der beiden Lichtquellen (siehe
Abbildung). (Taste A ist mit einer Erhebung in der Mitte versehen.)
Ein: Wenn das Licht ausgeschaltet ist, drücken Sie lange auf beide Tasten, um es einzuschalten und auf die
"LOW"-Stufe des Cool White Beam zuzugreifen.
Aus: Wenn das Licht an ist, drücken Sie lange beide Tasten, um es auszuschalten.
Wechsel der Lichtquellen
Wenn eine Helligkeitsstufe oder ein Spezial-Mode des Cool White Beam aktiviert ist, drücken Sie kurz die Taste B,
um zur entsprechenden Helligkeitsstufe oder zum Spezial-Mode des Warm White Beam zu wechseln.
Wenn eine Helligkeitsstufe oder ein Spezial-Mode des Warm White Beam aktiviert ist, drücken Sie kurz die Taste A,
um zur entsprechenden Helligkeitsstufe oder zum Spezial-Mode des Cool White Beam zu wechseln.
(Hinweis: Es können NICHT beide Lichtquellen gleichzeitig eingeschaltet werden.)
Wechsel der Helligkeitsstufen
Cool White Beam: Wenn der Cool White Beam eingeschaltet ist, drücken Sie wiederholt kurz die Taste A, um
durch die folgenden Helligkeitsstufen des Cool White Beam zu schalten: "LOW" - "MID" - "HIGH".
Warm White Beam: Wenn der Warm White Beam eingeschaltet ist, drücken Sie wiederholt kurz die Taste B, um
durch die folgenden Helligkeitsstufen des Warm White Beam zu schalten: "LOW" - "MID" - "HIGH".
Aktivierung TURBO-Mode
Momentan-Licht-Mode: Der Scheinwerfer kehrt automatisch zur vorherigen Helligkeitsstufe zurück, nachdem
30 Sekunden lang auf TURBO zugegrien wurde. Dies ist z.B. für die Suche nach Wegweisern geeignet.
● Wenn der Cool White Beam eingeschaltet ist, halten Sie die Taste A gedrückt, um auf den "TURBO"-Mode des
Cool White Beam zuzugreifen.
● Wenn der Warm White Beam eingeschaltet ist, halten Sie die Taste B gedrückt, um auf "TURBO"-Mode des
Warm White Beam zuzugreifen.
Konstant-Ein-Mode: Wenn das Licht ausgeschaltet ist, drücken Sie lange beide Tasten, um auf den "TURBO"-
Mode des Cool White Beam zuzugreifen, nachdem Sie auf "LOW" des Cool White Beam zugegrien haben. Sie
müssen TURBO manuell beenden, wenn Sie diesen Zugri verwenden.
Sondermodi (SOS / Beacon)
Cool White Beam: Wenn das Licht ausgeschaltet ist, drücken Sie dreimal die Taste A, um auf den SOS-Mode des Cool White
Beam zuzugreifen. Wenn der SOS-Mode aktiviert ist, drücken Sie kurz die Taste A, um zwischen dem BEACON- und dem SOS-Mode
zu wechseln. Halten Sie die Taste A oder beide Tasten gedrückt, um die Spezialmodi zu verlassen und das Licht auszuschalten.
Warm White Beam: Wenn das Licht ausgeschaltet ist, drücken Sie dreimal die Taste B, um auf den SOS-Mode des Warm White
Beam zuzugreifen. Wenn der SOS-Mode aktiviert ist, drücken Sie kurz die Taste B, um zwischen dem BEACON- und dem SOS-Mode
zu wechseln. Halten Sie die Taste B oder beide Tasten gedrückt, um die Spezialmodi zu verlassen und das Licht auszuschalten.
Power Tipps
Wenn die Batterie eingesetzt und die Endkappe festgezogen ist, ohne dass eine Stromversorgung angeschlossen ist,
blinkt die Stromanzeige, um die Batteriespannung (± 0,1 V) anzuzeigen. Wenn die Batteriespannung beispielsweise
4,2 V beträgt, blinkt die Stromanzeige viermal, gefolgt von einer Pause von 1,5 Sekunden und zwei weiteren
Blinksignalen. Unterschiedliche Spannungen stellen die entsprechenden verbleibenden Batterieleistungsstufen dar:
1×18650 battery
2×CR123 batteries
Hinweis:
1.
Wenn Sie zwei CR123 / RCR123 in Reihe verwenden, zeigt die Anzeige die durchschnittliche Spannung der beiden Batterien an.
2. Sollte die Spannung nicht korrekt angezeigt werden, halten Sie den Netzschalter bei gelöster Heckklappe
länger als 1 Sekunde gedrückt, um sicherzustellen, dass die Lampe vollständig stromlos ist. Ziehen Sie dann
die Endkappe erneut fest.
ATR (erweiterte Temperaturregulierung)
Mit dem "Advanced Temperature Regulation"-Modul regelt die UT32 ihre Leistung und passt sich der Umgebungs-
temperatur an, um so die optimale Leistung zu erhalten.
Wechsel der Akkus/Batterien
Die Batterien sollten ausgetauscht werden, wenn die Stromanzeige schnell und kontinuierlich blinkt und die
Leistung schwach erscheint oder der Scheinwerfer aufgrund geringer Leistung nicht mehr reagiert.
Wartung
Alle 6 Monate sollte das Gewinde mit einem sauberen Tuch abgewischt und anschließend mit einer dünnen
Schicht Silikonfett geschmiert werden.
Allgemeine Hinweise
Altbatterien gehören nicht in den Hausmüll. Sie können gebrauchte Batterien unentgeltlich an unser Versandlager
zurückgeben. Als Verbraucher sind Sie zur Rückgabe von Altbatterien gesetzlich verpichtet.
Entsorgung von Elektro- und Elektronikgeräten
D
ie durchgestrichene Mülltonne bedeutet, dass Sie gesetzlich verpichtet sind, diese Geräte einer vom
unsortierten Siedlungsabfall getrennten Erfassung zuzuführen. Die Entsorgung über die Restmülltonne
oder die gelbe Tonne ist untersagt. Enthalten die Produkte Batterien oder Akkus, die nicht fest verbaut
sind, müssen diese vor der Entsorgung entnommen und getrennt als Batterie entsorgt werden.
3.5V 3.7V 3.9V 4.2V
Low power Full power


Praat mee over dit product
Laat hier weten wat jij vindt van de Nitecore UT32 Zaklamp. Als je een vraag hebt, lees dan eerst zorgvuldig de handleiding door. Een handleiding aanvragen kan via ons contactformulier.