
English
Congratulations on your purchase, and welcome to Philips! To fully
EHQHÀWIURPWKHVXSSRUWWKDW3KLOLSVRIIHUVUHJLVWHU\RXUSURGXFWDW
www.philips.com/welcome.
1 Important
Read this user manual carefully before you use the appliance and keep it
for future reference.
WARNING: Do not use this appliance
near water.
When the appliance is used in a
bathroom, unplug it after use since
the proximity of water presents a risk,
even when the appliance is
switched off.
WARNING: Do not use this appliance
near bathtubs, showers, basins
or other vessels containing
water.
Always unplug the appliance after use.
If the mains cord is damaged, you
must have it replaced by Philips, a
service centre authorised by Philips or
VLPLODUO\TXDOLÀHGSHUVRQVLQRUGHUWR
avoid a hazard.
This appliance can be used by
children aged from 8 years and above
and persons with reduced physical,
sensory or mental capabilities or
lack of experience and knowledge
if they have been given supervision
or instruction concerning use of
the appliance in a safe way and
understand the hazards involved.
Children shall not play with the
appliance. Cleaning and user
maintenance shall not be made by
children without supervision.
Before you connect the appliance,
ensure that the voltage indicated on
the appliance corresponds to the local
power voltage.
Do not use the appliance for any
other purpose than described in
this manual.
When the appliance is connected to
the power, never leave it unattended.
Never use any accessories or
parts from other manufacturers
RUWKDW3KLOLSVGRHVQRWVSHFLÀFDOO\
recommend. If you use such
accessories or parts, your guarantee
becomes invalid.
Do not wind the mains cord round
the appliance.
Wait until the appliance has cooled
down before you store it.
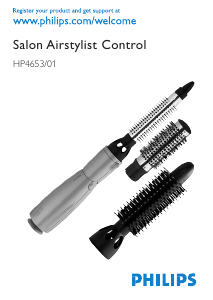
Register your product and get support at
www.philips.com/welcome
BHH814
BHH815
Specifications are subject to change without notice
© 2015 Koninklijke Philips N.V.
All rights reserved.
3140 035 39564
EN User manual
KO ␚⫔#⒢ᴮ⒚
TH คู่มือผู้ใช
ZH-TW Ԛʹ˫
l
m
a
b
cd
ef hg
ijk
n
(BHH815)
(BHH814)
4
2
3
1
1
54
2
1
2
2
1
23
456
1
1
1
2
5-8
sec.
3
3
4
Pay full attention when using the
appliance since it could be extremely
hot. Only hold the handle as other
parts are hot and avoid contact with
the skin.
Always place the appliance with the
bristles extracted on a heat-resistant,
VWDEOHÁDWVXUIDFH7KHKRWKHDWHG
barrel should never touch the surface
RURWKHUÁDPPDEOHPDWHULDO
Avoid the mains cord from coming
into contact with the hot parts of
the appliance.
Keep the appliance away from
ÁDPPDEOHREMHFWVDQGPDWHULDOZKHQ
it is switched on.
Never cover the appliance with
anything (e.g. a towel or clothing)
when it is hot.
Only use the appliance on dry hair. Do
not operate the appliance with
wet hands.
Keep the heated barrel clean and free
of dust and styling products such as
mousse, spray and gel. Never use the
appliance in combination with styling
products.
The heated barrel has coating. This
coating might slowly wear away over
time. However, this does not affect the
performance of the appliance.
If the appliance is used on color-
treated hair, the heated barrels may be
VWDLQHG%HIRUHXVLQJLWRQDUWLÀFLDOKDLU
always consult their distributor.
Always return the appliance to a
service centre authorized by Philips
for examination or repair. Repair by
XQTXDOLÀHGSHRSOHFRXOGUHVXOWLQDQ
extremely hazardous situation for
the user.
'RQRWLQVHUWPHWDOREMHFWVLQWR
openings to avoid electric shock.
Do not pull on the power cord after
using. Always unplug the appliance by
holding the plug.
(OHFWURPDJQHWLFÀHOGV(0)
This Philips appliance complies with all applicable standards and
UHJXODWLRQVUHJDUGLQJH[SRVXUHWRHOHFWURPDJQHWLFÀHOGV
Environment
Do not throw away the appliance with the normal household
ZDVWHDWWKHHQGRILWVOLIHEXWKDQGLWLQDQRIÀFLDOFROOHFWLRQ
point for recycling. By doing this, you help to preserve the
environment.
2 Introduction
Glamour has become much more down-to-earth and uncomplicated.
It’s all about ease and speed rather than complex styling. With the
Philips Volume Multi-Styler you can transform your look easily: straight,
FXUO\ORRNVRUÁLFNVMXVWDWDWZLVWRIDWLS/RRNLQJIDEXORXVKDVQHYHU
EHHQHDVLHU(QMR\XVLQJ\RXUPhilips Volume Multi-styler.
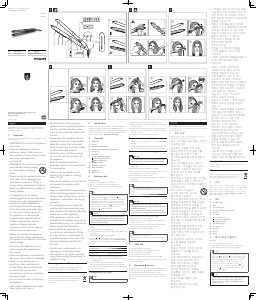
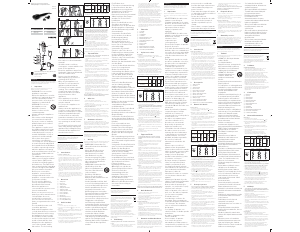
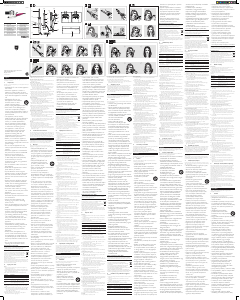
3 Overview
a Display panel
b Cool tip
c Protective retractable bristles
d Heated barrel with Tourmaline Ceramic coating
e Turning arm
f Ionic outlet
g Curling / Straightening indication
: Turn to straightening position
: Turn to curling position
h Lock/Unlock button
i 7HPSHUDWXUHVHWWLQJ
j Power on/off button
k Hanging loop
l Protective cap
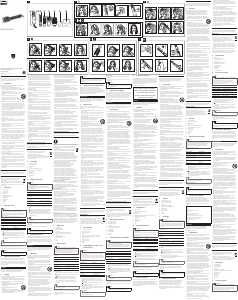
4 Style your hair
Preparation for hair
Wash your hair with shampoo and conditioner.
Blow dry your hair with a dryer before using the styler.
Use heat protection product and comb your hair with large
toothed comb.
Tip
There are symbols and arrows printed on the inner side of the
lower arm of the styler. (
) is for curling and ( ) is for
straightening. Turn the unique arm as indicated for switching from
straightening to curling or vice versa. If you want to switch to
curling when the styler is in the straightening position, turn the
styler following the curling symbol (
). When the styler is in the
curling position, turn towards the direction indicated for
straightening (
) to start straightening.
Caution
+HDWSURWHFWLYHJORYHLVLQWHQGHGWRSURWHFWÀQJHUVKDQGIURP
incidental contact with heated barrel. Prolonged exposure of
glove on heated barrel will melt onto barrel. Glove cannot be
used as a mat to rest the styler.
1 Slide the lock/unlock button (
h ) downwards to unlock the
appliance.
2 Connect the plug to a power supply socket.
3 Press and hold the power on/off button (
j ) until the display panel
(
a ) lights up.
» The default temperature setting is displayed.
4 Press the
or button ( i ) to select a temperature setting
that is suitable for your hair. Please refer to the Temperature Setting
table below. Choose a low setting when you use the styler for the
ÀUVWWLPH
Temperature Setting Hair Type
190-200 ºC Thick Coarse, curly, hard-to-style
170-180 ºC Normal Medium-textured or soft waves
150-160 ºC Fine Fragile, thin or treated hair
» When the appliance is heating up, all the settings will blink.
» When the heated barrel have reached the selected temperature,
the blinking will stop.
The ion function is activated when the appliance is switched on,
which provides additional shine and reduces frizz. You may smell a
special odor and hear a sizzling noise. It is common because they are
caused by the ion generator.
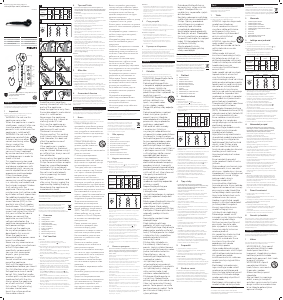
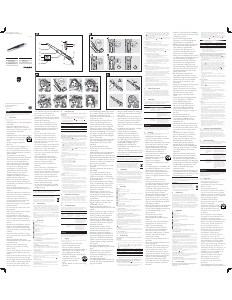
7RVWUDLJKWHQ\RXUKDLU)LJ
Note
Do not touch the heated barrels when using to avoid burns.
1 Ensure the curved sides of the styler are facing each other.
2 Place one section of hair that is not wider than 5cm in between the
heated barrels (
d ).
3 Hold the handle and slide the styler down the length of the hair in a
single motion (max. 5 seconds) from root to end, without stopping
to prevent overheating.
4 To straighten the rest of your hair, repeat steps 2 to 3.
7RFUHDWHÁLFNVDWKDLUHQGV)LJ
1 6WUDLJKWHQ\RXUKDLUDVGHVFULEHGLQWKHÀUVWVHFWLRQ“ To straighten
your hair”.
2 When the styler gets close to the end of the hair tips, slowly rotate
\RXUZULVWWRWXUQWKHVW\OHULQZDUGVRURXWZDUGVWRFUHDWHÁLFNV
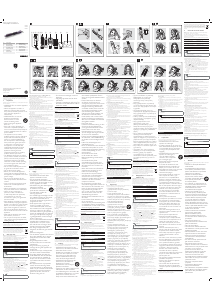
7RFUHDWHYROXPHDWKDLUURRWV)LJ
Warning
Do not tilt the styler at an angle on your scalp as the heated
barrel is hot and this could be uncomfortable on your scalp.
1 Turn the cool tip (
b ) of the turning arm ( e ) to extract the
bristles (
m ).
2 Select one hair strand that is parallel to your hair line.
3 Put the bristles on your scalp and put the section of hair on top of it.
Gently pull the section of hair to create a tension.
4 /HDYHWKHVW\OHULQWKHSRVLWLRQIRUVHF
5 Remove the styler without pulling the selected hair to maintain the
styling result.
6 To style the rest of your hair, repeat steps 2-5.
Tip
For maximum results, as you pull the styler away from the roots,
push it against the hair and slightly towards the center of your
head.
7RFUHDWHVRIWFXUOV)LJ
Warning
The heated barrel is hot and should be used with care.
Do not touch the barrel when using to avoid burns. All sections
of the barrels are heated.
,IWKLVLV\RXUÀUVWWLPHXVHZLWKWKLVSURGXFWWU\RXWWKHVH
VWHSVZLWKRXWÀUVWVZLWFKLQJRQWKHGHYLFHWRJHWVRPHSUDFWLFH
1 Place the turning arm into the curling position (
n ).
2 Select a hair strand that is 3-4cm wide.
3 Hold the styler away from your head and face and wrap the hair
around from root to tip.
4 /HDYHWKHKDLULQSODFHIRUDERXWVHFDQGWKHQJHQWO\VOLGHWKH
styler out of your hair without unwinding the strand.
5 To style the rest of your hair, repeat steps 2-4.
Tip
Spread hair evenly across the barrel.
Use smaller strands of hair for curls and larger strands of hair
for waves.
5 After use
1 Switch off the appliance and unplug it.
2 Wait until the appliance cools down before you store it.
3 Remove hairs and dust from the styler.
4 Clean the barrel with a damp cloth.
5 Put the heat resistant cap on it with bristles retracted (
n ).
6 Keep it in a safe and dry place, free of dust. You can also hang it with
the hanging loop (
k ).
6 Guarantee & service
If you need information e.g. about replacement of an attachment or if
you have a problem, please visit the Philips website at www.philips.com
or contact the Philips Customer Care Centre in your country
\RXZLOOÀQGLWVSKRQHQXPEHULQWKHZRUOGZLGHJXDUDQWHHOHDÁHW,I
there is no Consumer Care Centre in your country, go to your local
Philips dealer.
㭛⧄
㨀ᬎ┐#⬵㤫⩂#ശ⪌㨶#ⰲ⎖⍙#⋙㨨ጽ$#㨀ᬎ┐ஜ#ᖒጁ#
ⴏ⧁#㫳㔍⩂#ᶶ⨺╘#⑳#⪏ᑘᦃ#zzz1sklolsv1frp2zhofrph⢠⍙#
⬵㤫⩂#ᖨᦃ㨖╢═⤀1
4# ⶉ⪾#␚㭭
Ằ#⬵㤫⩂#⋙⦓㨖ณ#⬜⢠#⩺#⋙⦓#⍡ᯭ⍙#ⰲ⩚#ฮహ#⪃ಙ#
ⱈ⢠#⿒⮕㨞#⑳#⪏ᑘᦃ#⪠#Ậಽ㨖╢═⤀1
౯ಙ=#Ằ#⬵㤫⨾#⩺#⢖ጁ#ಭ⢠⍙#
⋙⦓㨖╢═⤀1#
⥾╘⢠⍙#⋙⦓㨞#౯⦝#⋙⦓#
㮰⢠ጁ#ᶳᖒ═#⬜⧁#㧀ᤅී#
⅓⨺╢═⤀1#⬜⧁⩺#ັ⭕#
⪏Ꮫᢅᑘ#⢠#፷⨺ᯛ#⧽㪦㨞#⑳#
⪏┢ጽ1
౯ಙ=#Ằ#⬵㤫⩂#⥾⮕/#⌙⦽ณ/#
፻⡃#᛭ጁ#ณ㓬#⩺#⪏ጁ#⦓ณ#
あ⢠⍙#⋙⦓㨖ⴏ#ᬚ╢═⤀1
⋙⦓#㮰#ᶳᖒ═#⬜⧁#㍔ᖒ#
⅓⨺╢═⤀1
⬜⧁#㍔ᖒஜ#⏚⋯ᒹ#౯⦝/#⠇⬜⩂#
⧽㨶#㨀ᬎ┐#⍙…┐#⍺㕬#᛭ጁ#
㨀ᬎ┐#⍙…┐#ⴏ⬮⬨⢠#⩚᧟㨖⣀#
ഖた㨖╢═⤀1
;⍶#⩺⋯⩚#⠃⩺ᖚಹ#
╔た⬙/#⬮╔⬙⩾#ጓ⩺#
ᙸ⢃ⴏజ#౯㪦ಹ#
ⴏ║⩺#㤱Ὁ㨖ⴏ#⠉⨾#⍯⩾⩺#⩺#
⬵㤫⩂#⋙⦓㨖ᯛ#⬵㤫#⋙⦓ಹ#
ಽ᥆㨖⣀#⠇⬜㨖హ#⋙⦓㨞#⑳#
⪏ᑘᦃ#ⴏ═⋙㨬⩂#ㅲὍ㲍#⑴ⴏ㨚#
⋙ᢕ⩚#ᑘ⦭⩂#ᶶ⠃⡃#㨨ጽ1#
⢃ᬀ⩺ஜ#⬵㤫⩂#ஜⴏಙ#ᇋⴏ#
⠉ᑘᦃ#㨖╢═⤀1#⢃ᬀ⩺ஜ#㬗⪘#
⬵㤫#じ⏖#⬮…#㨖ⴏ#⠉ᑘᦃ#
㨖╢═⤀1#
⬵㤫⢠#⬜⧁⩂#⣄ౡ㨖ณ#⬜⢠#
⬵㤫⢠#㣻═ᒹ#⬜⠕ಹ#㨶፱#
⋙⦓#ⴏ⣁⩚#⬜⠕⩺#⪂㈹㨖ጁⴏ#
㬴⩾㨖╢═⤀1
⩺#⍡ᯭ⍙⢠#⤠⪏ጁ#⩺⥝⩚#
⦓ᑘᦂ#⬵㤫⩂#⋙⦓㨖ⴏ#
ᬚ╢═⤀1
⬵㤫⩺#⬜⧁⢠#⣄ౡᒹ#⋯㔌ᦂ#
⥝ㅤ㨖జ#⪘#…⦝ⴏ#
ᬚ╢═⤀1
#⬵⮕⢕た⢠⍙#ᬞᖚ⢘జ#
㨀ᬎ┐⢠⍙#൚⪮㨖ⴏ#⠉⨾#
⬵㤫#⠤⍶⍙#᛭ጁ#Ὁ㤫⨾#
⬠፻#⋙⦓㨖ⴏ#ᬚ╢═⤀1#
⩺ᤅ㨚#⠤⍶⍙#Ὁ㤫⩂#
⋙⦓㩋⩂#౯⦝⢠ጁ#㤫ⴗ#Ậ⳥⩺#
Ჴ㮐㬳ᓇጽ1
⬜⧁#㍔ᖒ#⬵㤫⢠#ⴏ#
ᬚ╢═⤀1
⬵㤫⩺#ㅲὍ㲍#║⨾#⩊#
Ậಽ㨖╢═⤀1
⩺#⬵㤫⨾#ᬺ⦝#ᠧజ⦝ᵑᦂ#⬵㤫#
⋙⦓#ⱈ⢠#ු㲍#ⰲ⩚㨶⡃#㨨ጽ1#
#Ὁ⧽ጁ#ᠧజ⦝ᵑᦂ#㧸Ὁ⢠#
፷ⴏ#⠉ᑘᦃ#ⰲ⩚㨖ಙ#⏚⪪⩺ᦂᬞ#
⬵㤫⩂#⪪⨺╢═⤀1
⬵㤫⨾#㨬⋯#ᦊ⩂#ც#⋯㔌ᦂ#
ღ⣈⍯⩺#ᇞಙ#㡔㡔㨖ᯗ#⠇⬮⬙⩾#
ಭ⢠#ᇟ⨺╢═⤀1#ᠧజ⦡#ஜ⣈#
㋟ᬒณஜ#㣻ᯛ#᛭ጁ#ณ㓬#ஜ⣄⍯#
ⴗ⢠#፷⠃⍙ጁ#⠇#ᓇጽ1
⬜⧁#㍔ᖒஜ#⬵㤫⩚#ᠧజ⦡#
ὉὍ⢠#፷ⴏ#⠉ᑘᦃ#
ⰲ⩚㨖╢═⤀1
⬜⧁⩂#㌘#⋯㔌⢠⍙#⬵㤫⩂#
ஜ⣄⍯#ⴗ⢠#ஜั⩺#㨖ⴏ#
ᬚ╢═⤀1
ஜ⣈ᒹ#⋯㔌⢠⍙#⬵㤫⩂#㓬⧅⩺#
⤔#ᖨ#⢃ᙴ#ర⨺ᦂᑘ#ⴏ#
ᬚ╢═⤀1#
ᰗᶷ⩺#ఠ⮕㨚#⋯㔌⢠⍙ᬞ#
⋙⦓㨖╢═⤀1#⬯⨾#⏚⨺ᦂ#
⬵㤫⩂#⪙ᑮ㨖ⴏ#ᬚ╢═⤀1#
ஜ⣈#㋟ᬒณጁ#ᮞⴏ#ᶩ#Ჴ┐/#
┐㦸ᤢ⩺/#⬽#ᖨ⩚#┐㓬⪂ᬒ#
⬵㤫⩺#ⴏ#⠉⨾#๑ၼ㨚#⋯㔌ᦂ#
⨚ⴏ㨖╢═⤀1#⬵㤫⩂#┐㓬⪂ᬒ#
⬵㤫ಹ#㨦໎#⋙⦓㨖ⴏ#ᬚ╢═⤀1#
ஜ⣈#㋟ᬒณጁ#㍔㝹ᒵ⢃#
⪏┢ጽ1#═⩺#ⴏᯛ⍙#
㍔㝹⩺#⮕⟦#ᬚᰗᒽ#⑳#
⪏┢ጽ1#㨖ⴏᬞ#⩺ᤅ㨚#㫗⋯⨾#
⬵㤫⩚#⍯ጓ⢠#⣖㩬⩂#ᶑ㈹ⴏ#
⠉┢ጽ1#
⣐⋺㨚#ᰗᶷ⢠#⬵㤫⩂#⋙⦓㨖ᯛ#
ஜ⣈#㋟ᬒณ⢠#⢋ᨠ⩺#⌏ป#⑳#
⪏┢ጽ1#⩾⮕#ᰗᶷ⢠#⋙⦓㨶⡃#
㨞#౯⦝/#ᶳᖒ═#⋙⦓#⬜⢠#
፻⬨⢠#Ჸ⩚㨖╢═⤀1#
బ⋙#᛭ጁ#⑳ஜ#㨀⥽㨚#
౯⦝⢠ጁ#㨬⋯#㨀ᬎ┐#⍙…┐#
ⴏ⬮⬨⨺ᦂ#Ჸ⩚㨖╢═⤀1#
…ಯ⩾⢕た⢠⍙#⑳㨖ጁ#౯⦝#
⬵㤫#⋙⦓⪘⢠హ#ᬺ⦝#⧽㪦㨚#
⋯㭉⩂#タᢥ㨞#⑳#⪏┢ጽ1#
⬜#⋙ಙ#ᬛ⨺ᯛ#⬵㤫⩚#
㜳⢠#⏗#ⴗ⩂#⋫⪌㨖ⴏ#
ᬚ╢═⤀1
⋙⦓#㮰#⬜⧁#㍔ᖒ#፱ณⴏ#
ᬚ╢═⤀1#㨬⋯#㧀ᤅී#⪪ಙ#
⬵㤫⩚#⬜⧁#㍔ᖒ#⅓⨺╢═⤀1
HPI+ⱝ⯙པ⯯,#
⩺#㨀ᬎ┐#⬵㤫⨾#HPI+⬜⪘ณ⪮,⤠#ಽ᥆ᒹ#ᰗᖖ#ณⰶ#ᶩ#
ඳ⬮⩂#ⰶ⑳㨨ጽ1#
㱸ධ#
⑳ᯭ⩺##ᒹ#⬵㤫⨾#⪂ᶳ#ஜ⬮⦓#➥ᤢณ⤠#㨦໎#ḯⴏ#
ᬢಙ#ⴏ⬮ᒹ#⪸㬻⦓㤫#⑳జ#⪮⏖⢠#ḯ╢═⤀1#⩺ᤉ#
ṁ⨺ᦂ#㬷౯#Ậ㬓⢠#ᑮ⿒㨖╘#⑳#⪏┢ጽ1
5# ┗
⩺⬵#Ꮫ#ⓥಙ#㡂㨖హ#┐㓬⪂⩂#⤤⍯㨞#⑳#⪏┢ጽ1#ậ⪪㨚#
┐㓬⪂ᬒ#፻╔#㡂㨖ಙ#╔⏗㨖హ#⋙⦓㨞#⑳#⪏ጁ#㨀ᬎ┐#Ẵ᪬#
ᮢ㝣#┐㓬⪂ᤅጁ#ῦᤅⓓ#ႂ⩂#ณᬞ#㨖ᯛ#┐㜣ᤢ⩺㜣/#㋟/#
⧝⩺ῦ#ᖨ⩚#┐㓬⪂⩂#⪘⨚ᦔహ#⣄ㅤ㨞#⑳#⪏┢ጽ1#┐㓬⪂#
⣄ㅤ⩺#Ꮫ⦞#ⓓ⦽⭪┢ጽ1#㭁ᱏ♑#ᯭ#᳣㢤#♑㘭⯃ᩆᦂ#ᮮⴓ#
㪳⢃┐㓬⪂⩂#⣄ㅤ㨖╢═⤀1
6# ⪾
a ᜓ♑㬁ᩣ⮻#㣢
b 㔺#㢶
c ⥈ⱝ㭛#㊥⯍㰪#ⅻ␢
d 㜪᯽ᱣ᱁#Ⓑᧆồ#㒕㢺ᗺ#ೝ⨉#㐠᱓པ
e 㲱ⱝ⚒#⥔
f ⮻⩅#ἐ㊥
g 㐠᱓2♑㡤ᩣ⮻㡤#㨼⚑##
=#♑㡤ᩣ⮻㡤#⬾㍺#ᖡ᰽པ#
=#㐠᱓⬾㍺#ᖡ᰽པ
h ⯩༤2⯩༤#㭷ⱶ#ὰ㡨
i ⩅ᖙ#⒢Ɐ+.20,
j ⱝ⬂#ὰ㡨
k ේ᰽
l ῭㱔㏊
7# 㯴⧄♑㘭⯃#⨅㊥㭗པ
Ⅷ#␚㭭
⟨㤛⤠#㋛ᗒ⎖ᅆᦂ#ᮚ#┢ጽ1
┐㓬⪂ᤅ#⋙⦓㨖ณ#⬜⢠#ᖒᢅ⩺⢃ᦂ#ᰗᶷ⩂#ᬢᬎጽ1
⣈#Ậ㬓#⬵㤫⩂#⋙⦓㨖ಙ#ി⨾#›⨺ᦂ#›ⴗ㨨ጽ1#
ᖙ⫮ᱣ
# ┐㓬⪂ᤅ⩚#⠃ᢥ⸫#⠓⩚#⠇⸫⢠#ณ㬓⤠#㬳⋡㣻ஜ#⩾␖ᒵ⢃#
⪏┢ጽ1#+
,ጁ#㋟ᬒ⦓/#+ ,ጁ#┐㜣ᤢ⩺㜣⦓⪌ጽ1#
㨀ᬎ┐ᬞ⩚#⠓⩂#㣻═ᒹ#፻ᦂ#㭰⬜㨖⣀#┐㜣ᤢ⩺㜣⢠⍙#
㋟ᬒ⨺ᦂ/#㋟ᬒ⢠⍙#┐㜣ᤢ⩺㜣ᦂ#⬜㬷㨞#⑳#⪏┢ጽ1#
┐㓬⪂ᤅஜ#┐㜣ᤢ⩺㜣#⧽㈹⢠#⪏⩂#ᘐ#㋟ᬒ⨺ᦂ#
⬜㬷㨖ಙ⪘#㨖ጁ#౯⦝#┐㓬⪂ᤅ#㋟ᬒ#ณ㬓+#
#,⢠#
ᗰᢅ#㭰⬜═㓠ጽ1#┐㓬⪂ᤅஜ#㋟ᬒ#⧽㈹⢠#⪏ጁ#౯⦝#
┐㜣ᤢ⩺㜣+
,#㓬ღጁ#㩬⨺ᦂ#㭰⬜═㓒#⩊#
┐㜣ᤢ⩺㜣#═⪙㨨ጽ1#
⮛
⨉#῭㱔#⯯೯⭿#┛ೝᧇ2┛⮻#ೝ⨉ᗺ#℧ᩆ⚑⧡#ᒸ⹐#⥊ᖙ#
㭷ⶅᑾᒜ1#ೝ⨉ᗺ#℧ᩆ⚑⧡#⯯⚑ೡ#ጄ㊥ᗶᴜ#⯯೯⮻#
℧ᩆ⚑⧡⒚#ጅ♣ᑾᒜ1#⯯೯⭿#♑㘭⯃ᩆᰅ#ጠᑂ#ᱻ㡤#
␚⫔㭟#▴#⧗♣ᑾᒜ1#

Praat mee over dit product
Laat hier weten wat jij vindt van de Philips BHH814 Krultang. Als je een vraag hebt, lees dan eerst zorgvuldig de handleiding door. Een handleiding aanvragen kan via ons contactformulier.