© 2019 Koninklijke Philips N.V.
All rights reserved
HD2173_Russian_UM_v2.0
English
1 Your electric pressure cooker
Congratulations on your purchase, and welcome to
Philips!
To fully benefit from the support that Philips
offers, register your product at
www.Philips.com/welcome.
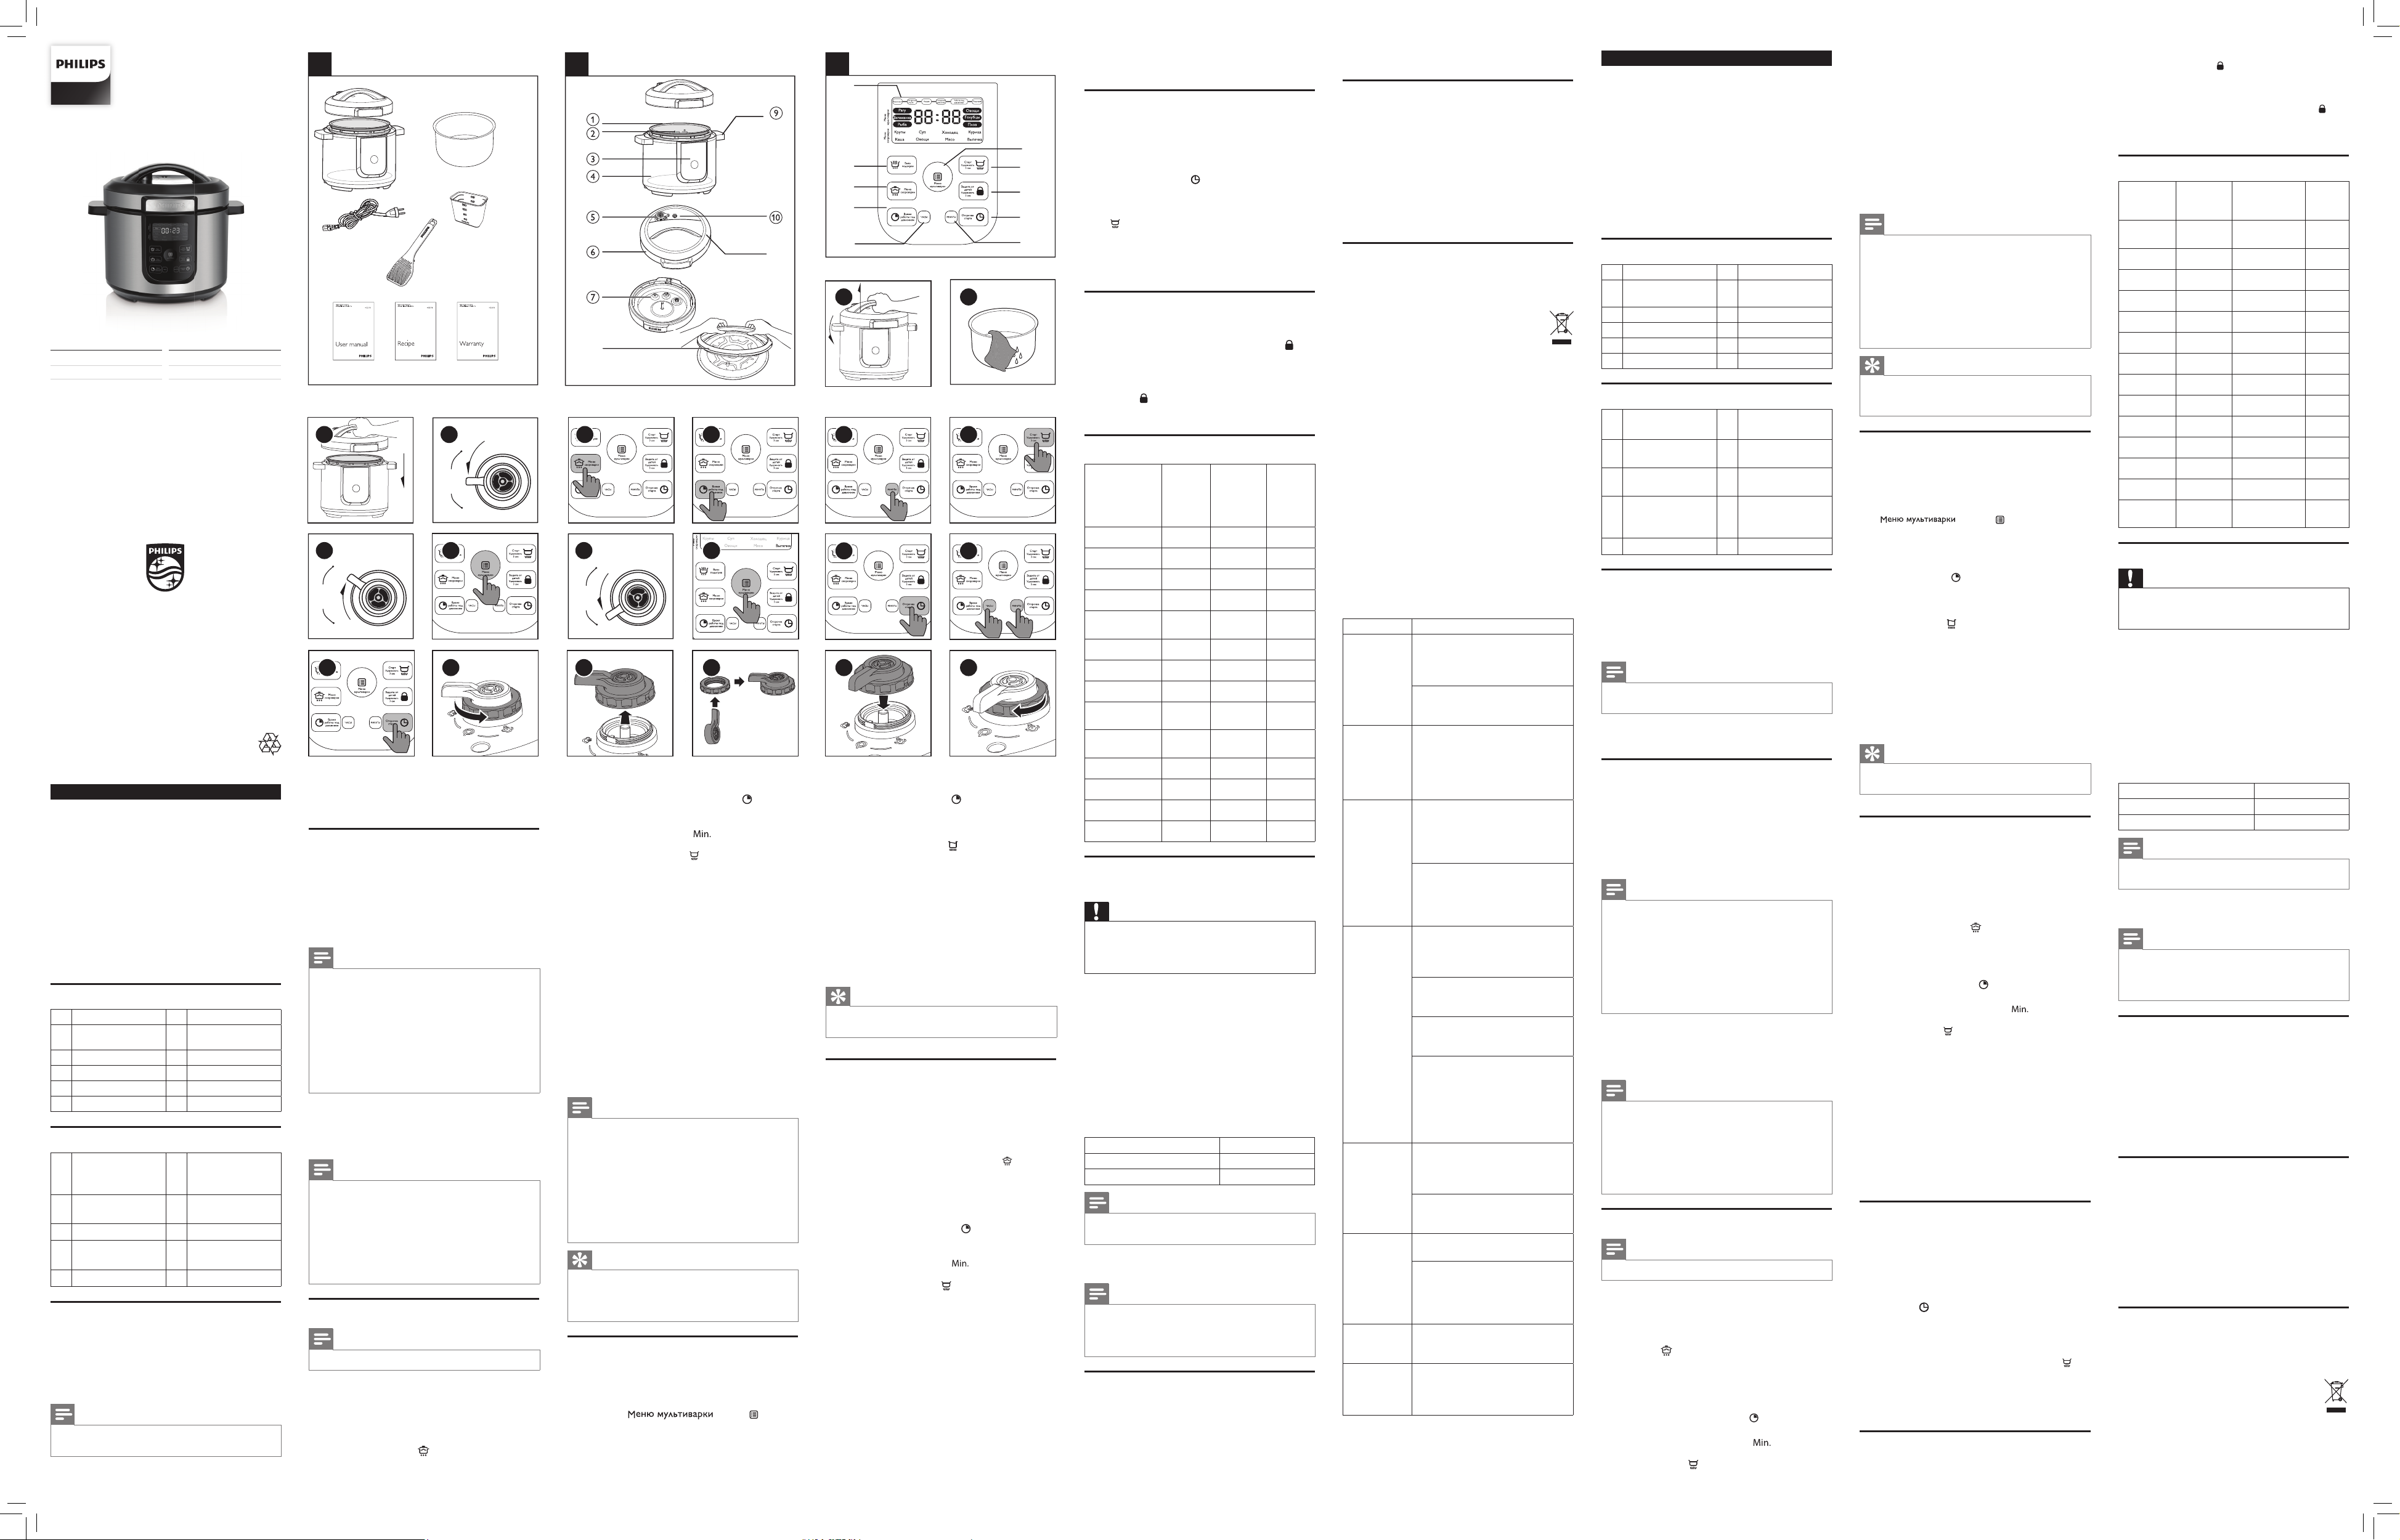
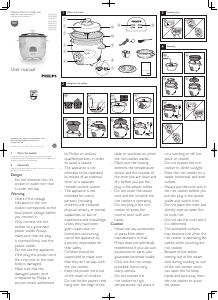
2 What’s in the box (fig. 1)
Electric pressure cooker main unit Inner pot
Rice spoon Soup ladle
Measuring cup User manual
Warranty card Power cord
Recipe
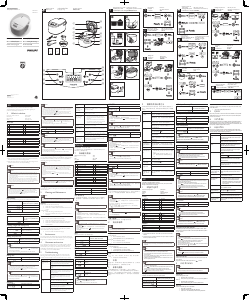
Overview (g. 2)
a
Inner pot
g
Safety valve
b
Water level
indication
h
Sealing ring
c
Control panel
i
Main unit handle
d
Heating element
j
Floating valve
e
Pressure regulator
k
Lid handle
f
Top lid
Controls overview (g. 3)
l
Display screen
q
Menu button
(non-pressure
cooking)
m
Menu button
(pressure cooking)
r
Start button
n
Warm/off button
s
Child lock button
o
Keep pressure
time button
t
Presset timer
button
p
Hour button
u
Minute button
Before rst use
1 Remove all packaging materials from the
appliance.
2 Take out all the accessories from the inner pot.
3 Clean the parts of the electric pressure cooker
thoroughly before using it for the rst time
(see chapter “Cleaning and Maintenance”).
Note
• Make sure all parts are completely dry before you
start using the electric pressure cooker.
3 Using the electric pressure
cooker
Preparations before cooking
Before using the electric pressure cooker to cook
food, you need to follow below preparations:
1 Hold the lid handle and turn it anti-clockwise until the
top lid cannot move any more, then lift up the top lid
(g. 4).
2 Take out the inner pot from the electric pressure
cooker and put the pre-washed food in the inner
pot.
Note
• Do not ll the inner pot with less than 1/3 or more
than 2/3 full of food and liquid.
• For food that expands during cooking, do not ll
the inner pot with more than 1/2 full of food and
liquid.
• For rice cooking, follow the water level indications
on the inside of the inner pot. You can adjust the
water level for different types of rice and your own
preference. Do not exceed the maximum water
level indication.
• Make sure the oater falls down before cooking.
3 Wipe the outside of the inner pot dry (g. 5) and
put it back into the electric pressure cooker.
4 Place the top lid onto the electric pressure cooker
and turn it clockwise (g. 6). You will hear a “click”
sound when the top lid is properly locked.
Note
• Make sure the sealing ring is properly assembled
around the inside of the top lid.
• Make sure the pressure regulator and oating valve
are clean and not blocked.
• Make sure the outside of the inner pot is dry and
clean, and that there is no foreign residue on the
heating element.
• Make sure the inner pot is in proper contact with
the heating element.
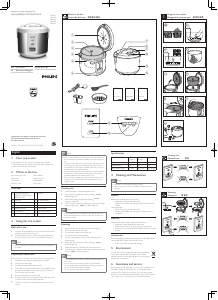
Pressure cooking
Note
• Make sure the oater drops down before cooking.
1 Follow the steps in “Preparations before cooking”.
2 Turn the pressure regulator to the seal position
(g. 7).
3 Put the plug in the power socket.
4 Press the desired cooking function button to
choose a cooking mode by pressing the Меню
скороварки button (
) (g. 8).
» The selected cooking mode indicator ashes.
» The default pressure keeping time is displayed
on the screen.
5 If you want to set a dierent pressure keeping time,
press the keep pressure time button ( ) (g. 9).
» The pressure keeping time ashes on the
screen.
6 Press the minute button (
) to set the minute.
(g. 10).
7 Press the Старт button (
) and the electric
pressure cooker starts working in the selected
mode (g. 11).
» You will hear two beeps after you press the
start button.
8 When the electric pressure cooker reaches the
working pressure, the pressure keeping time starts
to count down.
9 When the pressure keeping time has elapsed,
you will hear two beeps and the electric
pressure cooker switches to keep-warm mode
automatically.
» The keep warm indicator lights up.
10 Turn the pressure regulator to the vent position
(g. 12).
» The electric pressure cooker starts releasing
pressure.
» The oater drops when the pressure is
released suciently.
11 Hold the top lid handle and turn the lid anti-
clockwise until it cannot move any more, then lift it
up (g. 4).
Note
• When cooking soup or viscous liquid, do not
release pressure by turning the pressure regulator
to the steam vent position, otherwise liquid might
spurt from the pressure control valve. Wait until the
pressure is naturally released and the oater has
dropped to open the top lid.
• After the cooking is nished and the pressure is
released, unplug the electric pressure cooker to
turn o the keep warm function or when not in use.
• You can press the Warm/O button to cancel the
cooking process.
Tip
• You can adjust the pressure keeping time
for different types of food according to your
preference. Pressure keeping time is not adjustable
for rice cooking function.
Non-pressure cooking
1 Follow the steps in “Preparations before cooking”.
2 Turn the pressure regulator to the vent position
(g. 12).
3 Put the plug in the power socket.
4 Press the
button ( )
to choose a desired non-pressure cooking
function(g. 13).
» The selected cooking mode indicator ashes.
» The default pressure keeping time is displayed
on the screen.
5 If you want to set a dierent cooking time, press
the cooking time button ( ) (g. 9).
» The cooking time ashes on the screen.
6 Press the hourt/minute button(Часы/Минуты)to
set the minute and hour (g. 10).
7 Press the Старт button (
) and the electric
pressure cooker starts working in the selected
mode (g. 11).
» You will hear two beeps after you press the
start button.
8 When the cooking time has elapsed, you will
hear two beeps and the electric pressure cooker
switches to keep-warm mode automatically.
» The keep warm indicator lights up.
9 Hold the top lid handle and turn the lid anti-
clockwise until it cannot move any more, then lift it
up (g. 4).
Tip
• You can adjust the cooking time for dierent types
of food according to your preference.
Baking
You can cook food without adding water in the
inner pot.
1 Follow the steps in “Preparations before cooking”.
2 Turn the pressure regulator to the bake position
(g. 14).
3 Put the plug in the power socket.
4 Press the Меню скороварки button (
) to
choose a desired baking mode (g. 15).
» The selected baking mode indicator ashes.
» The default baking time is displayed on the
screen.
5 If you want to set a dierent baking time, press the
keep pressure time button (
) (g. 9).
» The pressure keeping time ashes on the
screen.
6 Press the minute button (
) to set the minute
unit (g. 10).
7 Press the start button (
) and the electric
pressure cooker starts working in the selected
mode (g. 11).
» You will hear two beeps after you press the
start button.
8 When the electric pressure cooker reaches the
working temperature, the pressure keeping time
starts to count down.
9 When the baking is nished, you will hear two
beeps and the electric pressure cooker switches to
keep-warm mode automatically.
10 Turn the pressure regulator to the vent position
(g. 12).
» The electric pressure cooker starts releasing
pressure.
» The oater drops when the pressure is
released suciently.
11 Hold the top lid handle and turn the lid anti-
clockwise until it cannot move any more, then lift it
up (g. 4).
Preset time for delayed cooking
You can preset the delayed cooking time for
dierent cooking functions. The preset timer is
available up to 24 hours, but is not applicable to
the cake baking function.
1 Choose the desired cooking mode, then press the
preset timer button ( ) (g. 16).
2 Press the hour button ( Часы ) and minute button
( Минуты) to choose the preset time (g. 17).
3 Once the preset time is set, press the start button
(
) to enter preset mode (g. 11).
» The remaining preset time is displayed on the
screen.
4 When the preset time is elapsed, the electric
pressure cooker starts working in the selected
cooking mode automatically.
Setting up child lock
To protect your child from using the multicooker,
you can set up the child lock function.
• Press and hold the Защита от детей button ( ) for
3 seconds to enter the child lock mode (fig. 18).
» The child lock icon appears on the display
screen.
• To unlock, press and hold the Защита от детей
button (
) for 3 seconds again (g. 18).
» The child lock icon disappears from the display
screen.
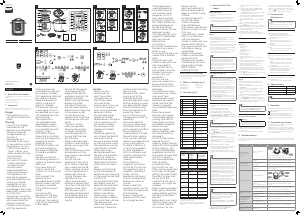
Cooking time regulating range
Cooking
function
Pressure
keeping
Default
pressure
keeping
time
(minute)
Cooking
time
(minute)
Ragout (Stew) x 23 20-59
Roasting x 18 18-59
Fish x 15 15-59
Vegetables x 3 1-59
Cabbage
meatrolls
x 20 20-59
Pilaf x 20 20-59
Cereals √ 14 NA
Soup √ 20 20-59
Aspic (gelly
meat)
√ 30 20-59
Poultry
(Chicken)
√ 30 25-59
Porridge √ 13 1-59
Vegetables √ 20 5-59
Meat √ 30 30-59
Baking √ 45 45-59
Assembling and disassembling the
pressure regulator
Caution
• Do not disassemble the pressure regulator during
cooking. Always unplug the electric pressure cooker
and wait until the pressure has been released
sufficiently.
To disassemble the pressure regulator:
1 Turn the lower screw anti-clockwise until it
becomes loose. (g. 19).
2 Pull it up and take out the pressure regulator.
(g. 20).
To assemble the pressure regulator:
1 Assemble the lower screw back to the regulator.
(g. 21)
2 Make sure the regulator points at the sealed
position and put it back to the steam valve. (g. 22)
3 Turn the screw clockwise until it is fastened. (g. 23)
4 Specifications
Model Number HD2173
Rated power output 1000W
Rated capacity 6L
Note
• Always unplug the appliance if not used for a
longer period.
5 Cleaning and Maintenance
Note
• Unplug the electric pressure cooker before starting
to clean it.
• Wait until the electric pressure cooker has cooled
down suciently before cleaning it.
Interior
Inside of the outer lid and the main body:
• Wipe with wrung out and damp cloth.
• Make sure to remove all the food residues stuck to
the electric pressure cooker.
Heating element:
• Wipe with wrung out and damp cloth.
• Remove food residues with wrung out and damp
cloth or toothpicks.
h
k
l
m
n
o
p
q
r
s
t
u
Открыто
Закрыто
Открыто
Открыто
Закрыто
Открыто
9 10 11
13
Открыто
Закрыто
Открыто
15
16 17
18
3S
14
19 21 22 2320
6 7
4 5
Верхний
уровень
продуктов
Рис
Уровень
воды
8
12
1
2
3
HD2173
Sealing ring:
• Soak in warm water and clean with sponge.
Exterior
Surface of the outer lid and outside of the main
body:
• Wipe with a cloth damped with soap water.
• Only use soft and dry cloth to wipe the control
panel.
• Make sure to remove all the food residues around
the pressure regulator and oating valve.
Pressure control valve and oating valve:
• Disassemble the pressure control valve, soak it in
warm water, and clean with sponge.
• Remove food residues in the pressure control valve
and oating valve with toothpicks.
Accessories
Rice spoon, soup ladle, and inner pot:
• Soak in hot water and clean with sponge.
6 Recycling
This symbol means that this product shall
not be disposed of with normal household
waste (2012/19/EU).
Follow your country’s rules for the separate
collection of electrical and electronic products.
Correct disposal helps prevent negative
consequences for the environment and human
health.
7 Guarantee and service
If you need service or information, or if you have
a problem, visit the Philips website at
www.philips.com or contact the Philips Customer
Care Center in your country. You can nd its
phone number in the worldwide guarantee
leaet. If there is no Customer Care Center in
your country, go to your local Philips dealer.
8 Troubleshooting
If your electric pressure cooker does not function
properly or if the cooking quality is insucient,
consult the table below. If you are unable to
solve the problem, contact a Philips service
center or the Consumer Care Center in your
country.
Problem Solution
I have
difficulties
closing the
top lid.
The sealing ring is not well
assembled. Make sure the
sealing ring is well assembled
around the inside of the top lid.
The floater blocks the locking pin.
Push down the floater so that it
does not block the locking pin.
I have
difficulties
opening the
top lid after
the pressure
is released.
The floater has not dropped.
Push the floater down.
The food is
not cooked.
Make sure that there is no
foreign residue on the heating
element and the outside of the
inner pot before switching the
electric pressure cooker on.
The heating element is
damaged, or the inner pot is
deformed. Take the cooker to
your Philips dealer or a service
center authorized by Philips.
Air or steam
leaks from
under the lid.
The sealing ring is not well
assembled. Make sure the
sealing ring is well assembled
around the inside of the top lid.
There is food residue in the
sealing ring. Make sure the
sealing ring is clean.
The top lid is not properly
closed. Make sure the top lid is
properly closed.
The pressure level inside of
the appliance is abnormal. In
this case the safety valve will
be releasing steam. Take the
appliance to your Philips dealer
or a service center authorized by
Philips.
Air or steam
leaks from
the floating
valve.
There is food residue in the
rubber ring of the floating valve.
Clean the rubber ring of the
floating valve.
The rubber ring of the floating
valve is broken. Replace the
rubber ring.
The floater
does not
rise after the
appliance
starts
pressurizing.
Make sure there is enough food
and water in the inner pot.
The top lid or the pressure
regulator has malfunction. Take
the appliance to your Philips
dealer or a service center
authorized by Philips.
E3 displays
on the
screen.
The temperature inside the inner
pot is too high. Wait until it falls
down to room temperature.
E1, E2, or E4
displays on
the screen.
The electric pressure cooker has
malfunction. Take the appliance
to a Philips dealer or a service
center authorised by Philips.
Қазақша
1 Электр лездеткіш
Сатып алғаныңыз құтты болсын және Philips
компаниясына қош келдіңіз!
Philips ұсынатын қолдауды толық пайдалану үшін, өнімді
www.Philips.com/welcome сайтына тіркеңіз.
2 Қорап ішіндегі заттар (1-сурет)
Электр лездеткіштің негізгі бөлігі
Ішкі ыдысы
Күрішке арналған қасық Сорпа ожауы
Өлшеуіш шыны аяқ
Пайдаланушы нұсқаулығы
Кепілдік кітапшасы Қуат сымы
Рецепттер
Жалпы сипаттама (2-сурет)
a
Ішкі ыдысы
g
Қауіпсіздік клапаны
b
Су деңгейінің
көрсеткіші
h
Нығыздағыш сақина
c
Басқару панелі
i
Негізгі бөлік тұтқасы
d
Қыздыру элементі
j
Қалқыма клапан
e
Қысымды реттегіш
k
Қақпақ тұтқасы
f
Жоғарғы қақпақ
Басқару элементтеріне шолу (3-сурет)
l
Дисплей экраны
q
Мәзір түймесі
(қысымсыз пісіру)
m
Мәзір түймесі
(қысыммен пісіру)
r
Бастау түймесі
n
Жылыту/Өшіру
түймесі
s
Балалардан құлыптау
түймесі
o
Қысым уақытын
сақтау түймесі
t
Алдын ала
орнатылған таймер
түймесі
p
Сағат түймесі
u
Минут түймесі
Алғашқы рет қолданар алдында
1 Құрылғыдан бүкіл орауыштарды алыңыз.
2 Барлық қосалқы құралдарды ішкі ыдыстан шығарыңыз.
3 Электр лездеткішті бірінші рет пайдаланбастан бұрын
оның бөліктерін мұқият тазалаңыз («Тазалау және күтім
жасау» тарауын қараңыз).
Ескертпе
• Электр лездеткішті пайдаланбастан бұрын барлық
бөліктерінің жақсы кепкенін тексеріңіз.
3 Электр лездеткішті пайдалану
Пісіруден бұрынғы сақтық шаралары
Тамақ пісіру үшін электр лездеткішті пайдаланбастан
бұрын төмендегі сақтық шараларын орындауыңыз
қажет:
1 Қақпақ тұтқасынан ұстап, жоғарғы қақпақ қозғалмай
қалғанша сағат тіліне қарсы бұраңыз да, жоғарғы қақпақты
көтеріңіз (4-сурет).
2 Ішкі ыдысты электр лездеткіштен шығарып алып, алдын ала
жуылған тағамды ішкі ыдысқа салыңыз.
Ескертпе
• Ішкі ыдысты 1/3 бөлігінен аз етіп немесе 2/3 бөлігінен
асырып тамақ пен сұйықтық құймаңыз.
• Пісірген кезде көлемі үлкейетін тамақтар үшін салынатын
тамақ пен сұйықтықты ішкі ыдыстың 1/2 бөлігінен
асырмаңыз.
• Күріш пісіру үшін, ішкі ыдыстың ішіндегі су деңгейі
көрсеткішінен асырмаңыз. Күріштің әр түрі үшін су
деңгейін өз қалауыңызға қарай әрқашан реттеуіңізге
болады. Ең жоғарғы су деңгейі көрсеткішінен асырмаңыз.
• Пісірместен бұрын қалтқының батып тұрғанын тексеріңіз.
3 Ішкі ыдыстың сыртын құрғатып сүртіңіз (5-сурет) және
электр лездеткіштің ішіне қайта салыңыз.
4 Электр лездеткіштің жоғарғы қақпағын жауып, сағат
тіліне қарсы бұраңыз (6-сурет). Жоғарғы қақпақ дұрыс
жабылғанда «сырт» еткен дыбыс естіледі.
Ескертпе
• Нығыздағыш сақинаның жоғарғы қақпақтың ішіне дұрыс
салынғанын тексеріңіз.
• Қысымды реттегіш пен қалқыма клапан таза және
бітелмегенін тексеріңіз.
• Ішкі ыдыстың сырты таза әрі құрғақ екенін және қыздыру
элементіне бөгде қалдықтың жоқ екенін тексеріңіз.
• Ішкі ыдыстың қыздыру элементіне дұрыс тиіп тұрғанын
тексеріңіз.
Қысыммен пісіру
Ескертпе
• Пісірместен бұрын қалтқының батып тұрғанын тексеріңіз.
1 «Пісіруден бұрынғы сақтық шаралары» бөліміндегі
қадамдарды орындаңыз.
2 Қысымды реттегішті нығыздау күйіне бұрыңыз (7-сурет).
3 Ашаны қуат розеткасына қосыңыз.
4 Пісіру режимін таңдау үшін Меню скороварки
түймесін (
) басу арқылы қалаған пісіру функциясын
таңдаңыз (8-сурет).
» Таңдалған пісіру режимінің индикаторы
жыпылықтайды.
» Әдепкі қысымды сақтау уақыты экранда көрсетіледі.
5 Басқа қысымды сақтау уақытын қойғыңыз келсе, қысым
уақытын сақтау түймесін басыңыз (
) (9-сурет).
» Қысымды сақтау уақыты экранда жыпылықтайды.
6 Минутты қою үшін минут түймесін (
) басыңыз.
(10-сурет).
7 Старт түймесін (
) басыңыз, электр лездеткіш
таңдалған режимде жұмыс істей бастайды (11-сурет).
» Старт түймесін басқаннан кейін екі дыбыстық
сигналды естисіз.
8 Электр лездеткіш жұмыс істейтін қысымға жеткенде
қысымды сақтау уақыты есептеуді бастайды.
9 Қысымды сақтау уақыты аяқталғанда екі дыбыстық
сигналды естисіз және электр лездеткіш автоматты түрде
жылы сақтау режиміне ауысады.
» Жылы сақтау көрсеткіші жанады.
10 Қысымды реттегішті айдау күйіне бұрыңыз (12-сурет).
» Электр лездеткіш қысымды баса бастайды.
» Қалтқы қысым жеткілікті түрде басылғанда түседі.
11 Жоғарғы қақпақтың тұтқасынан ұстап, енді
қозғалмайтындай болғанша оны сағат тіліне қарсы
бұраңыз (4-сурет).
Ескертпе
• Сорпа немесе тұтқыр сұйықтық әзірлеп жатқанда
қысымды реттегішті бу шығатын тесікше күйіне қойып,
бу шығармаңыз, әйтпесе қысымды басқару клапанынан
сұйықтық атқылауы мүмкін. Жоғарғы қақпақты ашу үшін
қысымның өздігінен басылып, қалтқының түскенін күтіңіз.
• Пісіруді аяқтап, қысым басылғаннан кейін жылы сақтау
функциясын өшіру немесе пайдаланбаған кезде электр
лездеткішті токтан ажыратыңыз.
• Пісіру процесінен бас тарту үшін Жылыту/Өшіру түймесін
басыңыз.
Кеңес
• Қалауыңызша тағам түріне байланысты қысымды сақтау
уақытын реттеуге болады. Күріш пісіру функциясы үшін
қысымды сақтау уақыты реттелмейді.
Қысымсыз пісіру
1 «Пісіруден бұрынғы сақтық шаралары» бөліміндегі
қадамдарды орындаңыз.
2 Қысымды реттегішті айдау күйіне бұрыңыз (12-сурет).
3 Ашаны қуат розеткасына қосыңыз.
4 Қажетті қысымсыз пісіру функциясын таңдау үшін
түймесін ( ) басыңыз (13-сурет).
» Таңдалған пісіру режимінің индикаторы
жыпылықтайды.
» Әдепкі қысымды сақтау уақыты экранда көрсетіледі.
5 Басқа пісіру уақытын қойғыңыз келсе, пісіру уақыты
түймесін басыңыз (
) (9-сурет).
» Пісіру уақыты экранда көрсетіледі.
6 Минут пен сағатты қою үшін сағат/минут түймесін
(Часы/Минуты) басыңыз (10-сурет).
7 Старт түймесін (
) басыңыз, электр лездеткіш
таңдалған режимде жұмыс істей бастайды (11-сурет).
» Старт түймесін басқаннан кейін екі дыбыстық
сигналды естисіз.
8 Пісіру уақыты аяқталғанда екі дыбыстық сигналды естисіз
және электр лездеткіш автоматты түрде жылы сақтау
режиміне ауысады.
» Жылы сақтау көрсеткіші жанады.
9 Жоғарғы қақпақтың тұтқасынан ұстап, енді қозғалмайтындай
болғанша оны сағат тіліне қарсы бұраңыз (4-сурет).
Кеңес
• Қалауыңызша тағам түріне байланысты пісіру уақытын
реттеуге болады.
Пісіру
Тағамды ішкі ыдысқа су қоспай пісіруге болады.
1 «Пісіруден бұрынғы сақтық шаралары» бөліміндегі
қадамдарды орындаңыз.
2 Қысымды реттегішті пешке пісіру күйіне
бұрыңыз (14-сурет).
3 Ашаны қуат розеткасына қосыңыз.
4 Қажетті пешке пісіру режимін таңдау үшін Меню
скороварки түймесін (
) басыңыз (15-сурет).
» Таңдалған пешке пісіру режимінің индикаторы
жыпылықтайды.
» Әдепкі пешке пісіру уақыты экранда көрсетіледі.
5 Басқа пешке пісіру уақытын қойғыңыз келсе, пешке пісіру
уақыты түймесін басыңыз (
) (9-сурет).
» Қысымды сақтау уақыты экранда жыпылықтайды.
6 Минутты қою үшін минут түймесін (
)
басыңыз. (10-сурет).
7 Старт түймесін (
) басыңыз, электр лездеткіш
таңдалған режимде жұмыс істей бастайды (11-сурет).
» Старт түймесін басқаннан кейін екі дыбыстық
сигналды естисіз.
8 Электр лездеткіш жұмыс істейтін температураға
жеткенде қысымды сақтау уақыты есептеуді бастайды.
9 Пешке пісіру уақыты аяқталғанда екі дыбыстық сигналды
естисіз және электр лездеткіш автоматты түрде жылы
сақтау режиміне ауысады.
10 Қысымды реттегішті айдау күйіне бұрыңыз (12-сурет).
» Электр лездеткіш қысымды баса бастайды.
» Қалтқы қысым жеткілікті түрде басылғанда түседі.
11 Жоғарғы қақпақтың тұтқасынан ұстап, енді
қозғалмайтындай болғанша оны сағат тіліне қарсы
бұраңыз (4-сурет).
Кідіртілген пісіру үшін уақытты алдын
ала орнату
Басқа пісіру мәзірлері үшін кідіртілген пісіру уақытын
алдын ала орната аласыз. Алдын ала орнату таймері
24 сағатқа дейін қолданылады, бірақ тәтті нан пісіру
функциясы үшін қолданылмайды.
1 Қажетті пісіру режимін таңдап, алдын ала орнату таймері
түймесін ( ) басыңыз (16-сурет).
2 Алдын ала орнату таймерін таңдау үшін сағат
түймесі ( Часы ) мен минут түймесін ( Минуты)
басыңыз (17-сурет).
3 Алдын ала орнату таймері көрсетілгеннен кейін алдын
ала орнату режиміне қосылу үшін старт түймесін (
)
басыңыз (11-сурет).
» Қалған алдын ала орнату уақыты экранда көрсетіледі.
4 Алдын ала орнату уақыты аяқталғанда электр лездеткіш
автоматты түрде таңдалған пісіру режимінде жұмыс істей
бастайды.
Балалардан қорғау құлпын орнату
Баланы электр лездеткішті пайдаланудан қорғау үшін
балалардан қорғау құлпы функциясын орнатуыңызға
болады.
• Балалардан қорғау құлпы режиміне өту үшін Защита
от детей түймесін (
) 3 секунд бойы басып
тұрыңыз (18-сурет).
» Дисплейде балалардан қорғау құлпының белгішесі
жанады.
• Құлыпты ашу үшін, Защита от детей түймесін (
)
қайтадан 3 секунд бойы басып тұрыңыз (18-сурет).
» Дисплейде балалардан қорғау құлпының белгішесі
өшеді.
Пісіру уақытын реттеу ауқымы
Пісіру
функциясы
Қысымды
сақтау
Әдепкі қысым
сақтау уақыты
(минут)
Пісіру
уақыты
(минут)
Рагу
(Бұқтырма)
x
23 20-59
Орама
x
18 18-59
Балық
x
15 15-59
Көкөністер
x
3 1-59
Голубцы
x
20 20-59
Палау
x
20 20-59
Жарма
√
14 NA
Сорпа
√
20 20-59
Іркілдек
√
30 20-59
Тауық еті
√
30 25-59
Ботқа
√
13 1-59
Көкөністер
√
20 5-59
Ет
√
30 30-59
Пісірілген
нан
√
45 45-59
Қысымды реттегішті салу және ажырату
Абайлаңыз
• Пісіріп жатқанда қысымды реттегішті ажыратпаңыз.
Әрдайым электр лездеткішті ажыратып, қысым жеткілікті
басылғанша күтіңіз.
Қысымды реттегішті ажырату үшін:
1 Төменгі бұранданы босағанша сағат тіліне қарсы бұраңыз.
( 19-сурет).
2 Жоғары қарай тартып, қысымды реттегішті шығарып
алыңыз. ( 20-сурет).
Қысымды реттегішті салу үшін:
1 Төменгі бұранданы реттегішке салыңыз. ( 21-сурет)
2 Реттегіш нүктелерді нығыздау күйінде тұрғанын тексеріп,
бу шығаратын клапанға қайтадан салыңыз. ( 22-сурет)
3 Бұранданы бекітілгенше бұраңыз. ( 23-сурет)
4 Техникалық сипаттамалары
Үлгі нөмірі HD2173
Номиналды қуат шығысы 1000 Вт
Номиналды сыйымдылық 6 л
Ескертпе
• Ұзақ уақыт пайдаланбайтын болсаңыз, құрылғыны әрдайым
ажыратып қойыңыз.
5 Тазалау және күтім жасау
Ескертпе
• Электр лездеткішті тазалар алдында оны тоқтан суыру
керек.
• Электр лездеткішті тазалар алдында оны дұрыстап суытып
алыңыз.
Іші
Сыртқы қақпақтың және негізгі корпустың іші:
• Сығылған, ылғалды шүберекпен сүртіңіз.
• Электр лездеткішке жабысқан барлық тағам қалдықтарын
міндетті түрде кетіріңіз.
Қыздыру элементі:
• Сығылған, ылғалды шүберекпен сүртіңіз.
• Сығылған, ылғалды шүберекпен немесе тіс
тазалағыштармен тамақ қалдықтарын кетіріңіз.
Нығыздағыш сақина:
• Жылы суға салып, губкамен тазалаңыз.
Сырты
Сыртқы қақпақтың беті және негізгі корпустың сырты:
• Сабынды сумен ылғалдандырылған шүберекпен сүртіңіз.
• Басқару панелін сүрту үшін тек жұмсақ және құрғақ
шүберекті пайдаланыңыз.
• Қысымды реттегіш пен қалқыма клапан айналасындағы
тамақ қалдықтарын кетіріңіз.
Қысымды басқару клапаны мен қалқыма клапан:
• Қысымды басқару клапанын ажыратыңыз, жылы суға салып,
губкамен тазалаңыз.
• Қысымды басқару клапанынан және қалқыма клапаннан тіс
тазалағыштармен тамақ қалдықтарын кетіріңіз.
Қосалқы құралдар
Күрішке арналған қасық, сорпа ожауы мен ішкі ыдыс:
• Ыстық суға малып, губкамен тазалаңыз.
6 Қайта өңдеу
Бұл таңба осы өнімді қалыпты тұрмыстық
қалдықпен тастауға болмайтынын білдіреді
(2012/19/EU).
Электр және электрондық өнімдердің қалдықтарын
бөлек жинау жөніндегі еліңіздің ережелерін сақтаңыз.
Қоқысқа дұрыс тастау қоршаған ортаға және адам
денсаулығына тиетін зиянды әсердің алдын алуға
көмектеседі.
EN User manual
KK Қолданушының нұсқасы
RU
Руководство пользователя
UK Посібник користувача


Praat mee over dit product
Laat hier weten wat jij vindt van de Philips HD2173 Rijstkoker. Als je een vraag hebt, lees dan eerst zorgvuldig de handleiding door. Een handleiding aanvragen kan via ons contactformulier.