QC5055
4222.002.8003.1
ENGLISH
Introduction
Congratulations on your purchase and welcome
to Philips! To fully benet from the support that
Philips offers, register your product at www.philips.
com/welcome.
Your new Philips Professional Power hair clipper
enables comfortable clipping of even the toughest
hair. To enjoy using the hair clipper, we advise you
to read the following information.
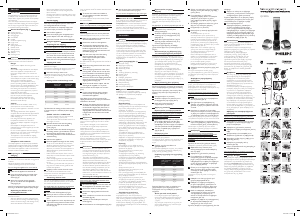
General description (Fig. 1)
A Cutting element
B Clipping attachment
C Charging light
D On/off slide
E Handle
F Socket for appliance plug
G Large comb
H Small comb
I Setting indications
J Stubble comb
K Setting selector
L Appliance plug
M Adapter
N Cleaning brush
Important
Read this user manual carefully before you use the
appliance and save it for future reference.
Danger
Make sure the adapter does not get wet.
Warning
Check if the voltage indicated on the adapter
and on the appliance corresponds to the
local mains voltage before you connect the
appliance.
The adapter contains a transformer. Do not cut
off the adapter to replace it with another plug,
as this causes a hazardous situation.
This appliance is not intended for use by
persons (including children) with reduced
physical, sensory or mental capabilities, or lack
of experience and knowledge, unless they
have been given supervision or instruction
concerning use of the appliance by a person
responsible for their safety.
Children should be supervised to ensure that
they do not play with the appliance.
Remove the clipping attachment from
the handle before you clean the clipping
attachment under the tap.
Caution
Never immerse the handle in water or any
other liquid, nor rinse it under the tap.
Do not use the appliance in the bath or in the
shower.
The clipping attachment of the appliance
complies with the internationally approved IEC
safety regulations and can be safely cleaned
under a tap (Fig. 2).
Use, charge and store the appliance at a
temperature between 15°C and 35°C.
Only use the adapter supplied to charge the
appliance.
If the adapter is damaged, always have it
replaced with one of the original type in order
to avoid a hazard.
Do not use the appliance when the clipping
attachment or one of the combs is damaged or
broken as this may cause injury.
This appliance is only intended for clipping
human scalp hair. Do not use it for any other
purpose.
Compliance with standards
This Philips appliance complies with all standards
regarding electromagnetic elds (EMF). If handled
properly and according to the instructions in this
user manual, the appliance is safe to use based on
scientic evidence available today.
Preparing for use
Charging
Charge the appliance for at least 10 hours before
you use it for the rst time and after a long period
of disuse.
When the appliance is fully charged, it has a
cordless operating time of up to 35 minutes.
Do not charge the appliance for more than 24
hours.
1 Make sure the appliance is switched off.
2 Insert the small plug into the socket of the
appliance and put the adapter in the wall
socket (Fig. 3).
3 After a few seconds, the charging light
goes on to indicate that the appliance is
charging (Fig. 4).
Note: The charging light does not change colour and
does not go out when the appliance is fully charged.
Optimising the lifetime of the
rechargeable batteries
To optimise the lifetime of the batteries, follow the
instructions below:
After the appliance has been charged for the
rst time, do not recharge it between clipping
sessions. Continue using it and recharge it only
when the batteries are almost empty.
-
-
-
-
-
-
-
-
-
-
-
-
-
-
-
Remove the adapter from the wall socket
when the batteries are fully charged (which
takes 10 hours).
Discharge the batteries completely twice a year
by letting the motor run until it stops. Then fully
recharge the batteries.
Corded clipping
Note: Only run the appliance from the mains when
the rechargeable batteries are empty.
Note: If the batteries are completely empty, wait a
few minutes before you switch on the appliance.
1 Switch off the appliance.
2 Insert the small plug into the appliance and
put the adapter in the wall socket (Fig. 3).
3 After a few seconds, switch on the appliance.
Using the appliance
Preparing for hair clipping
Only use the appliance on clean, dry hair. Do not
use it on freshly washed hair.
1 Make sure that the head of the person whose
hair you intend to cut is at the same level as
your chest. This ensures that all parts of the
head are clearly visible and within easy reach.
2 Comb the hair in the growth direction (Fig. 5).
Clipping with comb
The appliance comes with three combs for 15
different hair lengths.
The minimum remaining hair length is 1.6mm and
the maximum remaining hair length is 41mm.
1 Select the comb you want to use.
The table shows how long the hair will be after
clipping at the different settings of the small comb
and large comb.
Settings of the small and large comb
Setting Hair length after
clipping with
small comb
Hair length after
clipping with
large comb
1 3mm 23mm
2 6mm 26mm
3 9mm 29mm
4 12mm 32mm
5 15mm 35mm
6 18mm 38mm
7 21mm 41mm
Tip: Write down the settings you have used to create
a certain hairstyle as a reminder for future clipping
sessions.
Stubble comb for a ‘stubble look’
To create a ‘stubble look’, clip with the small
comb set to setting 1 (3mm) rst.
Then clip the hair with the stubble comb for a
hair length of 1.6mm.
2 Slide the selected comb into the guiding
grooves on both sides of the handle
(‘click’) (Fig. 6).
3 To set the comb to the desired setting, press
the setting selector (1) and slide the comb to
the desired hair length setting (2) (Fig. 7).
The setting indications on the comb show the
selected setting.
4 Switch on the appliance.
5 Move the appliance through the hair slowly.
To clip in the most effective way, move the
appliance against the direction of hair growth.
Since all hair does not grow in the same
direction, you need to move the appliance in
different directions (upward, downward or
across) (Fig. 8).
Make sure that the at part of the comb is
always fully in contact with the scalp to obtain
an even result.
Make overlapping passes over the head to
ensure that you cut all the hair that needs to
be cut.
To achieve a good result with curly, sparse or
long hair, use a hand comb to guide the hair
towards the appliance.
6 Regularly remove cut hair from the comb.
If a lot of hair has accumulated in the comb,
remove the comb from the appliance and blow
and/or shake the hair out of it.
Contouring without comb
You can use the appliance without comb to clip
hair very close to the skin (0.6mm) or to contour
the neckline and the area around the ears.
Be careful when you clip without comb because
the cutting element removes every hair it
touches.
1 Pull the comb off the appliance (Fig. 9).
2 Before you start to contour the hairline
around the ears, comb the hair ends over the
ears.
3 Tilt the appliance in such a way that only one
edge of the cutting element touches the hair
ends when you shape the contours around
the ears (Fig. 10).
-
-
-
-
,
-
-
-
-
-
Only cut the hair ends. The hairline should be close
to the ear.
4 To contour the neckline and sideburns,
turn the appliance and make downward
strokes (Fig. 11).
Move the appliance slowly and smoothly. Follow
the natural hairline.
Cleaning
Never use compressed air, scouring pads, abrasive
cleaning agents or aggressive liquids such as
petrol or acetone or ethereal oils to clean the
appliance.
Note: The appliance does not need any lubrication.
Clean the appliance every time you have used it.
1 Make sure the appliance is switched off and
disconnected from the mains.
2 Remove the comb from the appliance.
3 To remove the clipping attachment, turn
it anticlockwise until the open dot on the
handle is aligned with the arrow on the
attachment (1). Then lift the attachment off
the handle (2) (Fig. 12).
4 Push the centre top end of the cutting
element upwards with your thumb
until it opens and then pull it off the
appliance (Fig. 13).
Be careful that the cutting element does not fall on
the oor.
5 Clean the cutting element with warm water
(max. 40°C).
6 Clean the clipping attachment under warm
running water to ush out the cut hair that
has accumulated in the attachment (Fig. 14).
7 After cleaning, place the lug of the cutting
element in the slot of the clipping attachment
and push the cutting element back onto the
clipping attachment (Fig. 15).
8 Clean the handle and the adapter with the
cleaning brush supplied or a dry cloth.
Note: The handle and the adapter are not water-
proof.
9 Let the cutting element and the clipping
attachment dry completely before you
reassemble the appliance.
Note: Make sure the electrical contacts of the
clipping attachment are dry before you reattach the
attachment to the handle.
10 To attach the clipping attachment, put it on
the handle in such a way that the open dot
on the handle is aligned with the arrow on
the clipping attachment (1). Then turn the
clipping attachment clockwise until the arrow
is aligned with the solid dot on the handle
(2) (Fig. 16).
Replacement
If the adapter is damaged, always have it replaced
with one of the original type in order to avoid a
hazard.
Only replace a damaged or worn attachment
or comb with an original Philips replacement
attachment or comb.
Philips replacement parts (clipping attachment,
cutting element, combs, handle and adapter) are
available from your Philips dealer and authorised
Philips service centres.
If you have any difculties obtaining replacement
parts for the appliance, contact the Philips
Consumer Care Centre in your country (you nd
its phone number in the worldwide guarantee
leaet).
Environment
Do not throw away the appliance with the
normal household waste at the end of its life,
but hand it in at an ofcial collection point for
recycling. By doing this, you help to preserve
the environment (Fig. 17).
The built-in rechargeable batteries contain
substances that may pollute the environment.
Always remove the batteries before you
discard and hand in the appliance at an ofcial
collection point. Dispose of the batteries at
an ofcial collection point for batteries. If you
have trouble removing the batteries, you can
also take the appliance to a Philips service
centre. The staff of this centre will remove the
batteries for you and will dispose of them in an
environmentally safe way.
Removing the rechargeable batteries
Only remove the rechargeable batteries when
they are completely empty.
1 Disconnect the appliance from the mains and
let the appliance run until the motor stops.
2 Remove the comb from the appliance.
3 Remove the clipping attachment from the
handle.
4 Use a screwdriver to remove the screw from
the handle (Fig. 18).
5 Separate the two handle parts with your
hands (Fig. 19).
6 Lift the batteries out of the appliance (Fig. 20).
-
-
Συγχαρητήρια για την αγορά σας και καλώς
ήρθατε στη Philips! Για να επωφεληθείτε πλήρως
από την υποστήριξη που παρέχει η Philips,
καταχωρήστε το προϊόν σας στην ιστοσελίδα
www.philips.com/welcome.
Η νέα κουρευτική μηχανή της Philips σάς δίνει
τη δυνατότητα άνετων κουρεμάτων, ακόμη και
για τα πιο δύσκολα μαλλιά. Για να απολαύσετε
τη χρήση της κουρευτικής μηχανής, σας
συμβουλεύουμε να διαβάσετε τις παρακάτω
πληροφορίες.
A Στοιχείο κοπής
B Εξάρτημα κουρέματος
C Λυχνία φόρτισης
D Διακόπτης on/off
E Λαβή
F Υποδοχή βύσματος συσκευής
G Μεγάλη χτένα
H Μικρή χτένα
I Ενδείξεις ρυθμίσεων
J Χτένα για πολύ κοντά μαλλιά
K Επιλογέας ρυθμίσεων
L Βύσμα συσκευής
M Μετασχηματιστής
N Βουρτσάκι καθαρισμού
Διαβάστε αυτό το εγχειρίδιο χρήσης
προσεκτικά πριν χρησιμοποιήσετε τη συσκευή
και φυλάξτε το για μελλοντική αναφορά.
Φροντίστε να μην βραχεί ο
μετασχηματιστής.
Ελέγξτε εάν η τάση που αναγράφεται στο
μετασχηματιστή και στη συσκευή αντιστοιχεί
στην τοπική τάση ρεύματος προτού
συνδέσετε τη συσκευή.
Μην κόψετε το βύσμα του μετασχηματιστή
για να το αντικαταστήσετε με άλλο, καθώς
αυτό προκαλεί επικίνδυνες καταστάσεις.
Αυτή η συσκευή δεν προορίζεται για χρήση
από άτομα (συμπεριλαμβανομένων των
παιδιών) με περιορισμένες σωματικές,
αισθητήριες ή διανοητικές ικανότητες ή από
άτομα χωρίς εμπειρία και γνώση, εκτός
και εάν τη χρησιμοποιούν υπό επιτήρηση ή
έχουν λάβει οδηγίες σχετικά με τη χρήση
της συσκευής από άτομο υπεύθυνο για την
ασφάλειά τους.
Τα παιδιά θα πρέπει να επιβλέπονται
προκειμένου να διασφαλιστεί ότι δεν θα
παίζουν με τη συσκευή.
Αφαιρέστε το εξάρτημα κουρέματος από
τη λαβή πριν καθαρίσετε το εξάρτημα
κουρέματος στη βρύση.
Μην βυθίζετε ποτέ τη λαβή σε νερό ή
σε οποιοδήποτε άλλο υγρό, ούτε να την
ξεπλένετε στη βρύση.
Μην χρησιμοποιείτε τη συσκευή στην
μπανιέρα ή στο ντους.
Το εξάρτημα κουρέματος της συσκευής
συμμορφώνεται με τους διεθνώς
εγκεκριμένους κανονισμούς ασφαλείας IEC
και μπορεί με ασφάλεια να καθαριστεί με
νερό βρύσης (Εικ. 2).
Χρησιμοποιείτε, φορτίζετε και αποθηκεύετε
τη συσκευή σε θερμοκρασία μεταξύ 15°C και
35°C.
Χρησιμοποιείτε μόνο το
μετασχηματιστή που παρέχεται για να
φορτίσετε τη συσκευή.
Εάν ο μετασχηματιστής υποστεί βλάβη, θα
πρέπει να αντικατασταθεί μόνο με αυθεντικό
προς αποφυγή κινδύνου.
Μην χρησιμοποιείτε τη συσκευή όταν
το εξάρτημα κουρέματος ή κάποιος από
τους οδηγούς έχει φθαρεί ή σπάσει, καθώς
μπορεί να προκληθεί τραυματισμός.
Η συσκευή αυτή προορίζεται αποκλειστικά
για κούρεμα ανθρώπων και μόνο των
τριχών της κεφαλής. Μην τη χρησιμοποιείτε
για οποιονδήποτε άλλο σκοπό.
Η συγκεκριμένη συσκευή της Philips
συμμορφώνεται με όλα τα πρότυπα που
αφορούν τα ηλεκτρομαγνητικά πεδία (EMF). Εάν
γίνει σωστός χειρισμός και σύμφωνος με τις
οδηγίες του παρόντος εγχειριδίου χρήσης, η
συσκευή είναι ασφαλής στη χρήση βάσει των
επιστημονικών αποδείξεων που είναι διαθέσιμες
μέχρι σήμερα.
-
-
-
-
-
-
-
-
-
-
-
-
-
-
Φορτίστε τη συσκευή για τουλάχιστον 10 ώρες
πριν τη χρησιμοποιήσετε για πρώτη φορά ή
μετά από μεγάλο διάστημα μη χρήσης.
Όταν η συσκευή είναι πλήρως φορτισμένη,
επιτρέπει αυτονομία λειτουργίας έως και 35
λεπτά.
Μη φορτίζετε τη συσκευή περισσότερο από 24
ώρες.
1 Βεβαιωθείτε ότι η συσκευή είναι
απενεργοποιημένη.
2 Συνδέστε το βύσμα στην υποδοχή τής
συσκευής και το μετασχηματιστή στην
πρίζα (Εικ. 3).
3 Μετά από λίγα δευτερόλεπτα, η λυχνία
φόρτισης ανάβει υποδεικνύοντας ότι η
συσκευή φορτίζεται (Εικ. 4).
Σημείωση: Η λυχνία φόρτισης δεν αλλάζει
χρώμα και δεν σβήνει όταν η συσκευή φορτιστεί
πλήρως.
Για βελτιστοποίηση της διάρκειας ζωής των
μπαταριών, ακολουθήστε τις παρακάτω οδηγίες:
Μετά την πρώτη φόρτιση της συσκευής, μην
την επαναφορτίσετε μεταξύ των χρήσεων.
Συνεχίστε να τη χρησιμοποιείτε και
επαναφορτίστε τη μόνο όταν οι μπαταρίες
θα είναι σχεδόν άδειες.
Αποσυνδέστε το μετασχηματιστή από
την πρίζα όταν οι μπαταρίες φορτιστούν
πλήρως (το οποίο διαρκεί 10 ώρες).
Δύο φορές το χρόνο να αφήνετε το μοτέρ σε
λειτουργία μέχρι να σταματήσει προκειμένου
να αποφορτιστούν τελείως οι μπαταρίες.
Στη συνέχεια να επαναφορτίζετε πλήρως τις
μπαταρίες.
Σημείωση: Λειτουργείτε τη συσκευή με ρεύμα μόνο
όταν οι επαναφορτιζόμενες μπαταρίες είναι άδειες.
Σημείωση: Εάν οι μπαταρίες είναι εντελώς άδειες,
περιμένετε λίγα λεπτά πριν ενεργοποιήσετε τη
συσκευή.
1 Απενεργοποιήστε τη συσκευή.
2 Συνδέστε το βύσμα στη συσκευή και το
μετασχηματιστή στην πρίζα (Εικ. 3).
3 Μετά από λίγα δευτερόλεπτα,
ενεργοποιήστε τη συσκευή.
Χρησιμοποιείτε τη συσκευή μόνο σε καθαρά,
στεγνά μαλλιά. Μην την χρησιμοποιείτε σε
φρεσκολουσμένα μαλλιά.
1 Βεβαιωθείτε ότι το κεφάλι του ατόμου που
θα κουρέψετε βρίσκεται στο ίδιο ύψος
με το στήθος σας. Με αυτό τον τρόπο,
εξασφαλίζετε ότι όλα τα μέρη του κεφαλιού
του είναι ορατά και εύκολα προσβάσιμα.
2 Χτενίστε τα μαλλιά προς τη φορά των
τριχών (Εικ. 5).
Η συσκευή συνοδεύεται από τρεις χτένες για 15
διαφορετικά μήκη μαλλιών.
Το ελάχιστο μήκος μαλλιών που απομένει μετά
το κούρεμα είναι 1,6χιλ. και το μέγιστο είναι
41χιλ.
1 Επιλέξτε τη χτένα που θέλετε να
χρησιμοποιήσετε.
Στον πίνακα εμφανίζεται το μήκος των μαλλιών
μετά το κούρεμα στις διάφορες ρυθμίσεις της
μικρής και της μεγάλης χτένας.
Ρύθμιση Μήκος μαλλιών
μετά το κούρεμα
με τη μικρή
χτένα
Μήκος μαλλιών
μετά το κούρεμα
με τη μεγάλη
χτένα
1 3 χιλ. 23χιλ.
2 6 χιλ. 26χιλ.
3 9 χιλ. 29χιλ.
4 12 χιλ. 32χιλ.
5 15 χιλ. 35χιλ.
6 18 χιλ. 38χιλ.
7 21 χιλ. 41χιλ.
Συμβουλή: Σημειώστε κάπου τις ρυθμίσεις που
χρησιμοποιήσατε για να δημιουργήσετε ένα
συγκεκριμένο στυλ ως υπενθύμιση για μελλοντικά
κουρέματα.
Για να δημιουργήσετε μια εμφάνιση με
πολύ κοντά μαλλιά, κουρευτείτε αρχικά με
τη μικρή χτένα ρυθμισμένη στη ρύθμιση
1 (3χιλ.).
Στη συνέχεια, κουρευτείτε με τη χτένα για
πολύ κοντά μαλλιά, με την οποία θα έχετε
μήκος μαλλιών 1,6χιλ.
-
-
-
-
-
2 Σύρετε την επιλεγμένη χτένα στις εγκοπές-
οδηγούς και στις δύο πλευρές της λαβής
(‘κλικ’) (Εικ. 6).
3 Για να ρυθμίσετε τη χτένα στην
επιθυμητή ρύθμιση, πιέστε τον επιλογέα
ρυθμίσεων (1) και σύρετε τη χτένα
στην επιθυμητή ρύθμιση μήκους τριχών
(2) (Εικ. 7).
Οι ενδείξεις ρυθμίσεων επάνω στη χτένα
δείχνουν την επιλεγμένη ρύθμιση.
4 Ενεργοποιήστε τη συσκευή.
5 Μετακινήστε τη συσκευή αργά μέσα από
τις τρίχες.
Για να κουρευτείτε με τον πιο
αποτελεσματικό τρόπο, μετακινείτε τη
συσκευή αντίθετα από τη φορά των τριχών.
Επειδή δεν αναπτύσσονται όλες οι τρίχες
προς την ίδια κατεύθυνση, θα πρέπει να
μετακινείτε τη συσκευή προς διαφορετικές
κατευθύνσεις (προς τα επάνω, προς τα κάτω
ή κατά πλάτος) (Εικ. 8).
Βεβαιωθείτε ότι το επίπεδο τμήμα της
χτένας είναι πάντα σε πλήρη επαφή με
το κεφάλι προκειμένου να έχετε ένα
ομοιόμορφο αποτέλεσμα.
Κάντε επαναληπτικά περάσματα από το
κεφάλι για να εξασφαλίσετε ότι θα κόψετε
όλες τις τρίχες που πρέπει να κοπούν.
Για να επιτύχετε ένα καλό αποτέλεσμα
με τα κατσαρά, αραιά ή μακριά
μαλλιά, χρησιμοποιήστε μια χτένα για να
οδηγήσετε τα μαλλιά προς τη συσκευή.
6 Αφαιρείτε τακτικά τις κομμένες τρίχες από
τη χτένα.
Εάν έχουν συσσωρευτεί πολλές τρίχες
στη χτένα, αφαιρέστε τη χτένα από τη συσκευή
και φυσήξτε ή/και τινάξτε την ώστε να φύγουν
οι τρίχες.
Μπορείτε να χρησιμοποιήσετε τη συσκευή
χωρίς χτένα προκειμένου να κουρέψετε τα
μαλλιά σας πάρα πολύ κοντά (0,6χιλ.) ή να
διαμορφώσετε το περίγραμμα στο λαιμό και την
περιοχή γύρω από τα αυτιά.
Να είστε προσεκτικοί όταν κουρεύετε χωρίς
τη χτένα γιατί ο κόπτης κόβει κάθε τρίχα που
ακουμπά.
1 Τραβήξτε τη χτένα για να την αφαιρέσετε
από τη συσκευή (Εικ. 9).
2 Πριν ξεκινήσετε τη διαμόρφωση της
γραμμής των μαλλιών γύρω από τα αυτιά,
χτενίστε τις άκρες των μαλλιών πάνω από
τα αυτιά.
3 Κρατήστε τη συσκευή σε τέτοια κλίση,
ώστε μόνο ένα άκρο του κόπτη να ακουμπά
τις άκρες των μαλλιών όταν διαμορφώνετε
το περίγραμμα γύρω από τα αυτιά (Εικ. 10).
Κόψτε μόνο τις άκρες των μαλλιών. Η γραμμή
των μαλλιών θα πρέπει να είναι κοντά στα αυτιά.
4 Για να διαμορφώσετε το περίγραμμα στο
λαιμό και τις φαβορίτες, γυρίστε τη συσκευή
και κάντε κινήσεις προς τα κάτω (Εικ. 11).
Μετακινήστε τη συσκευή αργά και απαλά.
Ακολουθήστε τη φυσική γραμμή των μαλλιών.
Μην χρησιμοποιείτε ποτέ πεπιεσμένο
αέρα, συρμάτινα σφουγγαράκια, στιλβωτικά
καθαριστικά ή σκληρά υγρά όπως πετρέλαιο,
ασετόν ή αιθέρια έλαια για τον καθαρισμό της
συσκευής.
Σημείωση: Η συσκευή δεν χρειάζεται λίπανση.
Καθαρίστε τη συσκευή μετά από κάθε χρήση.
1 Βεβαιωθείτε ότι η συσκευή είναι
απενεργοποιημένη και αποσυνδεδεμένη
από την πρίζα.
2 Αφαιρέστε τη χτένα από τη συσκευή.
3 Για να αφαιρέσετε το εξάρτημα
κουρέματος, γυρίστε το αριστερόστροφα
μέχρι η ανοιχτή κουκκίδα στη λαβή να
ευθυγραμμιστεί με το βέλος στο εξάρτημα
(1). Στη συνέχεια, τραβήξτε το εξάρτημα
από τη λαβή (2) (Εικ. 12).
4 Πιέστε με τον αντίχειρά σας το άνω μεσαίο
άκρο του κόπτη προς τα επάνω μέχρι
να ανοίξει και μετά τραβήξτε το από τη
συσκευή (Εικ. 13).
Προσέχετε να μην σας πέσει ο κόπτης στο
δάπεδο.
5 Καθαρίστε τον κόπτη με ζεστό νερό
(μέγιστη θερμοκρασία 40°C).
6 Καθαρίστε το εξάρτημα κουρέματος
με ζεστό νερό βρύσης προκειμένου να
απομακρυνθούν οι κομμένες τρίχες που
συσσωρεύονται στο εξάρτημα (Εικ. 14).
7 Μετά τον καθαρισμό, τοποθετήστε
την προεξοχή του κόπτη στην εσοχή
του εξαρτήματος κουρέματος και
πιέστε τον κόπτη επάνω στο εξάρτημα
κουρέματος (Εικ. 15).
8 Καθαρίστε τη λαβή και το μετασχηματιστή
με το βουρτσάκι καθαρισμού που
παρέχεται ή με ένα στεγνό πανί.
Σημείωση: Η λαβή και ο μετασχηματιστής δεν είναι
,
-
-
-
-
-
αδιάβροχα.
9 Αφήστε τον κόπτη και το εξάρτημα
κουρέματος να στεγνώσουν εντελώς πριν
συναρμολογήσετε ξανά τη συσκευή.
Σημείωση: Βεβαιωθείτε ότι οι ηλεκτρικές επαφές
του εξαρτήματος κουρέματος είναι στεγνές πριν
επανατοποθετήσετε το εξάρτημα στη λαβή.
10 Για να προσαρτήσετε το
εξάρτημα κουρέματος, τοποθετήστε
το πάνω στη λαβή με τέτοιο τρόπο
ώστε η ανοιχτή κουκκίδα στη λαβή να
ευθυγραμμίζεται με το βέλος στο εξάρτημα
κουρέματος (1). Στη συνέχεια, γυρίστε το
εξάρτημα κουρέματος δεξιόστροφα μέχρι
το βέλος να ευθυγραμμιστεί με την κλειστή
κουκκίδα στη λαβή (2) (Εικ. 16).
Εάν ο μετασχηματιστής υποστεί βλάβη, θα
πρέπει να αντικατασταθεί μόνο με αυθεντικό
προς αποφυγή κινδύνου.
Αντικαθιστάτε ένα/μια κατεστραμμένο/η ή
φθαρμένο/η εξάρτημα ή χτένα μόνο με γνήσιο/α
εξάρτημα ή χτένα της Philips.
Ανταλλακτικά της Philips (εξάρτημα
κουρέματος, κόπτης, χτένες, λαβή και
μετασχηματιστής) διατίθενται από τον
αντιπρόσωπό σας της Philips και από
εξουσιοδοτημένα κέντρα σέρβις της Philips.
Εάν αντιμετωπίσετε δυσκολίες στην
ανεύρεση ανταλλακτικών για τη συσκευή,
επικοινωνήστε με το Κέντρο Εξυπηρέτησης
Καταναλωτών της Philips στη χώρα σας (θα
βρείτε το τηλέφωνο στο διεθνές φυλλάδιο
εγγύησης).
Στο τέλος της ζωής της συσκευής μην
την πετάξετε μαζί με τα συνηθισμένα
απορρίμματα του σπιτιού σας, αλλά
παραδώστε την σε ένα επίσημο σημείο
συλλογής για ανακύκλωση. Με αυτόν τον
τρόπο θα βοηθήσετε στην προστασία του
περιβάλλοντος (Εικ. 17).
Οι ενσωματωμένες επαναφορτιζόμενες
μπαταρίες περιέχουν ουσίες που ενδέχεται
να μολύνουν το περιβάλλον. Αφαιρείτε
πάντα τις μπαταρίες πριν απορρίψετε
τη συσκευή και την παραδώσετε σε ένα
επίσημο σημείο συλλογής. Απορρίψτε τις
μπαταρίες σε επίσημο σημείο συλλογής για
μπαταρίες. Αν αντιμετωπίσετε δυσκολίες
στην αφαίρεση των μπαταριών, μπορείτε
να αποταθείτε σε ένα εξουσιοδοτημένο
κέντρο σέρβις της Philips. Το προσωπικό
του κέντρου θα αφαιρέσει τις μπαταρίες και
θα τις απορρίψει με τρόπο ασφαλή για το
περιβάλλον.
Αφαιρείτε τις επαναφορτιζόμενες μπαταρίες
μόνο όταν είναι εντελώς άδειες.
1 Αποσυνδέστε τη συσκευή από την πρίζα
και αφήστε τη να λειτουργήσει μέχρι το
μοτέρ να σταματήσει.
2 Αφαιρέστε τη χτένα από τη συσκευή.
3 Αφαιρέστε το εξάρτημα κουρέματος από τη
λαβή.
4 Χρησιμοποιήστε ένα κατσαβίδι για να
αφαιρέσετε τη βίδα από τη λαβή (Εικ. 18).
5 Διαχωρίστε τα δύο μέρη της λαβής με τα
χέρια σας (Εικ. 19).
6 Αφαιρέστε τις μπαταρίες από τη
συσκευή (Εικ. 20).
7 Κόψτε τα καλώδια κοντά στις μπαταρίες με
ένα ψαλίδι (Εικ. 21).
Μην ξανασυνδέσετε τη συσκευή στην πρίζα
μετά την αφαίρεση των μπαταριών.
Εάν χρειάζεστε σέρβις ή πληροφορίες ή εάν
αντιμετωπίζετε κάποιο πρόβλημα, παρακαλούμε
επισκεφτείτε την ιστοσελίδα της Philips στη
διεύθυνση www.philips.com ή επικοινωνήστε
με το Κέντρο Εξυπηρέτησης Καταναλωτών της
Philips στη χώρα σας (θα βρείτε το τηλέφωνο
στο διεθνές φυλλάδιο εγγύησης). Εάν δεν
υπάρχει Κέντρο Εξυπηρέτησης Καταναλωτών
στη χώρα σας, απευθυνθείτε στον τοπικό
αντιπρόσωπό σας της Philips.
-
-
7 Cut the wires close to the batteries with a
pair of household scissors (Fig. 21).
Do not connect the appliance to the mains again
after you have removed the batteries.
If you need service or information or if you have a
problem, please visit the Philips website at
www.philips.com or contact the Philips Consumer
Care Centre in your country (you nd its phone
number in the worldwide guarantee leaet). If
there is no Consumer Care Centre in your country,
go to your local Philips dealer.
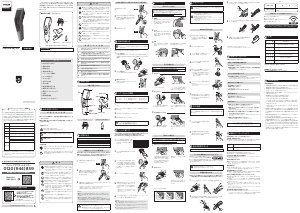
1
2 3 4
5 6 7
8 9
10
11
12 13
14
15 16
17
18
19
20 21


Praat mee over dit product
Laat hier weten wat jij vindt van de Philips QC5055 Tondeuse. Als je een vraag hebt, lees dan eerst zorgvuldig de handleiding door. Een handleiding aanvragen kan via ons contactformulier.