
Congratulations
on purchasing your new VTech product. Before
using this product, please read Important safety
instructions.
This manual has all the feature operations and
troubleshooting necessary to install and operate
your new VTech product. Please review this
manual thoroughly to ensure proper installation
and operation of this innovative and feature rich
VTech product.
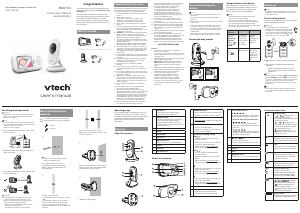
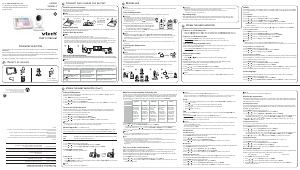
What’s in the box
Important safety instructions
When using your equipment, basic safety precautions
should always be followed to reduce the risk of fire,
electric shock and injury, including the following:
1. Follow all warnings and instructions marked on the
product.
2. Adult setup is required.
3. This product is intended as an aid. It is not a
substitute for responsible and proper adult
supervision and should not be used as such.
4. This product is not intended for use as a medical
monitor.
5. Do not use this product near water. For example,
do not use it next to a bath tub, wash bowl,
kitchen sink, laundry tub or swimming pool, or in a
wet basement or shower.
6. CAUTION: Use only the batteries provided. There
may be a risk of explosion if a wrong type of
battery is used for the parent unit. Do not dispose
of batteries in a fire. They may explode.
7. Use only the adapters included with this product.
Incorrect adapter polarity or voltage can seriously
damage the product.
Baby unit power adapter: Output: 6V DC 400mA
Parent unit power adapter: Output: 6V DC 400mA.
8. The power adapters are intended to be correctly
oriented in a vertical or floor mount position. The
prongs are not designed to hold the plug in place
if it is plugged into a ceiling, under-the-table or
cabinet outlet.
9. For pluggable equipment, the socket-outlet shall
be installed near the equipment and shall be easily
accessible.
10. Unplug this product from the wall outlet before
cleaning. Do not use liquid or aerosol cleaners.
Use a damp cloth for cleaning.
11. Unplug the power cords before replacing
batteries.
12. Do not cut off the power adapters to replace
them with other plugs, as this causes a hazardous
situation.
13. Do not allow anything to rest on the power cords.
Do not install this product where the cords may be
walked on or crimped.
14. This product should be operated only from the
type of power source indicated on the marking
label. If you are not sure of the type of power
supply in your home, consult your dealer or local
power company.
15. Do not overload wall outlets or use an extension
cord.
16. Do not place this product on an unstable table,
shelf, stand or other unstable surfaces.
17. This product should not be placed in any area
where proper ventilation is not provided. Slots and
openings in the back or bottom of this product
are provided for ventilation. To protect them from
overheating, these openings must not be blocked
by placing the product on a soft surface such as
a bed, sofa or rug. This product should never be
placed near or over a radiator or heat register.
18. Never push objects of any kind into this product
through the slots because they may touch
dangerous voltage points or create a short circuit.
Never spill liquid of any kind on the product.
19. To reduce the risk of electric shock, do not
disassemble this product, but take it to
an authorized service facility. Opening or
removing parts of the product other than
specified access doors may expose you to
dangerous voltages or other risks. Incorrect
reassembling can cause electric shock when the
product is subsequently used.
20. You should test the sound reception every
time you turn on the units or move one of the
components.
21. Periodically examine all components for damage.
22. Be aware of possible loss of privacy while using
public airwaves. Conversations may be picked
up by other nursery monitors, cordless phones,
scanners, etc.
23. Children should be supervised to ensure that they
do not play with the product.
24. The product is not intended for use by persons
(including children) with reduced physical, sensory
or mental capabilities, or lack of experience
and knowledge, unless they have been given
supervision or instruction concerning use of the
appliance by a person responsible for their safety.
SAVE THESE INSTRUCTIONS
Cautions
1. Use and store the product at a temperature
between 0
o
C and 40
o
C.
2. Do not expose the product to extreme cold, heat
or direct sunlight. Do not put the product close to
a heating source.
3. Batteries should not be exposed to excessive heat
such as bright sunshine or fire.
4. Warning—Strangulation Hazard—Children
have STRANGLED in cords. Keep this cord out
of the reach of children (more than 1 metre
away).
5. Never place the baby unit inside the baby’s cot or
playpen. Never cover the baby unit or parent unit
with anything such as a towel or a blanket.
6. Other electronic products may cause
interference with your baby monitor. Try
installing your baby monitor as far away
from these electronic devices as possible:
wireless routers, radios, cellular telephones,
intercoms, room monitors, televisions, personal
computers, kitchen appliances and cordless
telephones.
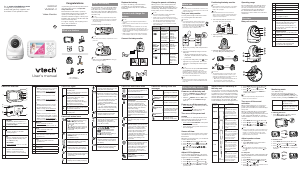
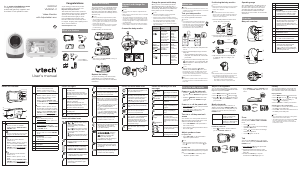
Connect and charge the
battery
NOTE
• The rechargeable battery is pre-installed in your
parent unit.
• Use only the power adapters supplied with this
product.
• Make sure the electrical outlets are not controlled by
wall switches.
• The power adapters are intended to be correctly
oriented in a vertical or floor mount position. The
prongs are not designed to hold the plug in place if
they are plugged into a ceiling, under-the-table or
cabinet outlet.
• Make sure the parent unit, the baby unit and the
power adapter cords are out of reach of children.
Connect the baby monitor
Charge the parent unit battery
When you have connected and turned on
the parent unit, the battery will be charged
automatically. The battery icon indicates the
battery status (see the following table).
NOTE
• The parent unit battery is fully charged after
11 hours of continuous charging.
• It takes longer to charge the battery when the
parent unit is turned on. To shorten the charging
time, turn the parent unit off while charging.
• The standby time varies depending on the volume
level you set and your actual use.
Battery
indicators
Battery status
Action
The screen
displays
Battery low
at Parent
Unit. The
or light
flashes.
The battery
has very little
charge and
may be used
for only a
short time.
Charge
without
interruption
(about 30
minutes).
The battery
icon
becomes
solid .
The battery is
fully charged.
To keep
the battery
charged,
connect it to
AC power
when not in
use.
Before use
• This baby monitor is intended as an aid. It is not a
substitute for proper adult supervision, and should
not be used as such.
Test your baby monitor
You may test the baby monitor before initial use,
and at regular times thereafter.
• For hearing protection, make sure the
parent unit is more than 1 metre away from
the baby unit. If you hear any high-pitched
noise, move the parent unit further until the
noise stops. You can also press VOL on the
parent unit to lower or mute the noise.
1. Make sure your baby unit and parent unit are
on.
2. The parent unit displays images from the
baby unit.
• Speak towards the microphone of the
baby unit. You will hear the sound at the
parent unit.
• When the parent unit displays No link to Camera,
and the POWER LED light flashes, move the parent
unit closer to the baby units (observe the minimum
distance of 1 metre). You can also check if the
baby unit is connected to a live power socket and
switched on.
• Increase the speaker volume of the parent unit if
you cannot hear the sounds transmitted from the
baby units.
Positioning the baby monitor
• Keep the baby unit out of the reach of your baby.
Never place or mount the baby unit inside the
baby’s cot or playpen.
• To avoid interference from other electronic devices,
place your baby monitor far away from devices such
as wireless routers, microwaves,
cell phones and computers.
1. Place the baby unit more than 1 metre away
from your baby.
2. Adjust the angle of the baby unit camera to
aim at your baby.
3. Place the parent unit more than 1 metre away
from the baby unit.
• The default volume of your parent unit is level
3, and the maximum volume is level 5. If you
experience high-pitched screeching noise from
your baby monitor while positioning:
- Make sure your baby unit and parent unit are
more than 1 metre apart, OR
- Turn down the volume of your parent unit.
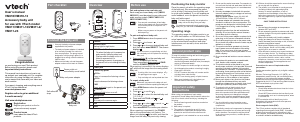
Mount the baby monitor
(optional)
You will need to purchase the following
items separately to mount your baby unit:
2 screws
2 anchors
Operating range
The operating range of the baby monitor is up
to 300 metres outdoors or 50 metres indoors.
The actual operating range may vary depending
on the environmental conditions and other
interferences such as walls, doors and other
obstructions.
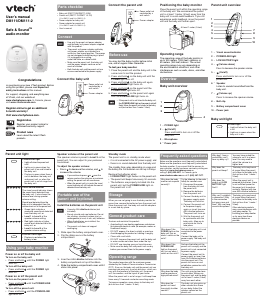
Overview
Baby unit overview
1
PAIR button
• Your baby unit and parent unit
provided are already paired.
2
POWER LED light
• On when the baby unit is turned on
and is paired to the parent unit.
• Flashes when the baby unit is not
being viewed; or when the link to the
parent unit is lost.
3 Microphone
4 Camera
5 Infrared LEDs
6 Light sensor
7
ON/OFF switch
• Slide to turn on or off the baby unit.
8 Speaker
9 Power jack
10 Wall mount holes
Parent unit overview
1
POWER LED light
• Green when the parent is powered on.
• Flashes green when no link to camera.
2 TALK
• Press and hold to talk to the baby unit.
3 MENU/SELECT
• Press to enter the menu.
• While in a menu, press to choose an
item, or save a setting.
4
Arrow keys and VOL / VOL
VOL
/
• Press to increase the parent unit
speaker volume.
• While in a menu, press to scroll up, or
to enter an item’s sub-menu.
• While zooming, press and hold to
move the zoomed image upward
VOL /
• Press to decrease the parent unit
speaker volume.
• While in a submenu, press to scroll
down.
• While zooming, press and hold to
move the zoomed image downward.
• While in a menu, press to choose the
next item on the left.
• While zooming, press and hold to
move the zoomed image leftward.
• While in a menu, press to choose the
next item on the right.
• While zooming, press and hold to
move the zoomed image rightward.
5 Microphone
6 Battery indicator
• Red when battery is charging.
• Flashes red when battery is low.
7
Visual sound indicators
The visual sound indicators can show the
sound level detected by the baby unit.
Sound level detected by the baby unit
•
One to three green lights indicate a
moderate sound level detected by the
baby unit.
•
Additional red lights indicate a higher
sound level detected by the baby unit
(e.g. baby crying loudly).
8
Zoom / Back
• Press to zoom in or out.
• Press to return to the previous screen.
9 LCD display
10 Speaker
11 Stand
12
ON/OFF switch
• Slide to turn on or off the parent unit.
13 Power jack
Parent unit status icons
Connection status
•
or displays when
strong signal strength is
detected between the baby unit
and the parent unit.
• or
or displays when
moderate or low signal strength
is detected between the baby
unit and the parent unit.
• displays when the link
between the baby unit and the
parent unit is lost.
Current view status
• Displays camera when baby unit
successfully linked to parent unit.
Zoom
• Displays when the current image
on the parent unit has zoomed
in.
Night vision
• Displays when the baby unit
being viewed has activated the
night vision feature.
Mute alert
• Displays when the parent unit
speaker volume is set to off.
or
Real-time temperature
• Displays the real-time
temperature detected by the
baby unit in Fahrenheit (
o
F) or
Celsius (
o
C) (e.g. 57
o
F or 14
o
C).
Battery status
• animates
when the battery is charging.
• displays solid when the
battery is fully charged.
• displays when the battery is
low and needs charging.
Speaker volume
• Displays the parent unit speaker
volume level while adjusting.
User’s manual
BM2700
Full Colour Video &
Audio Monitor
For product support please call:
1300 369 193
10
1
3
4
5
2
6
8
9
7
Use a pencil to mark two holes in
parallel. Make sure they are the same
distance apart as the wall mount holes
on the baby unit.
Check for reception strength and camera
angle before drilling the holes.
•
Drill two holes in the wall.
If you drill the holes into a stud, go to step 3.
-OR-
If you drill the holes into an object other
than a stud, insert the wall anchors into
the holes. Tap gently on the ends with a
hammer until the wall anchors are flush with
Insert the screws into the holes and
tighten the screws until only 1/4 inch of the
screws are exposed.
Align the wall mount holes on the baby unit
with the screws on the wall. Slide the baby
unit down until it locks into place.
Adjust the camera angle.
2
3
4
7
8
9
5
6
1
10
13
12
11
<1 metre
>1 metre
> 1 metre


Praat mee over dit product
Laat hier weten wat jij vindt van de Vtech BM2700 Babyfoon. Als je een vraag hebt, lees dan eerst zorgvuldig de handleiding door. Een handleiding aanvragen kan via ons contactformulier.
beantwoord | Ik vind dit nuttig (2) (Vertaald door Google)
beantwoord | Ik vind dit nuttig (0) (Vertaald door Google)