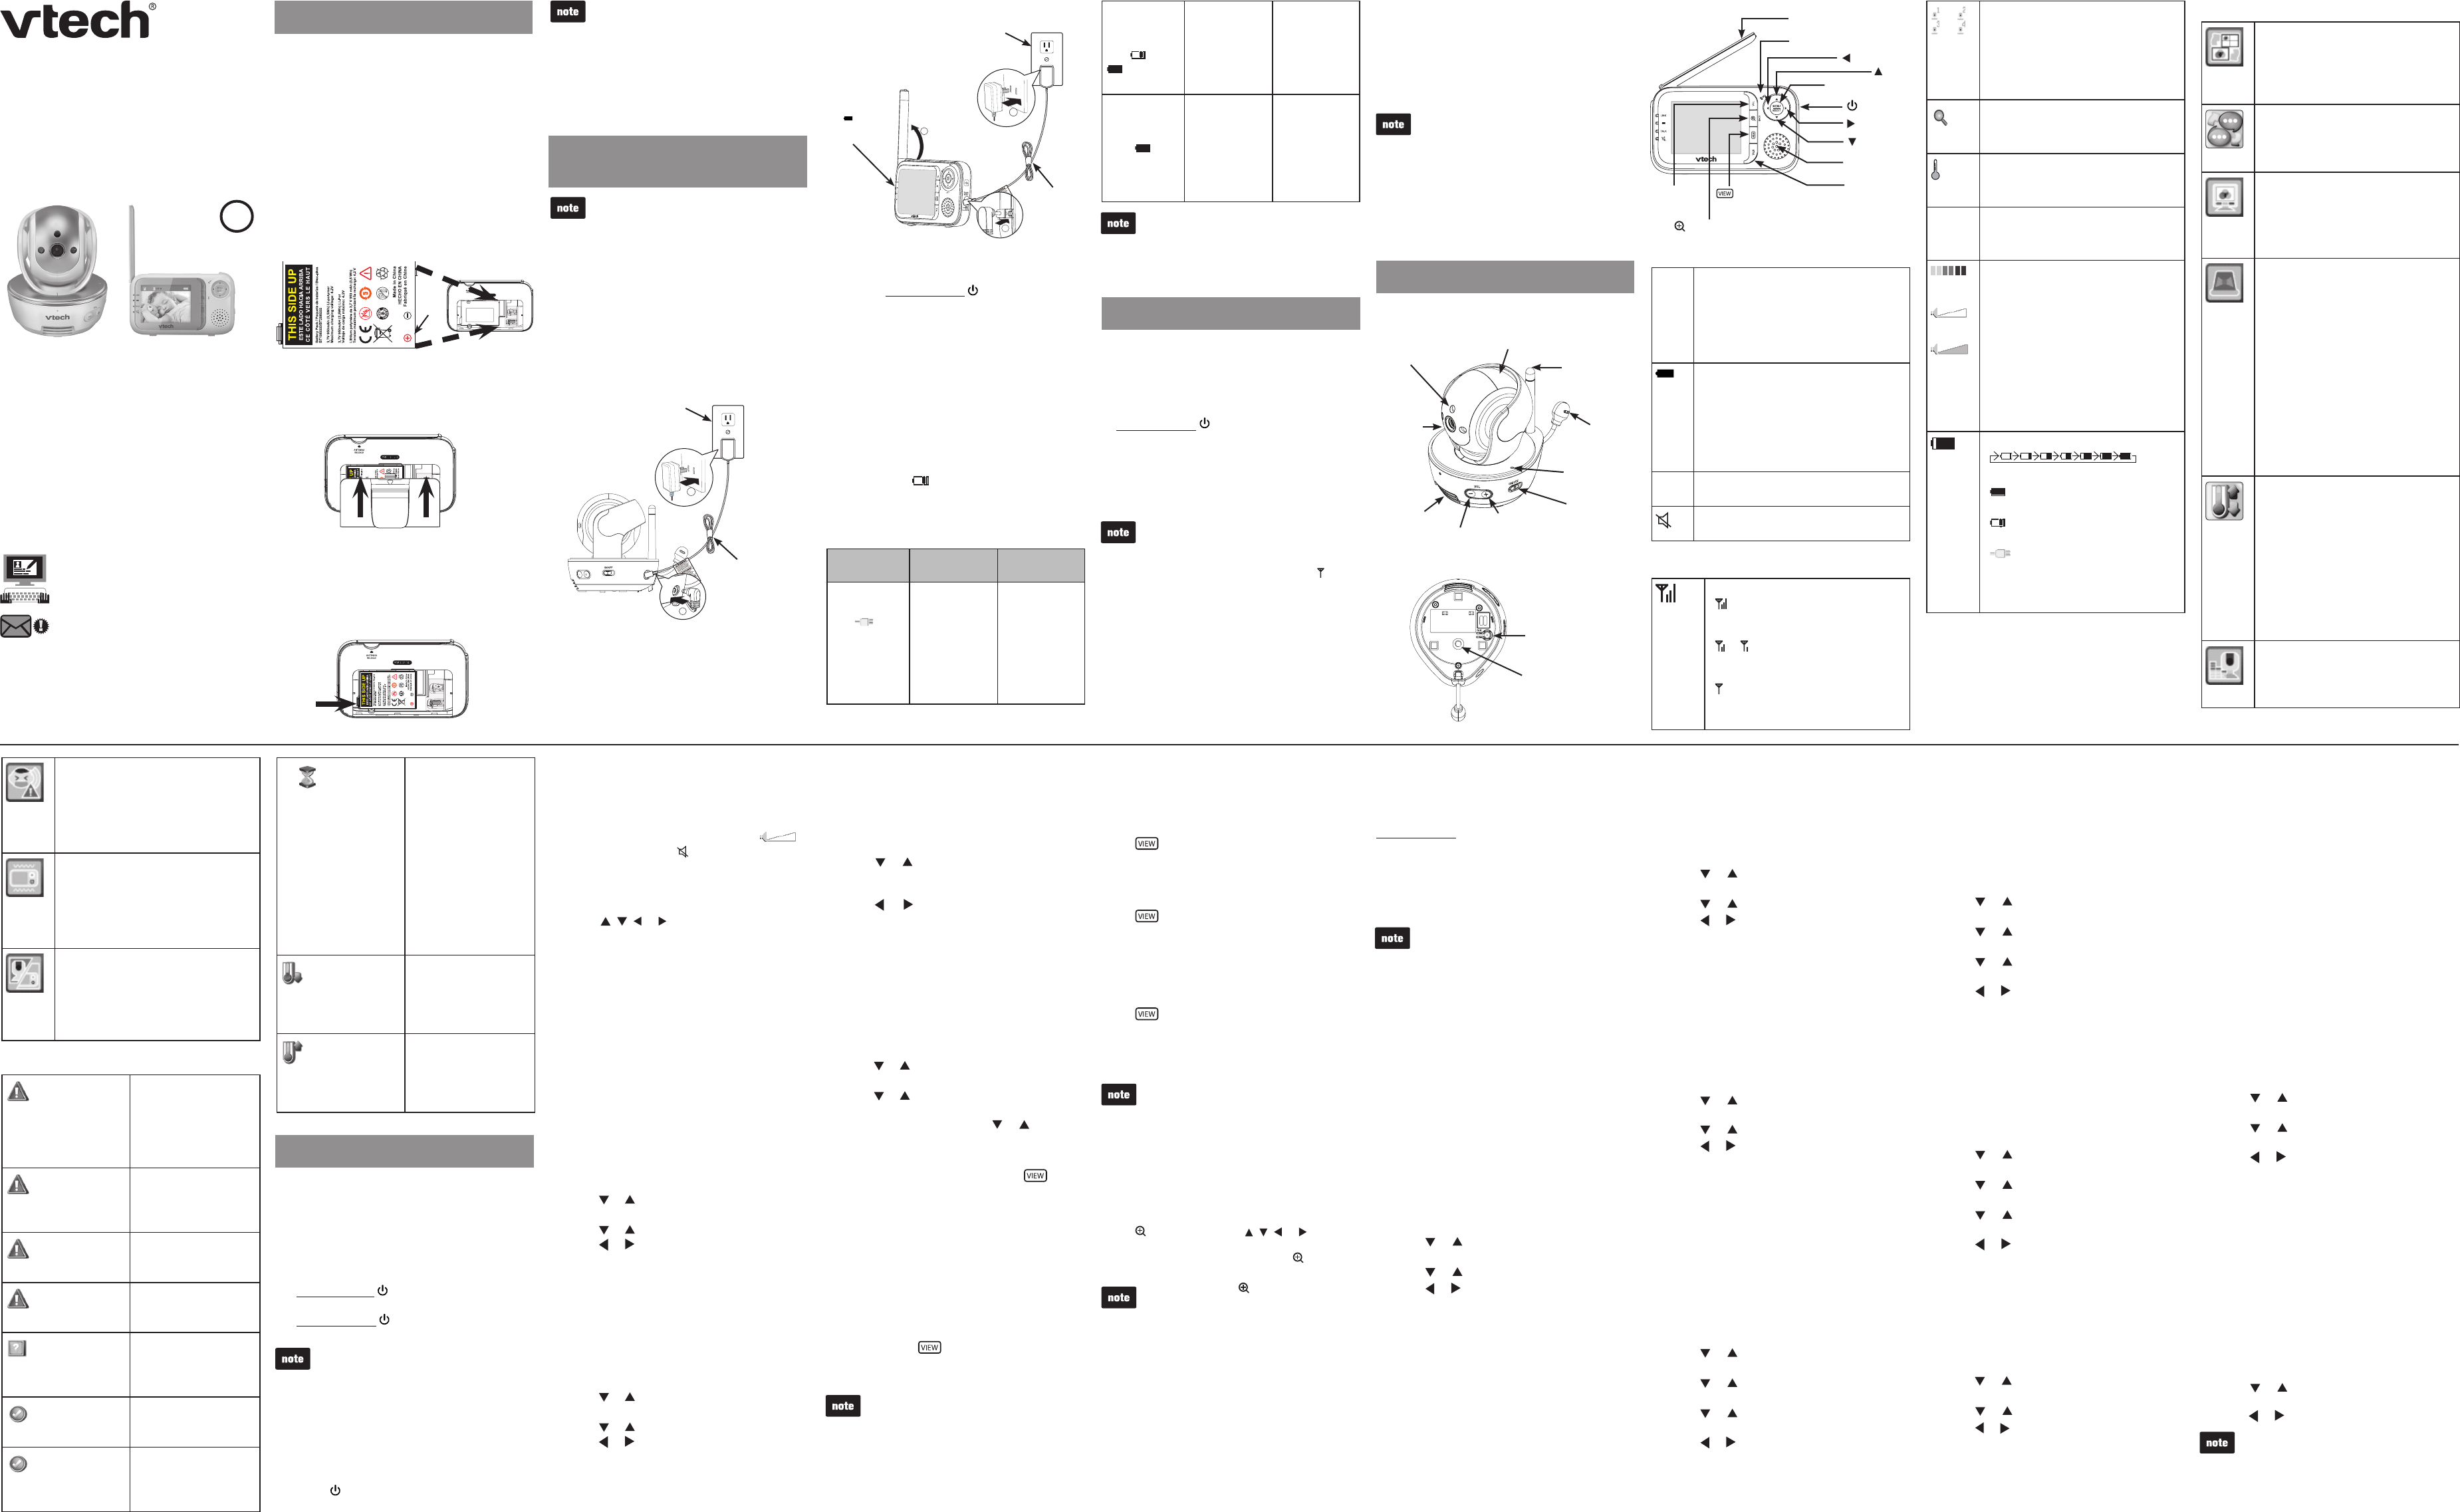
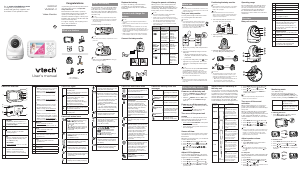
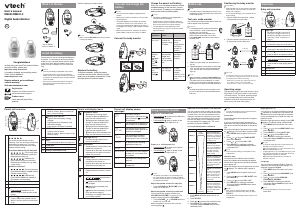
User’s manual
VM333/VM333-2/VM303
Safe & Sound
TM
Pan & Tilt Full Color
Video monitor
Congratulations
on purchasing your new VTech product. Before
using this product, please read Important
safety instructions below.
For support, shopping, and everything new at
VTech, visit our website at
www.vtechphones.com.
Register online to get an additional
3-month warranty!
Visit www.vtechphones.com.
Registration
Register your product online for
enhanced warranty support.
Product news
Learn about the latest VTech
products.
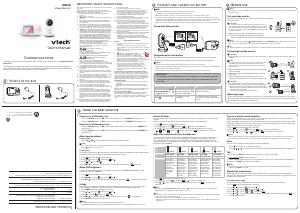
You can power up the parent unit by connecting
it to AC power or to the rechargeable battery
provided. Even if the parent unit is connected to
AC power, we recommend you also install the
battery. This guarantees continual operation in
case of a power outage.
Install the battery as shown below.
With the label THIS SIDE UP facing up,
insert the small tabs of the battery into
the slots inside the battery compartment.
Make sure the metallic contact is correctly
oriented as shown below. Push the battery
into the battery compartment until it clicks
securely into place.
Align the battery compartment cover flat
against the battery compartment, then slide
it towards the center of the parent unit until it
clicks into place.
Replace the battery
To replace the battery, press down on the large
tab of the battery and pull it out of the battery
compartment, then follow the steps above to
install the battery.
1.
2.
The operating time for using the
rechargeable battery is short. If you want
to monitor your baby for a long time, we
recommend you connect the parent unit to
AC power.
If the parent unit will not be used for a long
time, disconnect and remove the battery to
prevent possible leakage.
Use only the battery supplied with this
product.
Use only the parent unit power adapter or
the baby unit power adapter supplied with
this product.
The parent unit power adapter and baby
unit power adapter are intended to be
correctly oriented in a vertical or floor mount
position. The prongs are not designed to
hold the plug in place if it is plugged into a
ceiling, under-the-table or cabinet outlet.
Make sure the parent unit, the baby unit
and the power adapter cord are out of reach
of children.
Connect the baby unit
•
•
•
•
•
•
Connect the parent unit
Charge the parent unit battery
Once you have installed the parent unit and
its battery, press and hold to turn it on. The
battery icon indicates the battery status (see
the table below). The parent unit battery is fully
charged after 12 hours of continuous charging.
The standby time varies depending on the
sensitivity level you set, your actual use and the
age of the battery.
When the parent unit is operating in battery
mode and the battery is low, you need to charge
the parent unit without interruption for at least
30 minutes to give the parent unit enough
charge to use for a short time. When operating
in low battery condition, the parent unit displays
Battery low and . The parent unit plays short
beeps to alert you.
The following table summarizes the battery
charge indicators and actions to take.
Battery
indicators
Battery
status
Action
The battery
icon is off
and
displays.
No battery
is installed
but operates
using AC
power, or the
battery has
been installed
incorrectly.
Install the
parent unit
battery.
Charge
without
interruption
(at least 30
minutes).
The screen
displays
Battery low
and . The
light
flashes.
The battery
has very little
charge and
may be used
for only a
short time.
Charge
without
interruption
(about 30
minutes).
The battery
icon
becomes
solid .
The battery is
fully charged.
To keep
the battery
charged,
connect it to
AC power
when not in
use.
When you charge the battery initially or it is
not used for a long period of time, charge it
for 12 hours continuously. It takes longer to
charge the battery when the parent unit is
turned on. To shorten the charging time, turn
the parent unit off while charging.
You may test the baby monitor before initial use,
and at regular times thereafter.
To test your baby monitor:
Place the parent unit and the baby unit in the
same room to test the product.
Press and hold on the parent unit the
screen displays Please Wait....
Slide ON/OFF on the baby unit to turn it on.
If the parent unit displays an image from the
baby unit. Your baby monitor is now ready
for use.
Make sure the baby unit is at least 3 feet
away from the parent unit.
If both units are not connected, the parent
unit displays No Link for a few seconds.
Then it displays Please Wait... and
flashes.
1.
2.
3.
4.
•
•
Positioning the baby monitor
Place the parent unit within the operating range
of the baby unit. We recommend the parent
unit is at least 3 feet away from the baby unit
to avoid audio feedback. If you still experience
audio feedback, move the parent unit and the
baby unit farther apart.
For better image quality, do not place the
baby unit too far away from your baby.
Operating range
The operating range of the baby monitor is up
to 1,000 feet outdoors or 150 feet indoors. The
actual operating range may vary depending on the
environmental conditions and other interferences
such as walls, doors and other obstructions.
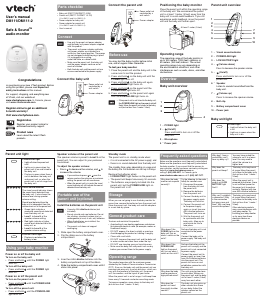
Baby unit overview
Parent unit overview
Parent unit lights
LINK
On when strong signal strength is
detected between the parent unit and
the selected baby unit.
Flashes when the parent unit cannot
link to the selected baby unit.
Off when the parent unit is turned off.
On when the parent unit battery is
being charged.
Flashes when the parent unit battery
is low and needs charging.
Off when the parent unit battery is
fully charged, or when no battery is
installed.
TALK
On when the parent unit is talking to
the baby unit.
On when the speaker volume of the
parent unit is turned off.
Parent unit display icons
Connection status
- displays when strong signal
strength is detected between the
baby unit and the parent unit.
- or displays when moderate signal
strength is detected between the
baby unit and the parent unit.
- displays when the link between the
baby unit and the parent unit
is lost.
or or
or
Current view status
- Displays the number of the baby unit
that is being viewed when in Single
Baby unit.
- Displays the highlighted baby unit
when in Patrol Mode.
Zoom
- Displays when the camera at the
baby unit has zoomed in.
Temperature alert
- Displays when the temperature alert
is set to on.
57
o
F Real-time temperature
- Displays the real-time temperature of
the selected baby unit.
or
or
Sound level indicators
-
Displays the sound level according to
the scales of loudness when there is
sound transmitted from the baby unit.
Speaker volume
- Displays the speaker volume of the
parent unit is turned off.
Speaker volume
- Displays the speaker volume level
while adjusting.
Battery status
-
animates when the battery is charging.
- displays solid when the battery is
fully charged.
- displays when the battery is low
and needs charging.
- displays when no battery is
installed but operates using AC
power, or the battery has been
installed incorrectly.
Parent unit main menu icons
Monitoring mode
You can choose to monitor in Single
Baby unit, Split Baby unit or Patrol
Mode if there are more than one
baby units in your system.
Language
You can select a language (English,
French or Spanish) to be used in all
screen displays.
Display
- You can change the brightness of the
parent unit screen.
- You can change the contrast of the
parent unit screen.
Alert tone
- You can set whether the parent
unit beeps whenever the parent unit
operates in low battery condition.
- You can set whether the parent unit
beeps whenever the link between the
parent unit and the baby unit is lost.
- You may turn on the sound alert so
that the parent unit beeps as soon
as the baby unit detects sounds
which light up four sound level
indicators on the parent unit when
the parent unit volume is turned off
manually.
Temperature
- You can set the desired minimum
room temperature of the baby unit.
- You can set the desired maximum
room temperature of the baby unit.
- You can set whether the parent unit
beeps whenever the temperature is out
of the preset temperature range.
-You can set the temperature scale of
the baby unit.
Sensitivity
- You can use the parent unit to
change the sound sensitivity level
of the baby units.
Install the battery
Connect and charge the
battery
Metallic
contact
PAIR
Threaded socket
Sound activation
- You can set the screen to be turned
on automatically whenever there
are sounds detected from the baby
units when the parent unit screen is
turned off manually.
Vibration
- You may turn on the vibration alert
so that the parent unit vibrates as
soon as the baby unit detects sounds
which light up three sound level
indicators on the parent unit.
Pair/unpair
- The baby units and parent unit
provided are already paired. You can
add or replace baby units (VM303,
purchased separately) to your baby
monitor system.
Parent unit display messages
Battery low
When the parent unit
is powered by the
rechargeable battery
and the battery level
is low, it needs to be
recharged.
Failed to connect
The parent unit fails to
switch to the next baby
unit in Single Baby
unit or Patrol Mode.
No Link
The selected baby unit
slot is not linked to the
parent unit.
Pairing failed
The selected baby unit
cannot be paired with
the parent unit.
Conrm to unpair?
You try to unpair the
baby unit(s). The
operation needs your
confirmation.
Pairing completed
The selected baby unit
has been paired with
the parent unit.
Unpairing completed
The selected baby
unit(s) has been
unpaired with the
parent unit.
Please Wait...
The link between the
parent unit and the
selected baby unit is
lost, or the selected
baby unit is out of
range, or the selected
baby unit slot is empty.
When you have only
one paired baby unit
and the link is lost,
or you have multiple
paired baby units and
the links are lost.
Temperature too low
The temperature
detected from the
selected baby unit is
below the set minimum
temperature.
Temperature too high
The temperature
detected from the
selected baby unit
is above the set
maximum temperature.
Power on or off the baby unit
Slide ON/OFF to the left to turn on the baby
unit. The ON/OFF LED light turns on.
Slide ON/OFF to the right to turn off the baby
unit. The ON/OFF LED light turns off.
Power on or off the parent unit
Press and hold to turn on the parent unit.
The LINK light turns on.
Press and hold again to turn off the
parent unit. The LINK light turns off.
The LINK light flashes when the parent
unit cannot link to the selected baby
unit.
Turn on or off the parent unit
screen
You can turn on or off the parent unit screen
without powering off the parent unit. You can still
hear sound from the baby unit.
Press on the parent unit at any time.
•
•
•
•
•
Adjust speaker volume for parent
unit
You can change the speaker volume from
Volume 1 to Volume 5, or turn it off.
When the speaker volume is set to off,
appears briefly and the light turns on.
To adjust the speaker volume:
Press VOL when the parent unit is not
in use.
Press , , or to adjust the speaker
volume.
Adjust speaker volume for baby
unit
You can change the speaker volume.
To adjust the speaker volume:
Press
+
or
-
on the baby unit at any time.
Adjust display
LCD brightness
You can change the brightness of the parent unit
screen from Level 1 to Level 5.
To set the brightness of the parent unit screen:
Press MENU/SELECT when the parent unit is
not in use.
Press or to choose DISPLAY, then press
MENU/SELECT to select.
Press or to choose Brightness.
Press or to choose the desired level of
brightness, then press MENU/SELECT to
confirm your selection.
LCD contrast
You can change the contrast of the parent unit
screen from Level 1 to Level 5.
To set the contrast of the parent unit screen:
Press MENU/SELECT when the parent unit is
not in use.
Press or to choose DISPLAY, then press
MENU/SELECT to select.
Press or to choose Contrast.
Press or to choose the desired level
of contrast, then press MENU/SELECT to
confirm your selection.
1.
2.
1.
2.
3.
4.
1.
2.
3.
4.
Set the language
You can select a language (English, French or
Spanish) to be used in all screen displays.
To change the language:
Press MENU/SELECT when the parent unit is
not in use.
Press or to choose LANGUAGE
(Langue if French is set, or Idioma if
Spanish is set).
Press or to choose English, Français
or Español.
Monitoring mode
You can choose to monitor in Single Baby
unit, Split Baby unit or Patrol Mode if there
are more than one baby units in your system.
To change the monitoring mode:
Press MENU/SELECT when the parent unit is
not in use.
Press or to choose MONITORING
MODE, then press MENU/SELECT to select.
Press or to choose Single Baby unit,
Split Baby unit or Patrol Mode.
Single Baby unit - Press or to
choose a desired baby unit. The parent
unit only displays image of one baby unit.
You may change to view images from
different baby units by pressing in this
mode.
Split Baby unit - The parent unit displays
multiple baby unit images in a maximum of
four in one screen. If there are more than
four baby units in your system, images
will be shown on two split screens, which
alternates with each other automatically.
Patrol Mode - The parent unit patrols to
display images from different baby units
in every 7 seconds. You may change to
view images from different baby units even
though the scanning period is not expired
by pressing in this mode.
Press MENU/SELECT to confirm your
selection.
Monitoring mode is not applicable when
there is only one baby unit.
1.
2.
3.
1.
2.
3.
•
•
•
4.
View
You can change the screen to view images from
different baby units.
To view different baby units while in Single
Baby unit:
Press repeatedly to switch to the desired
baby unit. The switching is in chronological
order: Baby unit 1 to Baby unit 4.
To view different baby units while in Split
Baby unit:
Press repeatedly to enlarge and switch
to the desired baby unit. The switching is in
chronological order: Baby unit 1 to Baby unit
4. The Split Baby unit mode resumes after
a while.
To view different baby units while in Patrol
mode:
Press repeatedly to switch to the desired
baby unit even if the scanning period on
a particular baby unit is not expired. The
switching is in chronological order: Baby unit 1
to Baby unit 4.
If the switching fails, the screen displays
Failed to connect. Try the switching
again.
Zoom
You can zoom in or out while viewing image
from baby unit in Single Baby unit and
Patrol mode.
To zoom in or out:
Press to zoom in. Press , , or to move
the zoomed image upward, downward, leftward
or rightward correspondingly. Press again to
zoom out.
In Split Baby unit, is not available.
Talk to the baby unit
You can broadcast messages from the parent
unit to any one of the baby units.
To talk to the baby unit:
Press and hold TALK when the parent unit is
in Single Baby unit or viewing particular baby
unit in Patrol Mode. Speak towards the MIC
(microphone) on the parent unit. The TALK light
is on when the voice connection to the baby unit
is made. Your voice is broadcast to the baby
unit. Release the key to stop the broadcast.
The TALK feature does not work in Split
Baby unit.
Night vision
To help you monitor your baby even at night,
the baby unit automatically uses the light from
its infrared LEDs for transmitting images to the
parent unit when it is turned on in a dark room.
However, it only transmits black-and-white
images.
Set the alert tone
Low battery tone alert
You can set whether the parent unit beeps
whenever the parent unit operates in low battery
condition.
To set the low battery tone alert:
Press MENU/SELECT when the parent unit is
not in use.
Press or to choose ALERT TONE, then
press MENU/SELECT to select.
Press or choose Low Battery Tone.
Press or to choose On or Off, then press
MENU/SELECT to confirm your selection.
1.
2.
3.
4.
No link alert
You can set whether the parent unit beeps
whenever the link between the parent unit and
the baby unit is lost.
To set the no link alert of the parent unit:
Press MENU/SELECT when the parent unit is
not in use.
Press or to choose ALERT TONE, then
press MENU/SELECT to select.
Press or to choose No Link Alert.
Press or to choose On or Off, then press
MENU/SELECT to confirm your selection.
Sound Alert
When the parent unit volume is turned off
manually, you may turn on the sound alert so
that the parent unit beeps as soon as the baby
unit detects sounds which light up four sound
level indicators on the parent unit.
To set the sound alert of the baby unit:
Press MENU/SELECT when the parent unit is
not in use.
Press or to choose ALERT TONE, then
press MENU/SELECT to select.
Press or to choose Sound Alert.
Press or to choose On or Off, then press
MENU/SELECT to confirm your selection.
Monitor the temperature
Minimum temperature
You can set the desired minimum room
temperature of the baby unit. The minimum
temperature can be set between 52
o
F (11
o
C)
and 69
o
F (20
o
C).
To set the minimum temperature of the baby
unit:
Press MENU/SELECT when the parent unit is
not in use.
Press or to choose TEMPERATURE,
then press MENU/SELECT to select.
Press or to choose Minimum, then
press MENU/SELECT to select.
Press or to choose a desired baby unit
or all baby units.
Press or to choose the desired
temperature, then press MENU/SELECT to
confirm your selection.
1.
2.
3.
4.
1.
2.
3.
4.
1.
2.
3.
4.
5.
Maximum temperature
You can set the desired maximum room
temperature of the baby unit. The maximum
temperature can be set between 70
o
F (21
o
C)
and 86
o
F (30
o
C).
To set the maximum temperature of the baby
unit:
Press MENU/SELECT when the parent unit is
not in use.
Press or to choose TEMPERATURE,
then press MENU/SELECT to select.
Press or to choose Maximum, then
press MENU/SELECT to select.
Press or to choose a desired baby unit
or all baby units.
Press or to choose the desired
temperature, then press MENU/SELECT to
confirm your selection.
Temperature alert
You can set whether the parent unit beeps
whenever the temperature is out of the preset
temperature range.
To set the temperature alert of the baby unit:
Press MENU/SELECT when the parent unit is
not in use.
Press or to choose TEMPERATURE,
then press MENU/SELECT to select.
Press or to choose Alert, then press
MENU/SELECT to select.
Press or to choose a desired baby unit
or all baby units.
Press or to choose On or Off, then press
MENU/SELECT to confirm your selection.
Temperature format
You can set the temperature scale of the baby
unit.
To change the temperature scale:
Press MENU/SELECT when the parent unit is
not in use.
Press or to choose TEMPERATURE,
then press MENU/SELECT to select.
Press or to choose Format.
Press or to choose
o
F or
o
C, then press
MENU/SELECT to confirm your selection.
1.
2.
3.
4.
5.
1.
2.
3.
4.
5.
1.
2.
3.
4.
Adjust the sound sensitivity
You can use the parent unit to change the
sound sensitivity level of the baby units from
Level 1 to
Level 5. The higher the sound sensitivity level
is set, the more sensitive the baby unit is in
detecting sounds for transmitting to the parent
unit.
If you want the baby unit to be very sensitive in
detecting sounds, you may set the sensitivity
level to Level 5, so that the baby unit will always
detect any sounds including background noises
for transmitting to the parent unit. If you want
the baby unit to be less sensitive in detecting
sounds, you may set the sensitivity level to a
lower level (Level 1 to Level 4), so that the baby
unit will transmit sounds to the parent unit only
when your baby is very noisy or crying loudly.
To set the sound sensitivity level of the baby
unit:
Press MENU/SELECT when the parent unit is
not in use.
Press or to choose SENSITIVITY, then
press MENU/SELECT to select.
Press or to choose a desired baby unit
or all baby units.
Press or to choose the desired
sensitivity level, then press MENU/SELECT to
confirm your selection.
Sound Activation
When the parent unit screen is turned off
manually, you can set the screen to be turned
on automatically whenever there are sounds
detected from the baby units. The parent unit
screen will turn off automatically when no
sounds are detected from the baby units within
50 seconds.
To turn the sound activation on or off:
Press MENU/SELECT when the parent unit is
not in use.
Press or to choose
SOUND ACTIVATION.
Press or to choose On or Off.
If you set the sensitivity level to Level 5, the
baby unit will be very sensitive and detect
any sounds including background noises.
These background noises may disrupt the
silence and prevent the sound activation
feature to work properly.
1.
2.
3.
4.
1.
2.
3.
Before use
Using the baby monitor
Overview
Rotatable camera head
Antenna
Temperature
sensor
ON/OFF
Camera
Light sensor
Speaker
+ (Volume up)
- (Volume down)
ON/OFF LED
light
The bar
keeps scrolling
until charging is
completed
Self-adhesive
strap
Power outlet not
controlled by a
wall switch
Bundle the power cord
Power outlet not
controlled by a
wall switch
BC
Antenna
MIC (Microphone)
(Left)
(Up)
(On/off)
(Right)
(Down)
Speaker
VOL
(Volume)
(Zoom)/BACK
(View)
MENU/SELECT
TALK


Praat mee over dit product
Laat hier weten wat jij vindt van de Vtech VM333-2 Babyfoon. Als je een vraag hebt, lees dan eerst zorgvuldig de handleiding door. Een handleiding aanvragen kan via ons contactformulier.