FIRSTLIGHT
TENT
© Black Diamond Equipment, Ltd. 2018
M13348_A
[EN]
INSTRUCTIONS FOR USE
BLACK DIAMOND FIRSTLIGHT
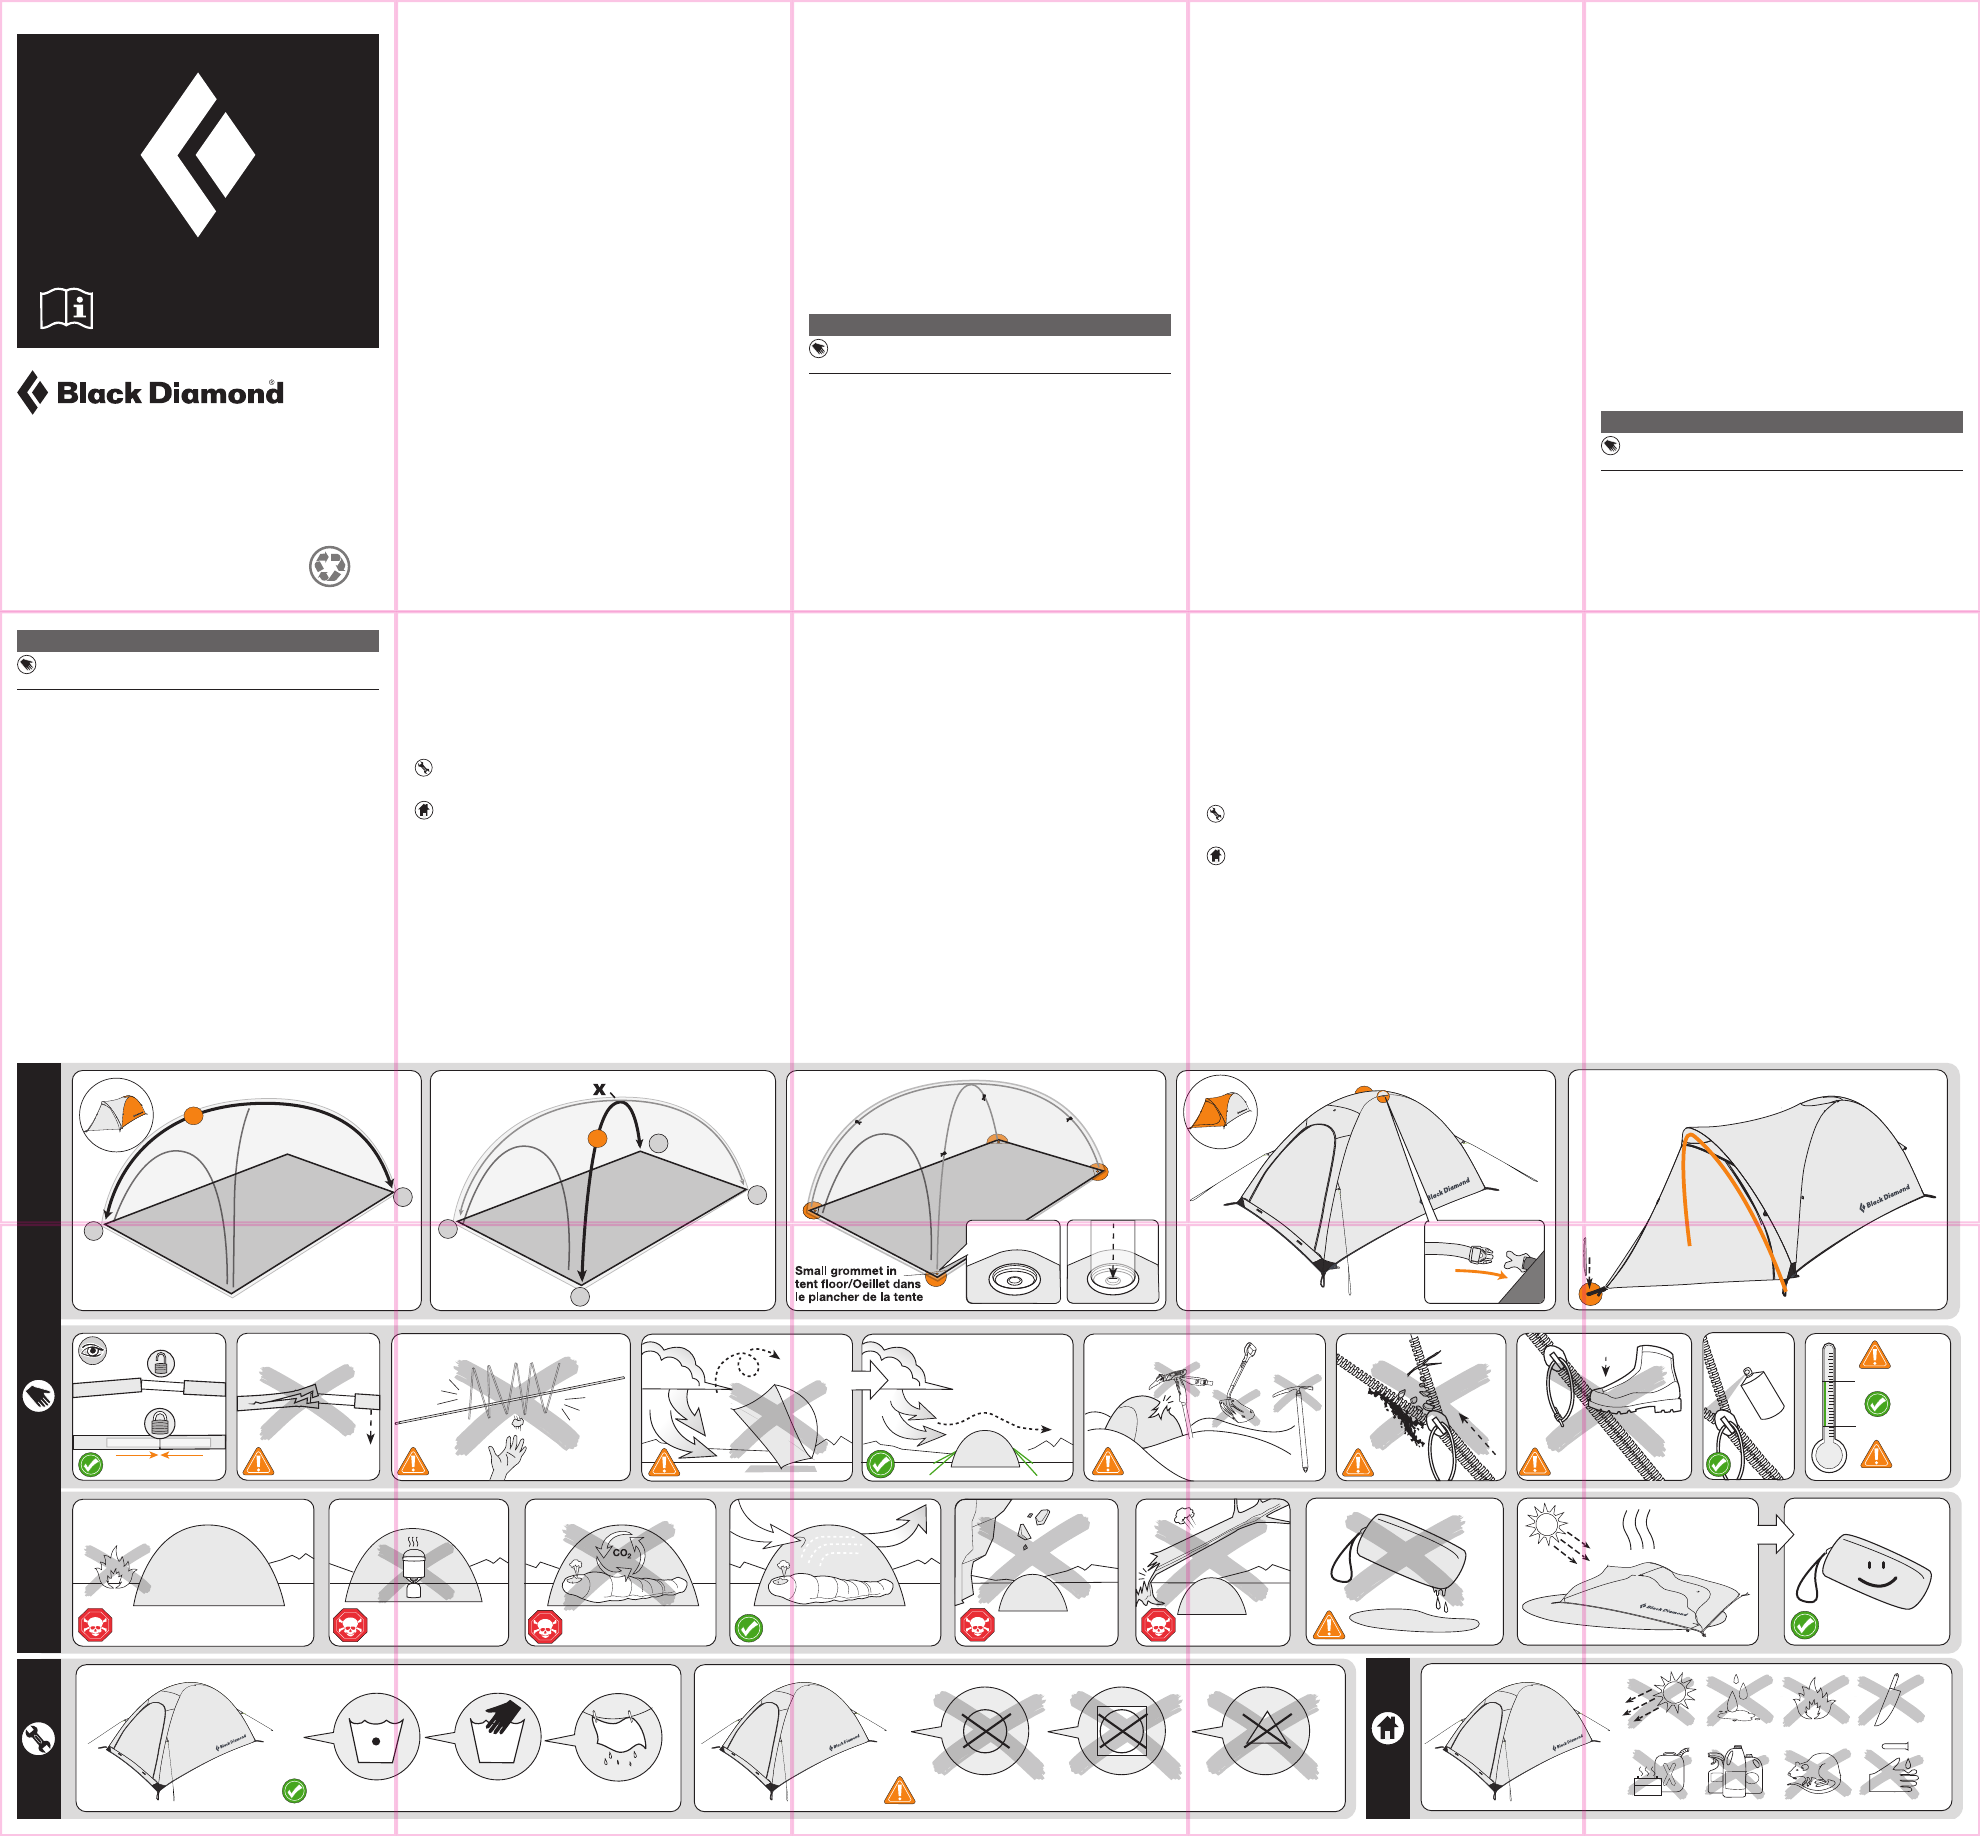
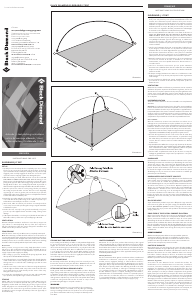
SET UP
Spread your tent out and open the zippered door completely.
Carefully unfold the shock-corded poles and make sure all joints
are fully engaged.
1. Insert a pole through the door and slide the end into the corner
(snap) at the opposite end of the tent (A). Fasten the pole to the
first hook-and-loop closure near the door with the tent lying flat.
2. Flex the pole toward the ceiling and put the other end into the
front corner. (B). It is easier to get the pole into the tent if you
pass the end through at the center of the door instead of direct-
ly into the corner. Never over flex the poles.
3. Insert the second pole into the other rear corner (C). Flex the
pole and bring the end into the remaining front corner (D). The
poles should cross each other at the peak forming an “X.”
4. Inside the tent, make sure all four pole ends are set securely
into their corner snaps. Secure each pole along the interior of
the canopy using the hook-and-loop fasteners to hold them in
place.
5. Anchor the tent securely by staking out your tent to the ground
immediately, every time you set it up. The slightest breeze can
blow it away, causing severe damage.
6. If the optional vestibule is not being used, buckle the two halves
of the buckle on the top of the tent to prevent them flapping in
the wind.
Optional Vestibule
7. Spread your vestibule out and unfold the shock-corded pole,
making sure all joints are fully engaged.
8. Take the pole and put the end tips into the grommet at the front
corners of the tent, so it makes an arch over the door. Drape the
vestibule over the pole and put the vestibule’s grommet over
the pole’s end tips. Fasten the two buckles joining the vestibule
to the tent. Secure the pole using the hook-and-loop pole ties.
Note: You can leave the hook-and-loop fastened and must thread
the pole through on subsequent set ups.
9. Stake out the front of the vestibule. Thread the tent’s two front
corner stake out loops through the small web loops on the vesti-
bule, near the pole ends and stake them. Adjust the webbing at
the two buckles for tautness.
SEAM SEALING
The seams of your Superlight Tent are not seam taped. Note: The
SilNet™ provided should be sufficient to do the exterior of your
tent. Extra tubes and/or applicators may be purchased. All the
exterior stitching should be sealed completely before use.
Here’s how: Before you start, set up your tent in a dry, shady place
where it can be left up for 1-2 days to allow the SilNet to dry com-
pletely. Be sure to stake it down. Be sure there is enough ventila-
tion in your work area. A supply of paper towels might prove handy.
After setting up your tent, carefully fill the syringe applicator about
three-quarters full with McNett SilNet.
Using the applicator, paint on a flat narrow brushstroke of SilNet
directly down ALL exterior seams, taking particular care around the
door awnings. Be sure to seal both sides of exterior items that are
sewn into the seams.
Seal the corner snaps on the interior of the tent. Using the appli-
cator, seal the edge around the metal snap on the inside of the
tent. Also put a small amount of sealer directly into the center of
the snap, letting the sealer seep inside. Let sealer dry completely
before storing your tent. This usually takes 24 to 48 hours, but may
take longer in some circumstances.
VENTILATION
Maintain adequate ventilation at all times. Leave the back zipper
vent open, unless it is extremely windy. The top of the door may
also be left open.
ATTACHING OPTIONAL GROUND CLOTH
A fitted ground cloth is available for the Firstlight tent. Along the
edges of the ground cloth are reinforced grommets. These can be
used to attach the ground cloth to the tent. Tie a short loop of cord
through each of the ground cloth corner grommets. Slip this loop
over the tent corner webbing when staking out the tent. The ground
cloth can also be used as a tarp—use the grommets along the
edges to suspend or anchor it.
(See accompanying illustrations)
CARE AND MAINTENANCE
(See accompanying illustrations)
STORAGE AND TRANSPORT
(See accompanying illustrations)
WARNING
Black Diamond Equipment is not responsible for the consequenc-
es, whether direct, indirect, or accidental, or for any other type of
damage arising or resulting from the use of its products. You are
responsible for your actions and activities and for any consequenc-
es that may result from them.
LIMITED WARRANTY
We warrant for one year from purchase date and only to the orig-
inal retail buyer (Buyer) that our products (Products) are free from
defects in material and workmanship. For headlamps our warranty
is for three years. If Buyer discovers a covered defect, Buyer
should return the Product to the place of purchase. In the event
that this is not possible, return the Product to us at the address
provided. The Product will be repaired or replaced at our discre-
tion. That is the extent of our liability under this Warranty and,
upon expiration of the applicable warranty period, all such liability
shall terminate. We reserve the right to require proof of purchase
for all warranty claims.
Warranty Exclusions:
We do not warranty Products against normal wear and tear (such
as ski edge cuts and abrasions, outsole wear, etc.), unauthorized
modifications or alterations, improper use, improper maintenance,
accident, misuse, negligence, damage, or if the Product is used
for a purpose for which it was not designed. This Warranty gives
you specific rights, and you may also have other rights which vary
from state to state. Except for expressly stated in this Warranty,
we shall not be liable for direct, indirect, incidental, or other types
of damages arising out of, or resulting from the use of Product.
This Warranty is in lieu of all other warranties, express or implied,
including, but not limited to, implied warranties of merchantability
or fitness for a particular purpose (some states do not allow the
exclusion or limitation of incidental or consequential damages
or allow limitations on the duration of an implied warranty, so the
above exclusions may not apply to you).
[FR]
INSTRUCTIONS D’UTILISATION
FIRSTLIGHT MONTAGE
MONTAGE
1. Déployez votre tente et ouvrez complètement la fermeture à
glissière de la porte. Dépliez les arceaux en vous assurant que
tous les segments sont bien emboîtés. Les segments dont les
embouts ne sont pas correctement emboîtés peuvent se rom-
pre. Ne jetez pas les arceaux par terre afin de les ouvrir ! Les
segments peuvent endommager les arceaux au moment où ils
se déplient et s’emboîtent brusquement.
2. Dos au vent, haubanez tout d’abord les coins avant de la tente.
IL N’EST PAS NÉCESSAIRE DE VOUS METTRE A QUATRE
PATTES DANS LA TENTE. Tenez le rabat de la porte d’une main
et de l’autre insérez un arceau dans la porte puis glissez son
extrémité dans le coin (œillet) à l’extrémité opposé de la tente
(A), en veillant à ne pas percer la toile. S’il y a du vent, posi-
tionnez-vous dos au vent de manière à faire pénétrer l’air par la
porte pour que la tente se gonfle comme un ballon.
3. Une fois que l’extrémité de l’arceau est insérée dans le coin le
plus éloigné (oeillet), courbez l’arceau vers le plafond et insérez
l’autre extrémité dans le coin avant diagonalement opposé (B).
Il est plus facile d’insérer l’arceau dans la tente si vous passez
son extrémité au centre de la porte avant qu’il ne soit complète-
ment courbé plutôt que l’inverse. Ne courbez jamais excessive-
ment les arceaux.
4. Répétez l’opération avec le second arceau (C, D). Les arceaux
doivent se croiser au sommet de la tente en formant un “X.”
Avec de l’entraînement, vous serez capable d’insérer les deux
arceaux en 10 secondes environ.
5. Une fois à l’intérieur, assurez-vous que vos quatre extrémités
d’arceaux sont solidement fixées dans les oeillets des coins.
Accrochez chaque arceau le long de la toile à l’aide des clips de
fixation prévus à cet effet.
6. A chaque montage, haubanez votre tente au sol solidement et
sans tarder. La moindre brise peut emporter la tente et grave-
ment l’endommager.
7. Si vous n’utilisez pas l’abside (en option), attachez les deux
moitiés de la boucle au sommet de la tente afin d’empêcher
qu’elles ne flottent au vent.
Instructions de Montage des Absides en Option
8. Déployez l’abside et dépliez l’arceau fourni, en vous assurant
que tous les segments sont bien emboîtés. Les segments
d’arceaux dont les embouts sont mal emboîtés peuvent se
rompre.
9. Prenez l’arceau et introduisez chaque extrémité dans l’œillet
situé sur les coins avant de la tente de manière à former une
arche au-dessus la porte. Tendez l’abside sur l’arceau comme
un rideau et enfilez l’œillet de l’abside dans l’extrémité de
l’arceau. Attachez les deux boucles reliant l’abside à la tente.
Fixez l’arceau à l’aide des attaches velcro prévues à cet effet.
REMARQUE : Lors de montages consécutifs, vous pouvez laisser
les velcros attachés puis passer l’arceau.
10. Haubanez la partie avant de l’abside. Passez les deux pattes
d’haubanage des coins avant dans les petites boucles de san-
gle de l’abside, près des extrémités de l’arceau et haubanez-les.
Ajustez les sangles au niveau des deux boucles pour obtenir le
degré de serrage idéal.
IMPERMÉABILISATION
Les coutures intérieures de votre tente Superlight ne sont pas
étanchées. Notez bien : le produit SilNet fourni doit suffire à imper-
méabiliser toute la surface externe de votre tente. Cependant,
il vous sera peut-être nécessaire d’acheter des tubes et/ou des
applicateurs supplémentaires. Toutes les coutures extérieures
doivent être complètement imperméabilisées avant utilisation.
Voici comment : Avant de commencer, montez votre tente dans un
endroit sec et ombragé où vous pourrez la laisser en place pendant
1 à 2 jours afin que le produit SilNet puisse sécher complètement.
Prenez soin de bien l’haubaner. Vérifiez si votre espace de travail
est suffisamment ventilé. Un rouleau d’essuie-tout placé à portée
de main pourra vous être utile.
Après avoir monté votre tente, remplissez soigneusement la
seringue de l’applicateur avec McNett SilNet jusqu’aux trois-quarts
environ.
A l’aide de l’applicateur, laissez couler une goutte de SilNet directe-
ment sur TOUTES les coutures externes, en particulier le long des
rabats de la porte. Assurez-vous que les deux boucles de sangles
cousues dans les coutures sont bien rendues étanches sur cha-
cune de leurs faces.
Imperméabilisez les œillets des coins (au sol) à l’intérieur de la
tente. A l’aide de l’applicateur, imperméabilisez le bord de l’œillet
métallique situé à l’intérieur de la tente. Laissez également pénétrer
une petite quantité d’imperméabilisant directement dans l’oeillet.
Laissez sécher complètement avant de plier la tente. Le temps de
séchage est généralement compris entre 24 et 48 heures – voire
plus, selon les circonstances.
VENTILATION
Maintenez une ventilation suffisante en permanence. Laissez
ouverte la ventilation derrière la fermeture à glissière, sauf en cas
de vent très fort. La partie supérieure de la porte peut également
rester ouverte.
COMMENT FIXER LE TAPIS DE SOL PROPOSÉ EN OPTION
Nous proposons un tapis de sol en option pour le modèles de tente
Firstlight. Les bords de ce tapis de sol comportent des œillets
renforcés. Ceux-ci peuvent être utilisés pour attacher le tapis de
sol aux pattes d’haubanage de la tente de manière à le fixer sous
la tente. Passez une petite boucle de hauban dans chacun des
œillets situés aux coins du tapis de sol. Enfilez cette boucle dans la
patte d’haubanage des coins de la tente et haubanez. Le tapis de
sol peut également être utilisé comme bâche – utilisez les œillets
situés le long des bords pour la suspendre ou l’haubaner.
PRÉCAUTIONS D’UTILISATION ET ENTRETIEN
(Voir les iIlustrations jointes)
STOCKAGE ET TRANSPORT
(Voir les illustrations jointes)
AVERTISSEMENT !
Black Diamond Equipment décline toute responsabilité quant aux
conséquences directes, indirectes, accidentelles, ou quant à tout
autre type de dommage découlant ou résultant de l’utilisation de
ses produits. Vous êtes responsable de vos actes et de vos activi-
tés ainsi que de toutes conséquences pouvant en résulter.
LIMITES DE GARANTIE
Nous garantissons pour une durée de un an à partir de la date
d’achat et seulement à l’Acheteur d’origine (Acheteur) que nos
produits (Produits) sont exempts de défauts de matériau et de
fabrication. Pour les lampes frontales, notre garantie est de trois
BlackDiamondEquipment.com
North America: Black Diamond Equipment, Ltd.
2084 East 3900 South
Salt Lake City, UT 84124
Europe: Black Diamond Equipment AG
Hans-Maier-Straße 9
6020, Innsbruck, Austria
+
-
70º C (158º F)
-62º C (-80º F)
SILICONE
Front/Avant
A
B
C
A
B
D
1
2
ans. Dans le cas où l’Acheteur découvrirait un vice caché, l’Ache-
teur devra renvoyer le Produit à l’adresse d’achat. Si cela n’est
pas possible, renvoyez-nous le Produit à l’adresse indiquée. Ce
Produit sera réparé ou échangé gratuitement. L’étendue de notre
responsabilité se limite à la présente Garantie et prend fin au terme
de la période de garantie applicable. Nous nous réservons le droit
d’exiger une preuve d’achat pour toutes les demandes d’applica-
tion de la Garantie.
Exclusions de garantie :
Sont exclus de cette Garantie l’usure normale du Produit (rayure
et abrasion des carres, usure des semelles, etc.), les modifications
ou les transformations non autorisées, l’utilisation incorrecte, l’en-
tretien inadéquat, les accidents, l’emploi abusif, la négligence, les
dommages, ou l’utilisation du Produit à des fins pour lesquelles il
n’a pas été conçu. La présente Garantie vous confère des droits
spécifiques et ne fait pas obstacle à l’application de la garan-
tie légale prévue par le Code Civil. À l’exception des clauses
expressément décrites dans la présente Garantie, nous déclinons
toute responsabilité en cas de dommages directs, indirects, acces-
soires, ou autres types de dommages découlant ou résultant de
l’utilisation du Produit. La présente Garantie exclut toute autre
garantie, explicite ou implicite, notamment, mais non limitative-
ment, toute garantie de qualité marchande ou d’adaptation à un
usage particulier (certains États/juridictions n’autorisent pas l’ex-
clusion ou la limitation de dommages accessoires ou consécutifs
ni la restriction de garantie implicite. Par conséquent, les exclu-
sions mentionnées ci-dessus peuvent ne pas vous concerner).
[DE]
GEBRAUCHSANLEITUNG
FIRSTLIGHT VORBEREITUNG
HINWEISE ZUM ABSPANNEN
1. Das Zelt ausbreiten und den Reissverschluss für den Eingang
vollständig öffnen. Die durch ein Zugband verbundenen
Zeltstangen aufklappen und die Verbindungsstücke voll ein-
rasten lassen. Nicht voll eingerastete Verbindungsstücke kön-
nen einknicken. BEIM TRENNEN DER ZELTSTANGEN KEINE
GEWALT ANWENDEN! Die einrastenden Teile können die
Zeltstangen beschädigen.
2. Zuerst die vorderen Zeltecken abspannen. Den Zelteingang
so ausrichten, dass der Wind in das Zelt hineinbläst. ES IST
NICHT NÖTIG, IN DAS ZELT ZU STEIGEN. Die Apsis in einer
Hand halten, die Zeltstange durch den Eingang einsetzen und
das Zeltstangenende bis zum Eckpunkt der Gegenseite des
Zeltes (A) schieben. Dabei darauf achten, dass das Gewebe
der Bodenwanne nicht beschädigt wird. Bei starkem Wind den
Eingang so ausrichten, dass der Wind durch den Eingang das
Zelt wie einen Ballon aufbläst.
3. Sobald sich das Zeltstangenende in der hinteren Ecke befindet,
die Zeltstange zum Zeltdach biegen und das andere Ende in
die vordere diagonal gegenüberliegende Ecke (B) einsetzen.
Die Zeltstange lässt sich einfacher im Zelt einsetzen, wenn das
Ende durch den Eingang geschoben wird, bevor die Zeltstange
der jeweiligen Seite vollständig gebogen ist. Die Zeltstangen nie
zu stark biegen.
4. Diese Schritte für die zweite Zeltstange (Punkt C und D) wie-
derholen. An der Spitze müssen sich die Zeltstangen in X-Form
kreuzen. Mit etwas Übung lassen sich die beiden Zeltstangen in
etwa 10 Sekunden einsetzen.
5. Im Inneren des Zeltes kontrollieren, dass alle vier
Zeltstangenenden sicher in den Eckpunkten sitzen. Jede
Zeltstange am Zeltdach mit dem Klettverschluss fixieren.
6. Das Zelt sofort sicher am Boden verankern, wenn es aufgebaut
wird. Auch eine leichte Brise kann das Zelt fortwehen und
schwere Schäden verursachen.
7. Wird das optionale Vorzelt nicht verwendet, die beiden Hälften
der Schnalle an der Oberseite des Zeltes fixieren, damit diese
nicht im Wind flattern.
Anleitungen zum Aufstellen für Optionale Windfänge
8. Breiten Sie den Windfang aus und falten Sie die mit einer


Praat mee over dit product
Laat hier weten wat jij vindt van de Black Diamond FirstLight 2P Tent. Als je een vraag hebt, lees dan eerst zorgvuldig de handleiding door. Een handleiding aanvragen kan via ons contactformulier.