GS38K
Date
9/19/16
Customer
CKTL
Model No.
GS38K
Description
IB
Job No.
16CF010
Reference No.
IB-16/395
Revision No.
0
Color
1C+1C(Black)
Open Size
552mm(W) X 214mm(H)
Folded Size
92mm(W) X 214mm(H)
Material
80gsm Artpaper
Prepared by
Carlos Ho
Approved by
Jimmy Ng / Anna Son
Vendor
MILLPLAN
Supplier
CONTINENTAL CONAIR LIMITED
CHINA CREATIVE DEPARTMENT
INSTRUCTION
BOOKLET
사용설명서
HANDHELD FABRIC STEAMER
터보 익스트림 스팀 핸디 다리미
CONAIR HANDHELD FABRIC STEAMER
IMPORTANT SAFETY INSTRUCTIONS
When using electrical appliances, especially when children are
present, basic safety precautions should always be followed,
including the following:
READ ALL INSTRUCTIONS BEFORE USING
KEEP AWAY FROM WATER
SAFETY PRECAUTIONS
WARNING: The polyethylene bags over the product
or its packaging may be dangerous. Keep these bags
out of the reach of babies and children.
Never use them in cribs, children’s beds, pushchairs
or playpens. The thin film may cling to the nose and
mouth and prevent breathing. A bag is not a toy.
WARNING: Do not use this appliance near bathtubs,
showers, basins or other vessels containing water.
1. If you are using the unit in a bathroom, unplug it after you have
finished using it. Using the unit close to a source of water can,
in fact, be dangerous, even if the unit is switched off. To ensure
additional protection, have installed in your bathroom a residual
current device (RCD) with a nominal trip current no higher than 30
mA. Ask your electrical fitter for advice.
2. Never immerse the unit in water or any other liquid.
3. If the supply cord is damaged, it must be replaced by the
manufacturer, its service agent or similarly qualified persons in
order to avoid a hazard.
4. Do not use the unit if it has fallen or if it appears to be damaged.
5. Do not leave the unit unattended when it is plugged in or switched
on.
6. Unplug the unit immediately if you have problems when using it.
7. Do not use any accessories other than those recommended by
manufacturer.
8. Unplug the unit after each use and before filling or cleaning it.
9. This unit is not intended for use by people (including children) with
reduced physical, sensory or mental capabilities, or by persons
who lack experience or knowledge, unless they are supervised
or have been given instructions beforehand on the use of the
unit by a person responsible for their safety. Children should be
supervised to make sure they do not treat the unit like a toy.
10. Allow the unit to cool before storing.
11. To prevent damage to the cord, do not wrap it around the unit and
ensure it is stored without twisting or folding it.
12. When emitting steam, this appliance may cause burns if it is used
too close to the skin or eyes, or if it is used incorrectly. To reduce
the risk of contact with hot water emitting from the steam vents,
test appliance before use by holding it away from the body.
13. Do not steam garments while on a person.
14. Burns could occur from touching hot metal parts, hot water or
steam. Use care when you turn steam appliance upside down.
15. Do not operate steamer without correctly filling the water container.
Only use clean cold water for filling this appliance. In hard water
areas, we recommend the use of distilled water.
16. Use of an extension cord is not recommended. If an extension
cord is absolutely necessary, a 13-ampererated cord should be
used. Cord rated for less amperage may overheat. Care should
be taken to arrange the cord so that it cannot be pulled or tripped
over.
17. Never yank cord to disconnect from outlet, instead, grasp plug
and pull to disconnect.
18. Use with caution when carrying steamer as it contains hot water.
NOTE: Before using the garment steamer for the first time, it is
recommended to operate the steamer for approximately 5 minutes,
unplug the unit and allow it to cool. Empty container and refill
before actually using.
HOUSEHOLD USE ONLY
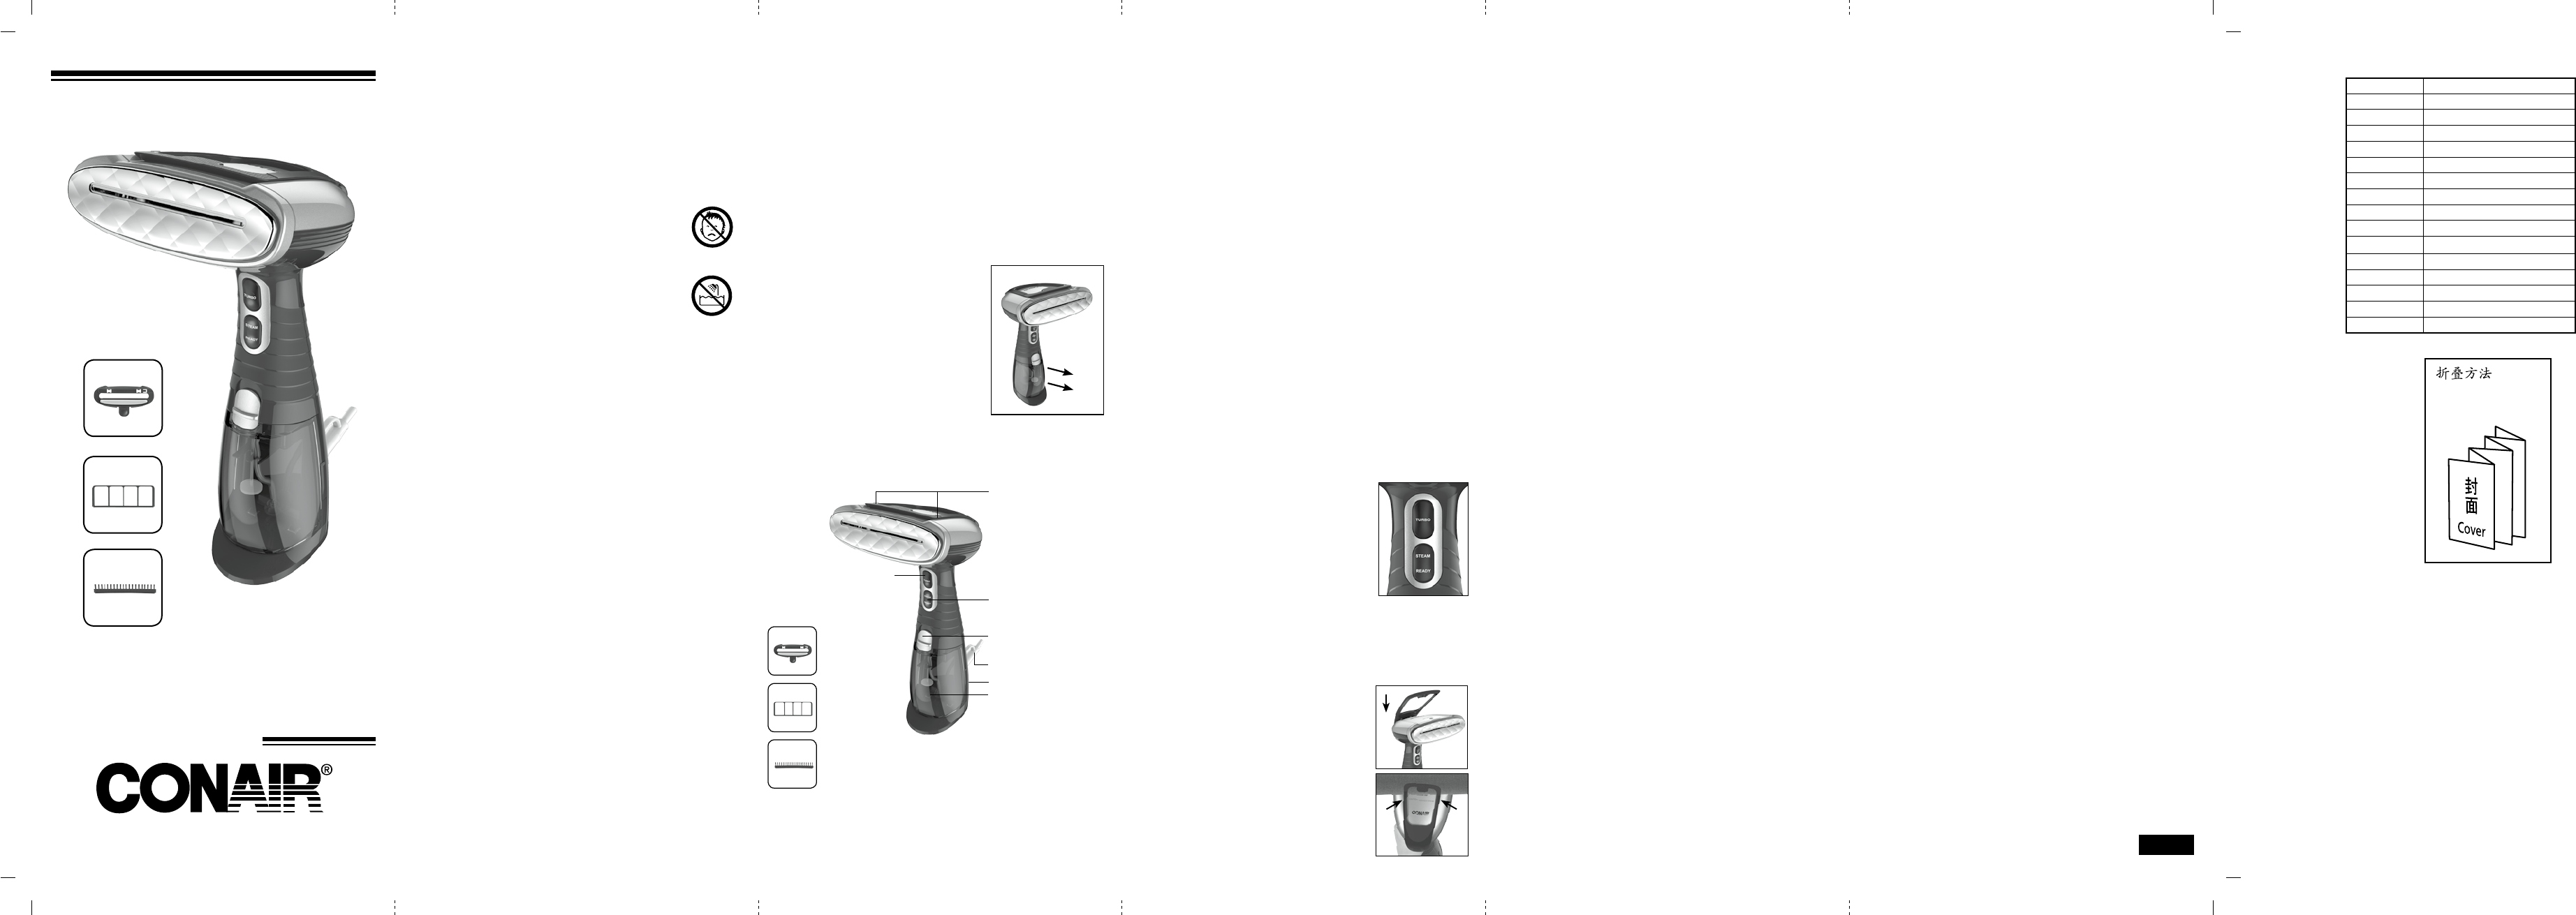
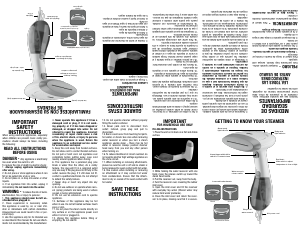
FILLING INSTRUCTIONS
1. Make sure the unit is unplugged.
2. Stand the unit on a table and grasp with one hand.
3. With other hand, move the release switch up toward the steam
head nozzle.
4. Pull the reservoir out, away from the steamer body.
5. The rubber inlet cover is located on the
top of the water reservoir.
6. Open the inlet cover and fill the reservoir
with distilled water (which can be found
in grocery stores). We recommend that
you use distilled water only as this will
prevent mineral deposits in the boiler
that can reduce performance or clog
the water system.
7. Close the inlet cover and return the
reservoir to its place, making sure that
it snaps in place and is secure.
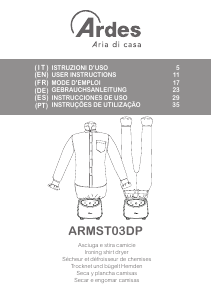
GET TO KNOW YOUR STEAMER
Power button(I/O button)
Red Turbo switch
Water reservoir
release switch
3-In-1
Attachments
Silicone band
Low Temperature
Guide
Bristle Brush
Blue power light
and READY light
Power cord
Built-in creaser with
garment guides
Easy-to-fill
water reservoir
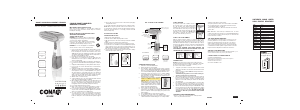
BRUSH ATTACHMENT
With the garment steamer off and cool, snap the silicone band
attachment over the steam head ensuring it is firmly affixed. At this
point the silicone band can be used or you can choose to affix either
the Bristle Brush or Low Temperature Guide inserts into the channel
on the top of the silicone band attachment as desired. Note, only
one function of the 3-In-1 attachment can be used at a time.
CAUTION: Use extreme care when changing the attachments
after the unit has been in use as the steam head will continue to
be hot.
ACCESSORIES:
1. Silicone Band: Pulls fabric taut for easier steaming.
2. Low Temperature Guide: Helps protect delicate fabric.
3. Bristle Brush: Opens fibers for better steam penetration.
OPERATING THE STEAMER
1. Fill water reservoir with distilled water. We recommend that you
use distilled water only, as this will prevent mineral deposits in the
boiler that can reduce performance or clog the water system.
2. Plug the unit into the electrical outlet and press the on/ off button
on the back of the steamer.
3. The blue READY light will illuminate and begin blinking. Allow 40
seconds for the unit to warm up. The appliance is ready to use
when the READY light stops blinking and remains solid. Note:
Before first use or when the unit has not been used for a long
period of time, it will be necessary to prime (i.e., fill with water) the
internal tank while the steamer prepares to steam. You may hear a
small tapping noise during the heat-up process; this is normal.
4. Your steamer has 2 options for steam, regular Steam and
Turbo. Use the Steam setting (blue button) for delicate fabrics or
freshening lightly wrinkled garments. Use the Turbo setting (red
button) for thicker fabrics and heavily wrinkled articles.
5. Pointing the steam jets away from you, and anyone else in the
room, press either the blue Steam button
or the red Turbo button to release steam.
Always have steam facing away from you or
anyone in the room.
6. When first using the device, test on an old
cloth, as there may be sediment left from the
manufacturing process or transportation.
7. To stop the flow of steam, depress the
button(s) that you have turned on, either the
red, blue, or both.
8. Turn off and Unplug the device when it is not in use.
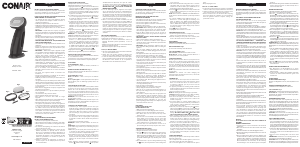
USING CREASER
This garment steamer has a built-in creaser on the top of the unit. To
use, slide garment under the clip and align edge with the pattern as
marked on the creaser. Press the Steam button and steam will issue
from the port on the top of the unit. Slide the
steamer along the edge of the garment to create
a sharp crease. Note: Steam will continue to emit
from the steam slot on the front of the unit during
creaser use!
STEAMING TIPS
1. First test unit on an inconspicuous area of
the item to be steamed using the regular
Steam setting to ensure fabric can tolerate
the effects of steam. If there is no evidence
of damage, you can proceed to use the
steamer on that item.
2. To prepare your fabric for steaming, brush it with the brush
attachment. This will loosen the fibers and allow better steam
penetration.
3. Hang your garment or fabric. Note: Avoid using metal clothes
hangers, if possible.
4. Pass the steam jets just above the fabric where the wrinkles are. It
may take a few passes to remove the wrinkles completely.
5. For heavier fabrics or severely wrinkled fabrics, you may position
the steamer head directly on the fabric for a few seconds to
remove wrinkles. Be cautious when working with delicate fabrics.
6. After use, turn unit off by depressing the button(s) that you have
turned on, either the red, blue, or both. Empty any remaining
water from the tank to avoid leakage. With dry hands, unplug
your garment steamer from the outlet. BE SURE TO PRESS THE
BUTTONS “O” PRIOR TO UNPLUGGING THE UNIT.
7. CAUTION: If hanging garment on a door while steaming, be
careful not to damage the door with steam.
8. When steaming, always keep the unit in motion. Do not
continuously hold steamer over an area or touch steamer jets
directly to fabric for more than a few seconds as this can cause
damage, including shrinkage, melting, or color shift on certain
types of material.
9. In the case of heavier, durable fabrics such as wool coats or
bedding, the Turbo setting and slower passes with the steamer
may be necessary to achieve desired results. As always, start
by testing on an inconspicuous area of the item to be steamed
using the regular Steam setting to ensure fabric can tolerate the
effects of steam, and adjust your technique as needed to obtain
the results desired.
NOTE: Test fabric for color fastness in an inconspicuous spot. Drape linens,
towels, handkerchiefs and napkins over a rod or place onto a towel rack.
TO MAKE CREASES OR PLEATS
1. Hang garment.
2. Fold fabric where crease or pleat is desired. Hold fold in place
while applying steam directly to fold.
TO STEAM TIES
1. Hang tie on hanger.
2. Apply steam directly to tie.
TO STEAM SHOULDERS AND SLEEVES
1. Hang garment, preferably on a padded hanger.
2. Fill out shoulders or sleeves with folded towel.
3. Apply steam to garment.
DECALCIFICATION
If the appliance begins to produce steam more slowly than usual,
or stops producing steam and then starts again, you may need
to decalcify your steamer. Decalcification refers to removing the
calcium deposits that form over time on the metal parts of the
steamer. For best performance from the Conair Garment Steamer,
decalcify the unit from time to time. The frequency depends upon
the hardness of your water and how often you use the steamer.
To decalcify, use a solution of 1/3 white vinegar and 2/3 water in
the water reservoir.
Plug the unit into electrical outlet. Wait the ready light goes on then
activate the steam trigger, and run until all amount has steamed.
Release the steam trigger, unplug from electrical outlet, and allow
to sit for 30 minutes.
Repeat the above procedure as many times as necessary until a
normal steam rate returns, usually 2 to 3 times. With each repeated
cycle, use a fresh solution of vinegar and water. Run one cycle of
fresh, cold water through the unit at the completion of decalcification
before using the unit again to steam garments.
Note: Minerals in water will vary in different areas. To insure
continued operation of the steamer, never store without cleaning
and removing excess water from the reservoir and water container.
ONE YEAR LIMITED WARRANTY
This Conair Appliance is guaranteed for consumer use for one
year. This guarantee is no longer valid in case of alteration or
repair by any unauthorized persons and only covers defects
under normal use from the date of purchase. If your product
does not perform satisfactorily because of defects in materials
or manufacture, it will be repaired or replaced under Consumer
Dispute Settlement Regulation of Fair Trade Commission.
GS38K
IB-16/395
Folding method:
12 pages (6 x 2)


Praat mee over dit product
Laat hier weten wat jij vindt van de Conair GS38K Kledingstomer. Als je een vraag hebt, lees dan eerst zorgvuldig de handleiding door. Een handleiding aanvragen kan via ons contactformulier.