XIX. GUARANTEE
XVIII. BATTERY USE WARNING
2. The Manufacturer is responsible for equipment malfunction resulting from physical
defects (manufacturing or material) of the Device for 12 months from the date of its
purchasing.
3. During the Guarantee period, the Manufacturer shall remove any defects, free of
charge, by repairing or replacing (at the sole discretion of the Manufacturer) any
defective components of the Device with new or regenerated components, that are free
of defects. When the repair impossible, the Manufacturer reserves the right to replace the
device with a new or regenerated one, which shall be free of any defects and its condition
shall not be worse than the original device owned by the Customer.
4. In special cases, when the device cannot be replaced with the device of the same type
(e.g. the device is no longer available in the commercial offer), the Manufacturer may
replace it with a different device having technical parameters similar to the faulty one.
Such activity shall be considered as fulfilling the obligations of the Manufacturer. The
Manufacturer shall not refund money paid for the device.
5. The holder of a valid guarantee shall submit a guarantee claim through the guarantee
service. Remember: before you submit a guarantee claim, contact our technical support
using telephone or e-mail. More than 50% of operational problems is resolved remotely,
saving time and money spent to initiating guarantee procedure. If remote support is
insufficient, the Customer shall fill the guarantee claim form (using our website
- www.fibargroup.com) in order to obtain claim authorization. When the guarantee claim
form is submitted correctly, the Customer shall receive the claim confirmation with an
unique number (Return Merchandise Authorization -RMA).
6. The claim may be also submitted by telephone. In this case, the call is recorded and
the Customer shall be informed about it by a consultant before submitting the claim.
Immediately after submitting the claim, the consultant shall provide the Customer with
the claim number (RMA-number).
7. When the guarantee claim form is submitted correctly, a representative of the
Authorised Guarantee Service (hereinafter as "AGS") shall contact the Customer.
8. Defects revealed within the guarantee period shall be removed not later than 30 days
from the date of delivering the Device to AGS. The guarantee period shall be extended
by the time in which the Device was kept by AGS.
9. The faulty device shall be provided by the Customer with complete standard
equipment and documents proving its purchase.
10. Parts replaced under the guarantee are the property of the Manufacturer. The
guarantee for all parts replaced in the guarantee process shall be equal to the guarantee
period of the original device. The guarantee period of the replaced part shall not be
extended.
11. Costs of delivering the faulty device shall be borne by the Customer. For unjustified
service calls, the Service may charge the Customer with travel expenses and handling
costs related to the case.
12. AGS shall not accept a complaint claim only when:
• the Device was misused or the manual was not observed,
• the Device was provided by the Customer incomplete, without accessories or
nameplate,
• it was determined that the fault was caused by other reasons than a material or
manufacturing defect of the Device
• the guarantee document is not valid or there is no proof of purchase,
13. The Manufacturer shall not be liable for damages to property caused by defective
device. The Manufacturer shall not be liable for indirect, incidental, special, consequen-
tial or punitive damages, or for any damages, including, inter alia, loss of profits, savings,
data, loss of benefits, claims by third parties and any property damage or personal
injuries arising from or related to the use of the Device.
14. The guarantee shall not cover:
• mechanical damages (cracks, fractures, cuts, abrasions, physical deformations caused
by impact, falling or dropping the device or other object, improper use or not observing
the operating manual);
• damages resulting from external causes, e.g.: flood, storm, fire, lightning, natural
disasters, earthquakes, war, civil disturbance, force majeure, unforeseen accidents,
theft, water damage, liquid leakage, battery spill, weather conditions, sunlight, sand,
moisture, high or low temperature, air pollution;
• damages caused by malfunctioning software, attack of a computer virus, or by failure to
update the software as recommended by the Manufacturer;
• damages resulting from: surges in the power and/or telecommunication network,
improper connection to the grid in a manner inconsistent with the operating manual, or
from connecting other devices not recommended by the Manufacturer.
• damages caused by operating or storing the device in extremely adverse conditions, i.e.
high humidity, dust, too low (freezing) or too high ambient temperature. Detailed
permissible conditions for operating the Device are defined in the operating manual;
• damages caused by using accessories not recommended by the Manufacturer
• damages caused by faulty electrical installation of the Customer, including the use of
incorrect fuses;
• damages caused by Customer's failure to provide maintenance and servicing activities
defined in the operating manual;
• damages resulting from the use of spurious spare parts or accessories improper for
given model, repairing and introducing alterations by unauthorized persons;
• defects caused by operating faulty Device or accessories.
15. The scope of the guarantee repairs shall not include periodic maintenance and
inspections, in particular cleaning, adjustments, operational checks, correction of errors
or parameter programming and other activities that should be performed by the user
(Buyer). The guarantee shall not cover natural wear and tear of the Device and its
components listed in the operating manual and in technical documentation as such
elements have a defined operational life.
16. If a defect is not covered by the guarantee, the Manufacturer reserves the right to
remove such defect at its sole discretion, repairing the damaged or destroyed parts or
providing components necessary for repair or replacement.
17. This guarantee shall not exclude, limit or suspend the Customer rights when the
provided product is inconsistent with the purchase agreement.
Fig. 3 Smoke Sensor icon in
Home Center 2*
XII. ASSOCIATIONS
Through an association Fibaro Smoke Sensor may control another Z-Wave
network device, e.g. a Dimmer, Relay Switch, Roller Shutter, RGBW Controller,
Wall Plug, or a scene (scene only through the Home Center 2 main controller)
NOTE
Association allows for direct communication between Z-Wave
network devices. Main controller does not take part in such
communication. Using this mechanism, Fibaro Smoke Sensor
may communicate with other devices even when the main
controller is damaged, e.g. in a fire.
Fig. 4 Smoke Sensor icon
in Home Center 2
indicating the smoke alarm
and a tamper alarm*
!
Fibaro Smoke Sensor allows for the associations of three groups.
1-st Association Group is assigned to the device status - sending the BASIC SET
(default) or ALARM control frame to the associated devices having detected fire.
The type of alarm frame sent may be modified in advanced configuration
parameters (see section XVII).
2-nd Association Group is assigned to the TMP button and the malfunction alarm.
Alarm frame will be sent to the associated devices once tampering or malfunction
are detected.
3-rd Association Group reports the device status and allows for assigning a
single device only (the main controller by default - the device reports its status to
the main controller). It’s not recommended to modify this association group.
Fibaro Smoke Sensor allows for controlling 5 regular and 5 multichannel devices
per an association group, out of which 1 field is reserved for the Z-Wave network
main controller.
To add an association (using Home Center 2 interface) go to device settings and
click the following icon:
Select the “device options” tab. Then specify to which group and what devices are
to be associated. Sending relevant information to devices that have been added to
association group may take up to a few hours depending on the previous
configuration parameters’ settings.
NOTE
During the Z-Wave network range test, Fibaro Smoke Sensor is
not detecting smoke presence. Device resumes normal operation
once the Z-Wave network range rest has been finished.
!
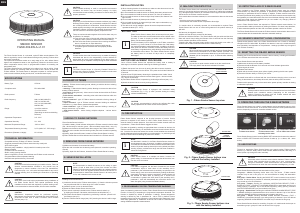
XVI. BLACK BOX
The Fibaro Smoke Sensor has a built in memory for recording smoke and
temperature information. Having recorded even the smallest amount of smoke, the
sensor records the smoke level measured, time and temperature measured at that
precise moment. This information is sent to the Z-Wave network main controller
every 60 seconds. Home Center 2 allows for monitoring Black Box recordings (see
below figure). The Fibaro Smoke Sensor stops sending the Black Box records
once the smoke disappears, but a user can always access earlier reports through
the Z-Wave main controller. Black Box sensitivity may be modified through the
parameter 83 settings.
NOTE
Black Box gathers and sends the information even when there’s
no fire alarm.
!
XVII. ADVANCED CONFIGURATION
WAKE UP INTERVAL: (3 bytes)
Available settings: 300 - 86399 (5min – 24h)
Default setting: 14400 (each 4h)
When the Smoke Sensor is in battery power mode you can set up the wake up time
based in seconds. At each wake up, a the Smoke Sensor communicates with the
main controller, updates parameters settings and the software if necessary. The
Smoke Sensor will wake up at defined time interval and will ALWAYS try to
communicate with the main controller. After each failed communication attempt,
the sensor will retry to establish connection with the main controller after 60
seconds. After 3 failed attempts, the lack of the Z-Wave range alarm will be
triggered. The parameter is relevant for the battery powering mode only. Longer
time interval means less frequent communication and thus a longer battery life.
The Z-Wave range alarm will be cancelled automatically, after first successfull
connection.
NOTE
Parameter settings do not influence the visual and acoustic
alarms, which are turned off once the smoke has disappeared.
!
2. LED indicator and acoustic alarm turned ON / OFF at any alarm type.
Allows for deactivating the LED indicator and the acoustic alarm, in case of
detecting an alarm of any type. This doesn’t affect the communication with the
Z-Wave network controller, i.e. the sensor will keep sending alarms, reports and all
information to the associated devices. Modifying this parameter settings helps
extending the battery life.
Available settings: 0-3
0 – acoustic and visual alarms inactive
1 – acoustic alarm inactive, visual alarm active
2 – acoustic alarm active, visual alarm inactive
3 – acoustic and visual alarms active
Default setting: 3
Parameter size: 1 [byte]
NOTE
Deactivating the acoustic and visual alarms may result in
insufficient reporting of the smoke alarm. It’s not recommended to
modify this parameter settings.
!
5. Type of alarm frame sent to 1-st Association Group devices (smoke alarm).
Allows for choosing a command class used in 1-st Association Group.
Available settings: 0, 255
0 - ALARM SENSOR (SMOKE) command frame,
255 - BASIC_SET command frame.
Default setting: 255
Paramter size: 1 [byte]
7. Forced level of dimming / opening dimmers, roller blinds etc. devices at
sending turn on / open / change level commands to 1-st Association Group’s
devices.
The value of 255 allows for turning on a device. In case of Dimmer, the value of 255
means turning on the device with the last memorized state. E.g. Dimmer set to
30% and then turned off, and next turned on using the 255 command, will turn on
with the last remembered status, i.e. 30%.
In case of alarm frames, alarm priority is defined.
Available settings: (1 - 99) or 255
Default setting: 255
Parameter size: 1 [byte]
NOTE
2-nd association group alarms cannot be cancelled.
!
10. Temperature report interval.
Time interval between consecutive temperature reports.
The parameter is relevant for the battery powering mode only. Longer time interval
means less frequent communication and thus a longer battery life.
Report is sent when new temperatue value is different from the one previously
reported. Temperature reports can be also sent as a result of polling.
Available settings: 1 – 17280, 0 (multiply by 5 seconds) [5s-24h]
0 – reports inactive
Default setting: 0 (Reports inactive)
Parameter size: 2 [bytes]
12. Temperature report hysteresis.
The temperature report will only be sent if there is a difference in temperature value
from the previous value reported, defined in this parameter (hysteresis).
Temperature reports can be also sent as a result of polling.
Available settings: 0 – 100 (in 0,1
o
C steps)
0 – temperature change reporting inactive
Default setting: 20 (2
o
C)
Parameter size: 1 [byte]
NOTE
The parameter is relevant for the battery powering mode only.
Longer time interval means less frequent communication and thus
a longer battery life.
!
Available settings: 0 – 144 (10min multiplier) [10min-24h]
0 – Z-Wave network range test inactive
Default setting: 1 (10min)
Parameter size: 1 [byte]
81. Temperature alarm threshold.
Temperature value, measured by the built-in temperature sensor, above which the
temperature alarm is sent.
Available settings: 0,2 - 100
0 – temperature alarm inactive
2 - 100 – (2 - 100
o
C)
Default setting: 54 (54
o
C)
Parameter size: 1 [byte]
NOTE
Any change in this parameter’s settings may cause a Fibaro
Smoke Sensor to operate contrary to valid safety regulations of
your country.
!
82. Fibaro Smoke Sensor sensitivity
There are 3 levels of sensitivity to smoke presence. Level 1 means the highest
sensitivity.
NOTE
Rising the parameter value lowers the sensitivity to smoke
presence. It’s not recommended to change this parameter’s
settings.
!
Available settings: 1 - 3
1 - HIGH Sensitivity
2 - MEDIUM Sensitivity
3 - LOW Sensitivity
Default setting: 2
Parameter size: 1 [byte]
83. Black Box sensitivity level.
This parameter allows for specifying the moment in which the Black Box starts
recording data. After the specified smoke and temperature values will be
exceeded, the Fibaro Smoke Sensor’s Black Box will record them.
Available settings: 1 - 3
1 - HIGH Sensitivity
2 - MEDIUM Sensitivity
3 - LOW Sensitivity
Default setting: 2
Parameter size: 1 [byte]
84. Malfunction alarm
Time interval in which malfuntion alarm, if detected, is repeated using visual and
acoustic alarms.
Available settings: 1 - 255 (100 ms multiplier) [100ms-25,5s]
Default setting: 10 (1s)
Parameter size: 1 [byte]
85. Temperature alarm
Time interval in which temperature alarm, if detected, is repeated using visual and
acoustic alarms.
Available settings: 1 - 255 (100 ms multiplier) [100ms-25,5s]
Default setting: 5 (500ms)
Parameter size: 1 [byte]
86. Lack of the Z-Wave range alarm
Time interval in which lack of the Z-Wave network alarm, if detected, is repeated
using visual and acoustic alarms.
Available settings: 1 - 17280 (5s multiplier) [5s-24h]
Default setting: 360 (30min)
Parameter size: 2 [bytes]
87. Low battery alarm
Time interval in which low battery alarm, if detected, is repeated using visual and
acoustic alarms.
Available settings: 1 - 17280 (5s multiplier) [5s-24h]
Default setting: 360 (30min)
Parameter size: 2 [bytes]
88. Consider temperature measurement compensation (parameter 73) when
sending temperature report.
Available settings: 0 - 1
0 - ignore temperature compensation
1 - include temperature compensation
Default setting: 0
Parameter size: 1 [byte]
XIII. LED VISUAL INDICATORS AND SETTINGS
The Fibaro Smoke Sensor is equipped with a LED diode for indicating, signaling
sensor’s operating modes and alarms. In addition the LED indicator may inform of
the Z-Wave network range and the current temperature.
LED indicator modes:
1) Fire alarm is signaled by blinking in red.
2) Tamper alarm is signaled with a short blink in red.
3) Malfunction alarm is signaled by blinking in red.
4) Z-Wave network range alarm is signaled by blinking in pink.
5) Low battery alarm is signaled by blinking in yellow.
6) MENU levels are signaled with glowing in certain colour.
To enter MENU, press and hold the B-button for 3 seconds.
Once the LED glows white, release the B-button. LED will then start changing
colours in sequence. Each colour means different MENU level. Press the B-button
briefly to confirm choice. Transitions between the MENU levels will be signaled
with a short beep as well.
LED colours will change in the following sequence:
WHITE - entering MENU + self test
GREEN - refresh alarm state for the associated devices
PINK - Z-Wave communication test.
YELLOW - sensor reset.
13. Alarm broadcast.
A value other than 0 means that alarms are being sent in broadcast mode, i.e. to
all devices within a Fibaro Smoke Sensor’s range.
Available settings: 0 - 3
0 – broadcast inactive
1 – smoke alarm broadcast (1-st Association Group) active; tamper alarm
broadcast (2-nd Association Group) inactive
2 – smoke alarm broadcast (1-st Association Group) inactive; tamper alarm
broadcast (2-nd Association Group) active
3 – smoke alarm broadcast active (1-st association group); tamper alarm
broadcast (2-nd association group) active.
Default setting: 0
Parameter size: 1 [byte]
73. Temperature measurement compensation.
Parameter stores a temperature value to be added to or deducted from the current
temperature measured by internal temperature sensor in order to compensate the
difference between air temperature and temperature measured at the ceiling level.
Available settings: -1000 -/+ 1000 (in 0,1
o
C steps)
Default setting: 0 (0
o
C)
Parameter size: 2 [byte]
80. Z-Wave range test interval.
Time period between the consecutive Z-Wave network range tests.
In battery powering mode, Z-Wave network range test is carried out at the wake up
interval. The value of 0 turns off the Z-Wave range test, regardless of the powering
mode chosen.
Fig. 5 Fibaro Smoke Sensor black box chart.
NOTE
During the Z-Wave network range test and during the software
update as well, Fibaro Smoke Sensor does not detect smoke
presence. Once the Z-Wave network range test and software
update is completed, the device resumes normal operation.
!
NOTE
Any change in this parameter’s settings may cause a Fibaro
Smoke Sensor to operate contrary to valid safety regulations of
your country.
!
89. Tamper alarm
Available settings: 0, 1, 2
0 – tamper alarm inactive
1 – tamper alarm active, with cancellation option available
2 – tamper alarm active, without cancellation option
default setting: 1
parameter size: 1 [byte]
Black Box recordings are stored for about 24 hours, depeding on
the parameter 83 settings and working environment conditions.
User may force sending these recordings to the Z-Wave network
main controller, depending on its model and software version.
i
XIV. CANCEL ALARM FOR ASSOCIATED DEVICES
The Fibaro Smoke Sensor automatically cancels smoke alarms sent to the Z-Wave
network controller and the associated devices. It’s possible to delay or deactivate
the alarm cancellation by modifying parameter 1 settings. In such a case, once an
alarm is detected, it will be constantly reported unless manually cancelled by
choosing green MENU level.
Fibaro Smoke Sensor is a battery-powered device. Using batteries other than
specified may result in explosion. Dispose of properly, observing environmental
protection rules.
NOTE
Tamper alarms cannot be cacelled through MENU.
!
XV. Z-WAVE RANGE TEST
The Fibaro Smoke Sensor has a built in Z-Wave network main controller’s range
tester. Follow the below instructions to test the main controller’s range:
1) Make sure the sensor is powered.
2) Press and hold the B-button for 3 seconds. LED will glow white.
3) Short signal will sound.
4) Release the B-button.
5) Wait untill the LED glows pink, and then press the B-button briefly to start the
test.
6) LED will indicate the Z-Wave network’s range (range signaling modes described
below).
7) To exit Z-Wave range test, press the B-button brefly.
Z-Wave range tester signaling modes:
LED indicator pulsing green - Fibaro Smoke Sensor attempts to extablish a
direct communication with the main controller. If a direct communication attempt
fails, sensor will try to establish a routed communication, through other modules,
which will be signaled by LED indicator pulsing yellow.
LED indicator glowing green - Fibaro Smoke Sensor communicates with the
main controller directly.
LED indicator pulsing yellow - Fibaro Smoke Sensor tries to establish a routed
communication with the main controller through other modules.
LED indicator glowing yellow - Fibaro Smoke Sensor communicates with the
main controller through the other modules. After 2 seconds the sensor will retry to
establish a direct communication with the main controller, which will be signaled
with LED blinking in green.
LED indicator pulsing violet - Fibaro Smoke Sensor communicates at the range
limit. If connection proves successful it will be confirmed with a yellow glow. It’s not
recommended to use the sensor at the range limit.
LED indicator glowing red - Fibaro Smoke Sensor is not able to connect to the
main controller directly or through another Z-Wave network nodes.
This Device may be used with all devices certified with Z-Wave
certificate and should be compatible with such devices produced
by other manufacturers.
Any device compatible with Z-Wave may be added to Fibaro system.
FIBARGROUP
FIBARO
In case of any technical questions contact customer service centre in your country.
www.fibargroup.com
i
1. The Guarantee is provided by FIBAR GROUP Sp. z o.o. (hereinafter
"Manufacturer"), based in Poznan, ul. Lotnicza 1; 60-421 Poznan, entered in the
register of the National Court Register kept by the District Court in Poznań, VIII
Economic Department of the National Court Register, no. 370151,
NIP 7811858097, REGON: 301595664.
0 - no delay, immediate cancellation
65535 - alarm cancellation inactive - Smoke Sensor will keep indicating smoke
alarm after the smoke will have disappeared. The smoke alarm can be only ceased
manually, by entering 2nd menu level (see section XIII).
Default setting: 0
Parameter size: 2 [bytes]
NOTE
Default value of the Wake Up, in Home Center 2, is 6 hours.
!
1. Smoke alarm cancellation delay
The time between when the smoke disappears and the Fibaro Smoke Sensor
stops sending the alarm signal.
Available settings: 0 – 17280, 65535 (5s multiplier) [5s-24h]


Praat mee over dit product
Laat hier weten wat jij vindt van de Fibaro FGSS-001 Rookmelder. Als je een vraag hebt, lees dan eerst zorgvuldig de handleiding door. Een handleiding aanvragen kan via ons contactformulier.