Handleiding Horstmann Electronic 7 Thermostaat

Handleiding voor je Horstmann Electronic 7 Thermostaat nodig? Hieronder kun je de handleiding gratis bekijken en downloaden als PDF in het Nederlands en/of Engels. Dit product heeft 2 veelgestelde vragen, 1 comment en heeft 0 stemmen. Is dit niet de handleiding die je zoekt, neem dan contact met ons op.

Is je product kapot en biedt de handleiding geen oplossing meer? Dan kun je voor reparatie gratis terecht bij Repair Café.

Handleiding

Loading…

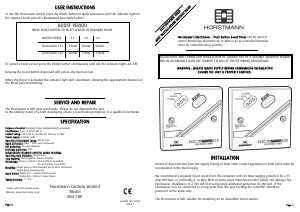
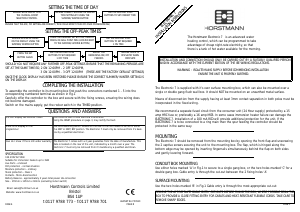
MOUNTING
The Electronic 7 should be removed from the mounting box by opening the front flap and unscrewing
the 2 captive screws securing the unit to the mounting box. The flap, which is hinged along the
bottom edge may be opened by inserting fingernails simultaneously behind the flap on both sides
and gently levering forward.
CONDUIT BOX MOUNTING
Use either holes marked ‘A’ in Fig.1 to secure to a single gang box, or the two holes marked ‘C’ for a
double gang box. Cable entry is through the cut-out between the 2 fixing holes ‘A’
SPECIFICATION
13A 230V AC 50Hz
Suitable for immersion heaters up to 3kW
Live Parts - enclosed
Dirt protection - normal situation
Moisture protection - ordinary
Shock protection - Class 1
Contacts - Micro-disconnection
Battery Reserve - approximately 2 years total power dis-connection
Size - 170mm x 115mm x 60mm (excluding rocker switch)
ENSURE CORRECT SUMMER OR WINTER
TIME SETTING BY USING THE
SUMMER/WINTER BUTTON
ENSURE WINTER APPEARS
ON THE DISPLAY USING THE
SUMMER/WINTER BUTTON
ENSURE SLIDE SWITCH IS IN
THE MANUAL BOOST
SELECTION POSITION.
REPEAT FOR
REMAINING ON/OFF
PERIODS
USE THE HRS AND MINS
BUTTONS TO SET CORRECT TIME
SETTING THE TIME OF DAY
ENSURE THAT THE AM/PM SETTING ARE CORRECT (THIS COULD EFFECT YOUR OFF-PEAK PROGRAMMING)
SETTING THE OFF-PEAK TIMES
PRESS THE RECESSED SET BUTTON, USING A
PENCIL OR BALL POINT PEN (LOCATED NEXT
TO THE SUMMER/WINTER BUTTON)
USE THE HRS AND MINS
BUTTONS TO SET REQUIRED
1 ON TIME
PRESS THE SET
BUTTON AGAIN
USE THE HRS AND MINS
BUTTONS TO SET REQUIRED
1 OFF TIME
ENSURE CLOCK IS
DISPLAYED WHEN
COMPLETE
SHOULD YOU NOT REQUIRE ANY FURTHER OFF-PEAK SETTINGS ENSURE THAT THE REMAINING PERIODS ARE
SET AT THE SAME TIME EG; 2 ON 12:00PM - 2 OFF 12:00PM,
3 ON 12:00PM - 3 OFF 12:00PM (THESE ARE THE FACTORY DEFAULT SETTINGS)
ONCE THE CLOCK DISPLAY HAS BEEN RESTORED PLEASE ENSURE THE CORRECT SUMMER/WINTER SETTING IS
ON THE DISPLAY.
COMPLETING THE INSTALLATION
To assemble the controller to its mounting box first push the connectors numbered 1 - 5 into the
corresponding numbered terminal as shown in Fig.1
Carefully offer the controller to the box and secure with the fixing screws, ensuring the wiring does
not become damaged.
Switch on the mains supply, put the rocker switch in the TIMED position.
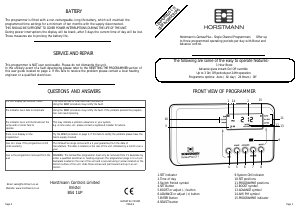
QUESTIONSANDANSWERS
The unit display has become frozen
There is no display on the
programmer
How do I know if the is still under warranty
This could be due to local electrical interference
Using the RESET procedure on page 3, may rectify the fault.
The commissioning switch located on the rear of the unit needs to be set in either
the GMT or GMT/BST position. The Electronic 7 must only be removed from it’s back-
box by a qualified electrician.
The Electronic 7 comes with a 2 year guarantee from the date of manufacture. This
date is located on the rear of the unit, indicated by a month over a year. The
Electronic 7 must only be removed from it’s backbox by a qualified electrician.
The Horstmann Electronic 7 is an advanced water
heating control, which can be programmed to take
advantage of cheap night-rate electricity, so that
there is a tank of hot water available for the morning.
PAGE 1PAGE 4
LEAFLET No P30910
ISSUE 8
INSTALLATION AND CONNECTION SHOULD ONLY BE CARRIED OUT BY A SUITABLY QUALIFIED PERSON
AND IN ACCORDANCE WITH THE CURRENT EDITION OF THE IEE WIRING REGULATIONS.
WARNING:ISOLATE MAINS SUPPLY BEFORE COMMENCING INSTALLATION
ENSURE THE UNIT IS PROPERLY EARTHED.
The Electronic 7 is supplied with it’s own surface mounting box, which can also be mounted over a
single or double gang flush wall box. It should NOT be mounted on an unearthed metal surface.
Means of disconnection from the supply having at least 3mm contact separation in both poles must be
incorporated in the fixed wiring.
We recommend a separate fused circuit from the consumer unit (24 Hour supply) protected by a 15
amp HRC fuse or, preferably a 16 amp MCB. In some cases immersion heater failure can damage the
ELECTRONIC 7. Installation of a 100 mA RCD will provide additional protection for the unit. If the
ELECTRONIC 7 is to be connected to a ring main then the spur feeding the controller should be
protected in the same way.
SURFACE MOUNTING
Use the two holes marked ‘B’ in Fig.1 Cable entry is through the most appropriate cut-out
REMOVE THE APPROPRIATE CABLE ENTRY CUT-OUTS BEFORE FIXING THE BOX, WHERE POSSIBLE DRILL THE
BOX TO PROVIDE A CLOSE FITTING ENTRY FOR CABLES AND HEAT-RESISTANT FLEXIBLE CORDS. TAKE CARE TO
REMOVE SHARP EDGES.
Horstmann Controls Limited
Bristol
BS4 1UP
t:0117 9788 773 - f:0117 9788 701
Website: www.horstmann.co.uk
Download de handleiding in het Nederlands en/of Engels (PDF, 0.1 MB)
(Denk aan het milieu en print deze handleiding alleen als dat echt noodzakelijk is)

Loading…

Beoordeling

Laat ons weten wat je van de Horstmann Electronic 7 Thermostaat vindt door een beoordeling achter te laten. Wil je je ervaringen met dit product delen of een vraag stellen? Laat dan een bericht achter onderaan de pagina.
Bent u tevreden over de Horstmann Electronic 7 Thermostaat?
Ja Nee
Beoordeel dit product als eerste
0 stemmen

Praat mee over dit product

Laat hier weten wat jij vindt van de Horstmann Electronic 7 Thermostaat. Als je een vraag hebt, lees dan eerst zorgvuldig de handleiding door. Een handleiding aanvragen kan via ons contactformulier.

Ness L 10-07-2020
Hallo, mijn Horstman-ketel werkte tot een stroomstoring. Na stroomonderbreking werd de tijd gereset en werkte de ketel tijdens de daluren, bijv. 2-7 uur. Ik heb dit gecontroleerd en bevestigd. Wat ik niet begrijp is waarom het water helemaal niet warm is als de ketel werkt, wat kan de reden zijn dat er geen warm water is? In de ochtend voelt de ketel warm aan. Om het even welk advies zou zeer gewaardeerd worden.

beantwoord | Ik vind dit nuttig (0) (Vertaald door Google)

Meer over deze handleiding

We begrijpen dat het prettig is om een papieren handleiding te hebben voor je Horstmann Electronic 7 Thermostaat. Je kunt de handleiding bij ons altijd downloaden en daarna zelf printen. Indien je graag een originele handleiding wilt hebben, raden we je aan contact op te nemen met Horstmann. Zij kunnen wellicht nog voorzien in een originele handleiding. Zoek je de handleiding van Horstmann Electronic 7 Thermostaat in een andere taal? Kies op de homepage je taal naar keuze en zoek daarna op het modelnummer om te zien of we deze beschikbaar hebben.

Specificaties

Merk Horstmann
Model Electronic 7
Categorie Thermostaten
Bestandstype PDF
Bestandsgrootte 0.1 MB

Alle handleidingen voor Horstmann Thermostaten
Meer handleidingen voor Thermostaten

Veelgestelde vragen over Horstmann Electronic 7 Thermostaat

Ons supportteam zoekt dagelijks naar nuttige productinformatie en antwoorden op veelgestelde vragen. Als er onverhoopt toch een onjuistheid tussen onze veelgestelde vragen staat, laat het ons dan weten via het contactformulier.

Wat is de dode zone van een thermostaat? Geverifieerd

Veel modernere thermostaten hebben een dode zone. Als de temperatuur minder dan ongeveer 4°C afwijkt van de ingestelde temperatuur, dan zal het systeem niet verwarmen of koelen. Deze zogenoemnde dode zone van de thermostaat voorkomt dat het systeem te vaak aan- en afslaat en bespaart zo energie.

Ik vind dit nuttig (1588) Lees meer

Wat is de beste locatie om een thermostaat te plaatsen? Geverifieerd

De beste plek voor een thermostaat is ongeveer 1,5 meter van de grond. Plaats de thermostaat niet in de buurt van een radiator of andere apparatuur die warmte afgeeft of in direct zonlicht. Kies een kamer die vaak wordt gebruikt. In veel gevallen is dit de woonkamer.

Ik vind dit nuttig (990) Lees meer
Handleiding Horstmann Electronic 7 Thermostaat

Gerelateerde producten

Gerelateerde categorieën