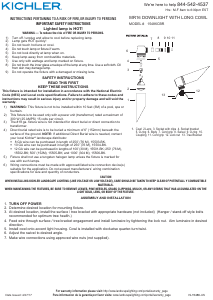
INSTRUCTIONS PERTAINING TO A RISK OF FIRE,OR INJURY TO PERSONS
IMPORTANT SAFETY INSTRUCTIONS
Lighted lamp is HOT!
WARNING — To reduce the risk of FIRE OR INJURY TO PERSONS.
1) Turno/unplugandallowtocoolbeforereplacinglamp.
2) LampgetsHOTquickly!Contactonlyswitch/plugwhenturningon.
3) Donottouchhotlensorcowl.
4) Donotremaininlightifskinfeelswarm.(Lightisintense,itmaycause“sunburn”.)
5) Donotlookdirectlyatlightedlamp.
6) Keeplampawayfrommaterialsthatmayburn.
7) Useonlywithwattageandlampmarkedonxture.
8) Donottouchtheinnerglassenvelopeofthelampatanytime.Useasoftcloth.Oil
fromskinmaydamagelamp.
9) Donotoperatethexturewithadamagedormissinglens.
SAFETY INSTRUCTIONS
READ THIS FIRST
KEEP THESE INSTRUCTIONS
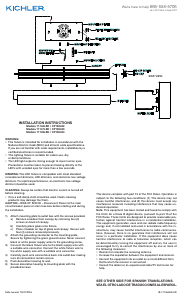
This xture is intended for installation in accordance with the National Electric
Code (NEC) and Local code specications. Failure to adhere to these codes and
instructions may result in serious injury and/or property damage and will void the
warranty.
1) Thisxtureistobeusedonlywithapowerunit(transformer)ratedamaximum
of300W(25AMPS)15volts.
2) The#18ga.xturewireisnotintendedfordirectburial.
3) Directburialratedwireistobeburiedaminimumof6”(152mm)beneaththe
surfaceoftheground.NOTE:IfadditionalDirectBurialwireisneeded,
contactyourlocalKichler
®
landscapedistributor.
•8GAwirecanbepurchasedinlengthof250’(76M),15503-BK.
• 10GAwirecanbepurchasedinlengthof250’(76M),15504-BK.
• 12GAwirecanbepurchasedinlengthsof100’(30M),15501-BK;250’(76M),
15502-BK;500’(152M),15505-BK;and1000’(304M),15506-BK.
4) Fixtureshallnotuseatungstenhalogenlampunlessthextureismarkedfor
usewithsuchlamps.
5) Wiringconnectionsmustbemadewithapproved/listedwireconnection
device(s)suitablefortheapplication.Donotexceedmanufacturers’wiring
combinationspecicationsforsizeandquantityofconductors.
CAUTION
WHEN INSTALLING KICHLER LANDSCAPE LIGHTING (LINE VOLTAGE OR LOW VOLTAGE), CARE
SHOULD BE TAKEN TO KEEP CLEAR OF POTENTIALLY COMBUSTIBLE MATERIALS.
WHEN MAINTAINING THE FIXTURES, BE SURE TO REMOVE LEAVES, PINE NEEDLES, GRASS
CLIPPINGS, MULCH, OR ANY DEBRIS THAT HAS ACCUMULATED ON THE LIGHT BULB, LENS, OR
BODY OF THE FIXTURE.
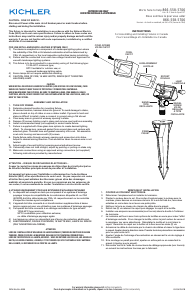
ASSEMBLY AND INSTALLATION
1) TURN OFF POWER.
2) Determinedesiredlocationformountingxture.
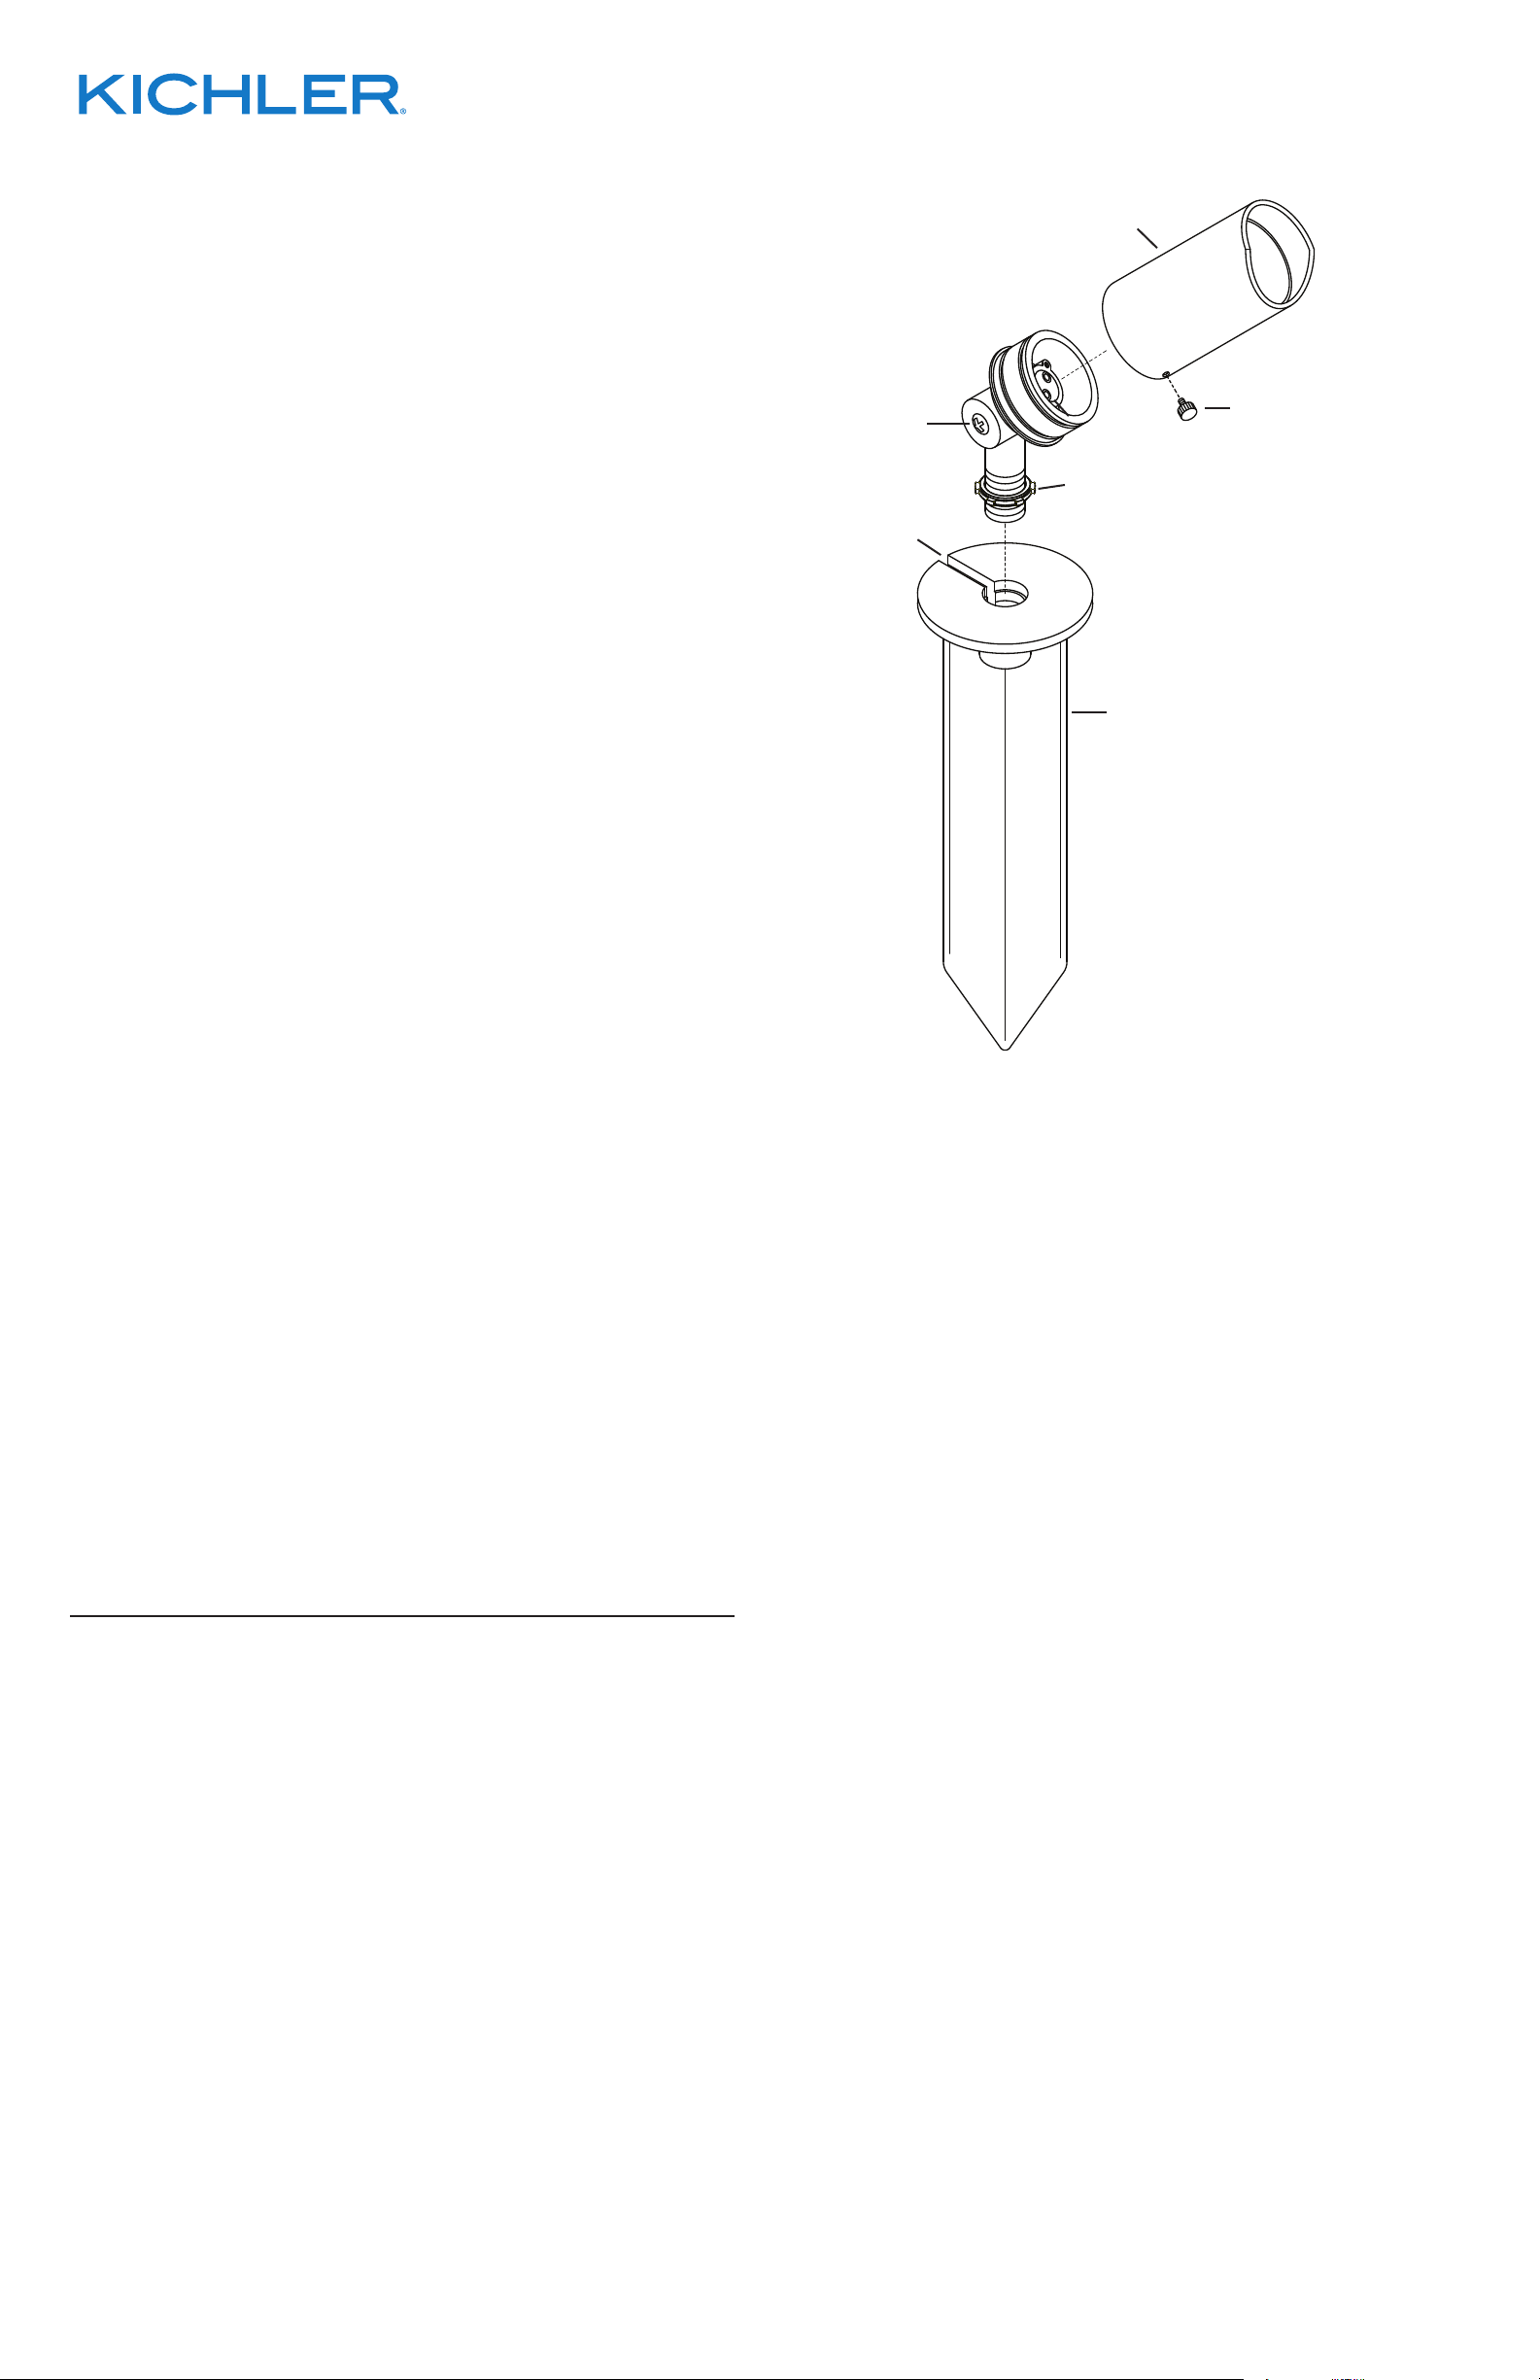
3) Atdesiredlocation,hammerstake(A)intoground.Toavoiddamagetostake,
placeaboardontopofstakewhilehammering.Ifgroundishardandstakeis
diculttoinstall,makeacrosscutingroundusingaatshovel.
4) Clearawayareaingroundatwirewayslot(B)intopofstake(A).
5) Unscrewcowl(E)fromaccentlight(D).
6) Installlamptosocketinsideaccentlight.NOTE: Usecautionwheninstalling.
Holdlampbyouterhousing.DONOTtouchglassenvelopeinside.Ifthis
happens,cleanlampwithdenaturedalcoholandalintfreecloth.
7) Applyalightcoatingofprovidedsiliconelubricanttoo-ring.
8) Screwcowl(E)ontoaccentlight(D).Secureinplaceusingeithertheprovided
thumbscrew(F)orthevandalresistantscrew.NOTE:Vandalresistantscrew
requiresa3/32hexkey(notprovided)forinstallationorremoval.
9) Lay12Vcableintowirewayslot(B)andscrewxtureintostake(A).Whenat
desireddirectionrunlocknut(G)downagainststake(A).
10) Adjustangleofaccentlightbylooseningscrew(H).DONOTremovescrew.
11) Makewireconnectionsusingapprovedwiringconnectors(notsupplied).
INSTRUCCIONES PERTINENTES A UN RIESGO DE ICENDIO O LESION A LAS
PERSONAS
INSTRUCCIONES IMPORTANTES DE SEGURIDAD
¡La lámpara encendida es CALIENTE!
ADVERTENCIA — Para disminuir el riesgo de INCENDIO O LESION A LAS PERSONAS.
1) Apague/desenchufeydejequeseenfríeantesdecambiarlalámpara.
2) ¡LalámparaseCALIENTArápidamente!Hagacontactodelconmutador/
enchufesólocuandoencienda.
3) Notoquelalenteolacapuchacaliente.
4) Nopermanezcaenlaluzsisientetibialapiel.(Laluzesintensa,puedecausar
“quemadurasdesol”).
5) Nomiredirectamentealalámparaencendida.
6) Mantengalalámparaalejadadelosmaterialesquepuedanencenderse.
7) Usesolamenteconelvatiajeylalámparamarcadosenelartefacto.
8) Notoqueelvidriodelinteriordelalámparaenningúnmomento.Useunpaño
suave.Elaceitedelcuerpopuededañarlalámpara.
9) Nohagafuncionarelartefactoconunalentedañadaofaltante.
INSTRUCCIONES DE SEGURIDAD
Primero lea esto
Guarde estas instrucciones
Este artefacto se debe instalar de acuerdo con el Código Eléctrico Nacional
(NEC, por sus siglas en inglés) y con las especicaciones del código local. No
cumplir con estos códigos e instrucciones puede resultar en lesiones graves y/
o en daños a la propiedad y anulará la garantía.
IS-15384-US
1) Esteartefactodebeutilizarsesolamenteconunaunidaddepotencia(tranformador)
concapacidadnominalmáximade300vatios(25amp.)15voltios.
2) ElalambredelartefactocalibreNo.18noesparasoterradodirecto.
3) Elalambreclasicadoparasoterradodirectosedebeenterrarunmínimode6
pulgadas(152mm)debajodelasuperciedelterreno.NOTA:Sinecesita
alambredesoterradodirectoadicional,comuníqueseconsudistribuidor
localKichler
®
deproductosdejardineríaornamental.
• Elalambrecalibre8puedecomprarseenlongitudde250’(76m.),15503-BK
• Elalambrecalibre10puedecomprarseenlongitudde250’(76m.),15504-BK
• Elalambrecalibre12puedecomprarseenlongitudesde75’(22m.),15550-BK;
100’(30m.),15501-BK;250’(76m.),15502-BK;500’(152m.),15505-BK;y
1000’(304m.),15506-BK.
4) Elartefactonodebeutilizarseconlámparasdehalógeno,amenossqueel
artefactoestémarcadoparausarcontaleslámparas.
5) Lasconexionesdecableadosedebenhacerconlasconexionesdel(los)
dispositivos)deconexióndecableadoaprobados/delalista,adecuados
paralaaplicación.Noexcedalasespecicacionesdecombinaciónde
cableadodelfabricanteparaeltamañoycantidaddeconductores.
PRECAUCION
CUANDO SE INSTALE SISTEMAS DE ALUMBRADO KICHLER PARA JARDINES (YA SEA DE VOLTAJE
DE LINEA O CON VOLTAJE BAJO) SE DEBE TENER CUIDADO DE MAINTNERLOS ALEJADOS DE
MATERIALES QUE PUEDAN SER COMBUSTIBLES EN POTENCIA.
AL DAR SERVICIO DE MANTENIMIENTO A ESTOS SISTEMAS, ASEGURESE DE DESPEJAR LAS
HOJAS, CONOS DE PINO, RECORTES DEL PASTO, CUBIERTA DE PAJA O CUALQUIER BASURA QUE
SE HAYA ACUMULADO EN LA BOMBILLA DE LUZ, EL LENTE O EL SOPORTE DE LA BOMBILLA.
MONTAJE E INSTALACIÓN
1) APAGAR LA ALIMENTACIÓN ELÉCTRICA.
2) Determineellugardeseadodondemontarelartefacto.
3) Enellugardeseado,martillelaestaca(A)enelsuelo.Paraevitardañarla
estaca,coloqueunatablaenlapartesuperiordelaestacamientrasesté
martillando.Sielsueloesduroyesdifícilinstalarlaestaca,hagauncorteen
cruzenelsuelousandounapalaplana
4) Limpieeláreadelsueloenlaranura(B)delcanaldealambresenlaparte
superiordelaestaca(A).
5) Destornillelacapucha(E)delaluzdeacento(D).
6) Instalelabombillaalcasquillodentrodelaluzdeacento.NOTA:Tenga
cuidadoalinstalar.Sostengalabombilladelacubiertaprotectora.NOtoque
laenvolventedevidriodeadentro.Siestosucede,limpielabombillacon
alcoholdesnaturalizadoyunatelasinpelusas.
7) Apliqueunacapadelgadadelubricantedesiliconaqueseproveealanillotórico.
8) Atornillelacapucha(E)alaluzdeacento(D).Asegureensulugarusandoel
tornillodemariposa(F)queseproveeoeltornilloresistentea
manipulaciones.NOTA:Eltornilloresistenteamanipulacionesrequiereuna
llavehexagonalde3/32(noseprovee)paralainstalaciónoretiro.
9) Coloqueuncablede12Venlaranura(B)delcanaldealambresyatornilleel
artefactoenlaestaca(A).Cuandoestéenladireccióndeseada,corrahacia
abajolatuercadeseguridad(G)contralaestaca(A).
10) Ajusteelángulodelaluzdeacentoaojandoeltornillo(H).NORETIRE
eltornillo.
11) Hagalasconexionesdealambreutilizandoconectoresdealambreaprobados
(nosesuministran).
D
E
H
B
A
G
F
We’re here to help 866-558-5706
Hrs: M-F 9am to 5pm EST
REV18-JUL-2025
For warranty information please visit: kichler.com/warranty
Para informacion de la garantia por favor visite: kichler.com/warranty


Praat mee over dit product
Laat hier weten wat jij vindt van de Kichler 15384CBR Lamp. Als je een vraag hebt, lees dan eerst zorgvuldig de handleiding door. Een handleiding aanvragen kan via ons contactformulier.