Handleiding Kichler 2771NI Dover Lamp

Handleiding voor je Kichler 2771NI Dover Lamp nodig? Hieronder kun je de handleiding gratis bekijken en downloaden als PDF in het Nederlands en/of Engels. Dit product heeft 7 veelgestelde vragen, 0 comments en heeft 0 stemmen. Is dit niet de handleiding die je zoekt, neem dan contact met ons op.

Is je product kapot en biedt de handleiding geen oplossing meer? Dan kun je voor reparatie gratis terecht bij Repair Café.

Handleiding

Loading…

INSTALLATION SUR TIGE
1) Acheminer le fil du luminaire par la
tige et visser la tige sur le tube fileté
en haut du luminaire. REMARQUE:
appliquer le frein filet sur tous les
filets de la tige indiqués par le
symbol (") œpour empêcher la
rotation accidentelle du luminaire
pendant le nettoyage, remplacement
de lampe, etc.
2) Acheminer le fil du luminaire par les
tiges restantes et visser ensemble.
3) Attacher la petite boucle à la dernière
tige.
4) Couper le courant d’alimentation.
5) Visser les vis dans les trous filetés de
la patte de fixation.
6) Fixer la patte de fixation à la boîte de
jonction. (Les vis ne sont par
fournies.)
7) Fixer le petit anneau au cache avec la
rondelle d’arrêt et l’écrou hexagonal.
Serrer avec une pince.
8) Attacher le luminaire et les tiges au
cache à l'aide des maillons de chaîne
fournie.
9) Connecter le fil de mise à la terre de
l’élément à celui de la boîte de jonction.
10)Hacer las conexiones de los alambres
(conectores no incluidos.) Ver el
cuadro más abajo para las conexiones
correctas y alambrar de acuerdo a
esto.
11) Pousser l’élément au plafond en passant
avec précaution les vis (montage)
dans les trous du cache.
12)Fixer l’élément au plafond avec les
rondelles d’arrêt et le bouton moleté.
13)Faire glisser le verre sur la douille et
fixer à l’aide de la bague de douille.
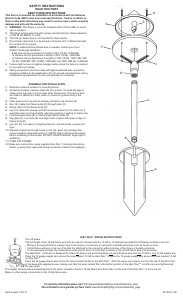
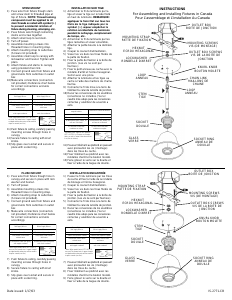
STEM MOUNT
1) Pass wire from fixture though stem
and screw stem to threaded pipe at
top of fixture. NOTE: Thread locking
compound must be applied to all
stem threads as noted with symbol (")
to prevent accidental rotation of
fixture during cleaning, relamping, etc.
2) Pass fixture wire through remaining
stems and screw together.
3) Attach small loop to last stem.
4) Turn off power.
5) Assemble mounting screws into
threaded holes in mounting strap.
6) Attach mounting strap to outlet box.
(Screws not provided).
7) Assemble small loop to canopy with
lockwasher and hexnut. Tighten with
pliers.
8) Attach fixture and stems to canopy
using provided chain link.
9) Connect ground wire from fixture and
ground wire from outlet box in outlet
box
10)Make wire connections (connectors
not provided.) Reference chart below
for correct connections and wire
accordingly.
11)Push fixture to ceiling, carefully passing
mounting screws through holes in
canopy.
12)Secure fixture to ceiling with knurl
knobs.
13)Slip glass over socket and secure in
place with socket ring.
FLUSH MOUNT
1) Pass wire from fixture though hole in
canopy and secure in place with lock
washer and hexnut.
2) Turn off power.
3) Assemble mounting screws into
threaded holes in mounting strap.
4) Attach mounting strap to outlet box.
(Screws not provided).
5) Connect ground wire from fixture and
ground wire from outlet box in outlet
box
6) Make wire connections (connectors
not provided.) Reference chart below
for correct connections and wire
accordingly.
7) Push fixture to ceiling, carefully passing
mounting screws through holes in
canopy.
8) Secure fixture to ceiling with knurl
knobs.
9) Slip glass over socket and secure in
place with socket ring.
Connect Black or
Red Supply Wire to:
Connect
White Supply Wire to:
Black White
*Parallel cord (round & smooth)
*Parallel cord (square & ridged)
Clear, Brown, Gold or Black
without tracer
Clear, Brown, Gold or Black
with tracer
Insulated wire (other than green)
with copper conductor
Insulated wire (other than green)
with silver conductor
*Note: When parallel wires (SPT I & SPT II)
are used. The neutral wire is square shaped
or ridged and the other wire will be round in
shape or smooth (see illus.)
Neutral Wire
Connect Black or
Red Supply Wire to:
Connect
White Supply Wire to:
Black White
*Parallel cord (round & smooth) *Parallel cord (square & ridged)
Clear, Brown, Gold or Black
without tracer
Clear, Brown, Gold or Black
with tracer
Insulated wire (other than green)
with copper conductor
Insulated wire (other than green)
with silver conductor
*Note: When parallel wires (SPT I & SPT II)
are used. The neutral wire is square shaped
or ridged and the other wire will be round in
shape or smooth (see illus.)
Neutral Wire
INSTALLATION ENCASTRÉE
1) Passer le fil du luminaire par les trous
du cache et fixer à l’aide de la rondelle
de blocage et l'écrou hexagonal.
2) Couper le courant d’alimentation.
3) Visser les vis dans les trous filetés de
la patte de fixation.
4) Fixer la patte de fixation à la boîte de
jonction. (Les vis ne sont par fournies.)
5) Connecter le fil de mise à la terre de
l’élément à celui de la boîte de jonction.
6) Hacer las conexiones de los alambres
(conectores no incluidos.) Ver el
cuadro más abajo para las conexiones
correctas y alambrar de acuerdo a
esto.
7) Pousser l’élément au plafond en passant
avec précaution les vis (montage)
dans les trous du cache.
8) Fixer l’élément au plafond avec les
rondelles d’arrêt et le bouton moleté.
9) Faire glisser le verre sur la douille et
fixer à l’aide de la bague de douille.
Date issued: 1/17/03 IS-2771-CB
Connecter le fil noir ou
rouge de la boite
Connecter le fil blanc de la boîte
A Noir A Blanc
*Au cordon parallèle (rond et lisse)
*Au cordon parallele (à angles droits el strié)
Au bransparent, doré, marron, ou
noir sans fil distinctif
Au transparent, doré, marron, ou
noir avec un til distinctif
Fil isolé (sauf fil vert) avec
conducteur en cuivre
Fil isolé (sauf fil vert) avec
conducteur en argent
*Remarque: Avec emploi d’un fil paralléle
(SPT I et SPT II). Le fil neutre est á angles
droits ou strié et l’autre fil doit étre rond ou
lisse (Voir le schéma).
Fil Neutre
Connect Black or
Red Supply Wire to:
Connect
White Supply Wire to:
Black White
*Parallel cord (round & smooth) *Parallel cord (square & ridged)
Clear, Brown, Gold or Black
without tracer
Clear, Brown, Gold or Black
with tracer
Insulated wire (other than green)
with copper conductor
Insulated wire (other than green)
with silver conductor
*Note: When parallel wires (SPT I & SPT II)
are used. The neutral wire is square shaped
or ridged and the other wire will be round in
shape or smooth (see illus.)
Neutral Wire
MOUNTING STRAP
PATTE DE FIXATION
MOUNTING SCREWS
VIS (DE MONTAGE)
OUTLET BOX
BOITE DE JONCTION
OUTLET BOX SCREWS
VIS DE LA BOITE DE
JONCTION
HEXNUT
ECROU HEXAGONAL
LOOP
ANNEAU
KNURL KNOB
BOUTON MOLETE
STEM
TIGE
LOCKWASHER
RONDELLE D’ARRET
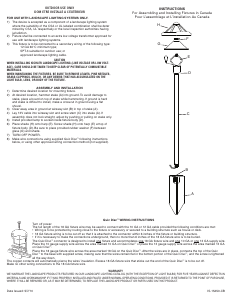
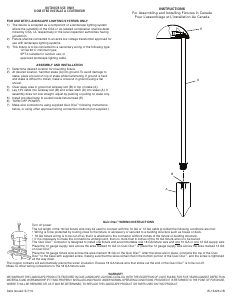
INSTRUCTIONS
For Assembling and Installing Fixtures in Canada
Pour L’assemblage et L’installation Au Canada
LOOP
ANNEAU
SOCKET
DOUILLE
SOCKET RING
ANNEAU DE
DOUILLE
GLASS
VERRE
MOUNTING STRAP
PATTE DE FIXATION
MOUNTING SCREWS
VIS (DE MONTAGE)
OUTLET BOX
BOITE DE JONCTION
OUTLET BOX SCREWS
VIS DE LA BOITE DE
JONCTION
HEXNUT
ECROU HEXAGONAL
KNURL KNOB
BOUTON MOLETE
LOCKWASHER
RONDELLE D’ARRET
SOCKET
DOUILLE
SOCKET RING
ANNEAU DE
DOUILLE
GLASS
VERRE
STEM
TIGE
"
"
CHAIN LINK
MAILLONS DE
CHAINE
Download de handleiding in het Nederlands en/of Engels (PDF, 0.1 MB)
(Denk aan het milieu en print deze handleiding alleen als dat echt noodzakelijk is)

Loading…

Meer over deze handleiding

We begrijpen dat het prettig is om een papieren handleiding te hebben voor je Kichler 2771NI Dover Lamp. Je kunt de handleiding bij ons altijd downloaden en daarna zelf printen. Indien je graag een originele handleiding wilt hebben, raden we je aan contact op te nemen met Kichler. Zij kunnen wellicht nog voorzien in een originele handleiding. Zoek je de handleiding van Kichler 2771NI Dover Lamp in een andere taal? Kies op de homepage je taal naar keuze en zoek daarna op het modelnummer om te zien of we deze beschikbaar hebben.

Specificaties

Merk Kichler
Model 2771NI Dover
Categorie Lampen
Bestandstype PDF
Bestandsgrootte 0.1 MB

Alle handleidingen voor Kichler Lampen
Meer handleidingen voor Lampen

Veelgestelde vragen over Kichler 2771NI Dover Lamp

Ons supportteam zoekt dagelijks naar nuttige productinformatie en antwoorden op veelgestelde vragen. Als er onverhoopt toch een onjuistheid tussen onze veelgestelde vragen staat, laat het ons dan weten via het contactformulier.

Is alle LED verlichting dimbaar? Geverifieerd

Nee, niet alle LED lampen zijn standaard dimbaar. Dit wordt aangegeven op de verpakking en evetueel op de lamp zelf.

Ik vind dit nuttig (510) Lees meer

Ik heb een nieuwe lichtbron in de lamp gedaan, maar deze gaat niet aan, waar kan dit door komen? Geverifieerd

Sommige lampen zijn gemaakt voor lichtbronnen van een specifiek wattage. Wanneer er een lichtbron in wordt gedaan die een hoger wattage vereist van de lamp kan leveren, dan kan het zijn dat het licht niet aangaat. Als de lamp een veel hoger wattage levert van waarvoor de lichtbron gemaakt is, kan de lichtbron doorbranden.

Ik vind dit nuttig (374) Lees meer

Waarom is de kleur van licht belangrijk? Geverifieerd

Er zijn grofweg twee soorten soort licht, warm licht en koud licht. Koud licht houdt je alerter en wakkerder. Warm licht werkt ontspannender. De warmte van licht wordt gemeten in Kelvin en staat aangegeven op de verpakking of de lamp zelf.

Ik vind dit nuttig (297) Lees meer

Wat is lumen? Geverifieerd

Lumen is een meeteenheid voor de totale hoeveelheid zichtbaar licht die een lichtbron naar alle kanten uitstraalt.

Ik vind dit nuttig (236) Lees meer

Welke fittingen zijn er? Geverifieerd

Wereldwijd worden vele soorten fittingen gebruiken, maar de meest gebruikte zijn die met de Edison schroefdraad, aangegeven met de letter E. In de meeste landen zijn fittingen E27 en E14 de standaard. In de Verenigde Staten zijn E26, E17, E12 en E10 de standaard.

Ik vind dit nuttig (180) Lees meer

Wat zegt het wattage over mijn lamp? Geverifieerd

Wattage is een meeteenheid voor het energieverbruik. Lampen met een hogere lichtopbrengst hebben een doorgaans hoger energieverbruik, maar voor het vergelijken van lichtopbrengst moet altijd gekeken worden naar de hoeveelheid lumen.

Ik vind dit nuttig (155) Lees meer

Wat is LED? Geverifieerd

LED staat voor light-emitting diode. Door in de juiste richting stroom door de halfgeleider te laten lopen ontstaat licht.

Ik vind dit nuttig (141) Lees meer

Beoordeling

Laat ons weten wat je van de Kichler 2771NI Dover Lamp vindt door een beoordeling achter te laten. Wil je je ervaringen met dit product delen of een vraag stellen? Laat dan een bericht achter onderaan de pagina.
Bent u tevreden over de Kichler 2771NI Dover Lamp?
Ja Nee
Beoordeel dit product als eerste
0 stemmen

Praat mee over dit product

Laat hier weten wat jij vindt van de Kichler 2771NI Dover Lamp. Als je een vraag hebt, lees dan eerst zorgvuldig de handleiding door. Een handleiding aanvragen kan via ons contactformulier.

Handleiding Kichler 2771NI Dover Lamp

Gerelateerde producten

Gerelateerde categorieën