■
C H A R A C T E R I S T I C S
1. Time/calendar display: Hour, minute, sec-
ond, month, date and day of the week
2. Time indication:
12-hour display format with
PM indicator and 24-hour display format are
available.
3. Stopwat ch: T he stopwatch can measure
up to 23 hours 59 minutes and 59 seconds in
1/100-second increments. Lap time measure-
ment is available. Up to 15 lap times can be
stored in memory.
Memory recall function:
Data obtained in the
Stopwatch mode can be recalled after meas-
urement.
4. Countdown timer: The countdown timer can
be set up to 23 hours 59 minutes and 59 sec-
onds.
5. Daily alarm:
The daily alarm can be set to
sound at the designated time on a 24-hour ba-
sis. Three individual daily alarms can be set.
Singl e-t ime alar m:
The Si ng le -t im e alarm
sounds only once at a designated time and it
is disengaged automatically.
Five individual
single-time alarms can be set.
6. Second Time Zone:
Time in a different time
zone can be displayed.
7.
Chime: The chime can be set to sound every
hour on the hour with a single beep.
8. Illuminating light:
The built-in electro-lumines-
cent (EL) light evenly illuminates the display for
easy viewing in darkness.
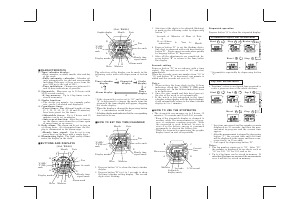
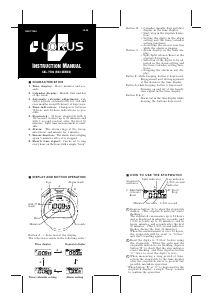
■
B U T T O N S A N D D I S P L AY S
■
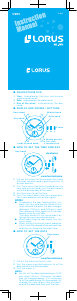
HOW TO S E T THE TIM E / C A L ENDAR
■
H O W T O U S E S T O P WAT C H
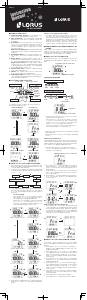
The display mode changes in the following or-
der by pressing Button D.
1 Press Button A for 2 seconds to change the dis-
play to the
TIME/CALENDAR SETTING mode. (The
second digits start flashing.)
2 Selection of the digits to be adjusted (flash-ing)
is made in the following order by pressing But-
ton D.
3 One digit (flashing) is increased or decreased
with each pressing of Button B or C, respective-
ly. To move the digits quickly, keep the Button
pressed.
• Second setting
Press Button B or C in accordance with a
time signal. The second digits are reset to
“00” and start counting immediately.
When the second digits count any number
from “ 3 0 ” to “ 5 9 ” a nd Butt o n B o r C i s
pressed, one minute is added and the sec-
onds are immediately reset to “00.”
Choice of 12-Hour/24-Hour format
• The time display for mat in either 12-hour in-
dication or in 24-hour indication can be se-
lected alternately by pressing button B or C.
Under the 12-hour indication format, “ PM” mark
appears in the afternoon, but no AM mark ap-
pears in the morning. Under the 24-hour indi-
cation format, no mark appears on the display.
* Measurement and release of lap time can be
repeated by pressing Button C.
* When Button C is pressed, the display changes
to show the current lap time and total time from
START for 3 seconds, and then it automatically
returns to show the ongoing measurement.
* When the stopwatch is reset by pressing Button C,
the measured data is stored in memory.
Press Button D to go to the STOPWATCH mode. The
STOPWATCH mode indicator appears on the dis-
play.
STOPWATCH OPERATION
Standard Measurement
Lap Time Measurement
During the measurement, the STOPWATCH signal
keeps flashing.
Press Button D to return to the TIME/CALENDAR
mode.
1. Press Button D to go to the Memory Recall
mode. The MEMORY RECALL moce indicator
appears on the display.
Memory Recall Function
2. Press Button C to show the data of the latest
measurement. The elapsed time and the
date of measurement are displayed with a
RUN number.
3. Press Button B to read each recorded lap
time. Recorded lap time is shown in order of
each lap number.
4. Press Button C to exit the Memory Recall Func
-
tion. The display returns to the MEMORY RE-
CALL mode.
How to delete all of the memories
• Press Button A for 2 seconds. The “DELETE” indi
-
cator appears on the display when the watch
starts deleting stored data. When the deletion
is finished, the display returns to the MEMORY
RECALL mode, and after 1 second, it automati-
cally goes to the STOPWATCH mode.
Data obtained in the Stopwatch mode can be re-
called after measurement. Each time data from
START to RESET is managed as a RUN. Press Button
D to return to the TIME/CALENDAR mode.
■
E N G A G E M E N T / D I S E N G A G E M E N T OF
C H I M E
With each press of Button C in the TIME/CALEN-
DAR mode, the chime can be alter nately en-
gaged or disengaged. The CHIME signal appears
or disappears on the display accordingly.
A ( SET /LI GHT )
PM ind i-
cat or
Hou r
Day of th e w eek
Chi me
sig nal
Sto pwa tch
sig nal
Dat e
Min ute
Sec ond
Tim er sig nal
Ala rm
sig nal
B ( STA RT/ STO P)
D ( MOD E)
C (LA P/RES ET )
4 After all the adjustments are completed, press
Button A to retur n to the TI ME/CALE NDAR
mode.
TI MER
TI ME/ CAL END AR
STO PWAT CH
MEM ORY R ECA LL
LOC AL CIT Y
D
D
D
D
SEC OND S
DAT E
12/ 24- HOU R F ORM AT
MON TH
MIN UTE S
HOU RS
LOC AL CIT Y
D
D
D
D
D
D
D
DATE SETTING
MONTH SETTING
TIME/CALENDAR mode
12/24 FORMAT SETTING
LOCAL CITY SETTING
MINUTE SETTING
HOUR SETTING
SECOND SETTING
D
D
A
C
A
D
D
D
B
B
B
B
B
B
B
D
STO PWAT CH mod e i ndi cat or
STO PWAT CH sig nal
D
B
C
Loc al cit y
Mon th Ye ar
DAI LY A LAR M
D
SIN GLE -TI ME ALA RM
D
YEA R
A
D
B
YEAR SETTING
D
MEM ORY R ECA LL moc e i ndi cat or
C
B
C
A
After
1 second
A
LAP nu mbe r
Tota l t ime from STA RT
■
H O W T O U S E C O U N T D O W N T I M E R
Press Button D three times to go to the TIMER
mode. The TIMER mode indicator appears on the
display.
1. Press Button A for 2 seconds to change the
display to the TIMER SETTING mode. The hour
digits start flashing.
2. Press Button B or C
to set the second digits.
One digit (flashing) is increased or decreased
with each pressing of Button B or C, respec-
tively. To move the digits quickly, keep the But-
ton pressed.
3. Press Button D to confirm the second setting
and move on to the minute setting. The minute
digits start flashing.
4. Press Button B or C to set the minute digits.
One digit (flashing) is increased or decreased
with each pressing of Button B or C, respec-
tively. To move the digits quickly, keep the But-
ton pressed.
5. Press Button D to confirm the minute setting
and move on to the hour setting. The hour dig-
its start flashing.
6. Press Button D to set the Timer number.
7. Press Button A to complete the timer setting.
C
C
C
C
C
C
C
B
B
LAP ti me
D
B
D
C
D
C


Praat mee over dit product
Laat hier weten wat jij vindt van de Lorus Z010 Uurwerk. Als je een vraag hebt, lees dan eerst zorgvuldig de handleiding door. Een handleiding aanvragen kan via ons contactformulier.