HM01
• 3D Pivoting System
• Specially Designed for ARC Rails
• Patented ATR Technology
Tactical Helmet Light
Features (English) HM01
(Francais) HM01
(Deutsch) HM01
Specications
Accessories
Battery Options
Technical Data
Warranty Service
Battery Installation
Installation on the Helmet
•
Utilizes a Luminus SST-20-W LED with a max output of 320 lumens
•
Max peak beam intensity of 1,390cd and max throw of 74 meters
•UtilizesaTIR(TotalInternalReection)Lensforasmooth
and soft beam
• Powered by a CR123A battery with a max runtime of 15 hours
•IncorporatedAdvancedTemperatureRegulation(ATR)module
(PatentNo.ZL201510534543.6)
•
Highlyecientconstantcurrentcircuitprovidesastableoutput
•3DPivotingSystemspeciallydesignedforARCRailstoexibly
adjust the beam angle
• Constructed from aero grade aluminum alloy
•HAIIImilitarygradehard-anodizednish
• Waterproof and dustproof rating in accordance with IP68
(2meterssubmersible)
• Impact resistant to 1 meter
Dimensions: 53.8mm×39.7mm×20.8mm(Folded)
(2.12"×1.56"×0.82")
Weight: 40.5g(1.43oz)
SpareO-ring,CR123ABattery,φ2.5mmHexKey,
φ1.5mmHexKey
Type Nominal Voltage Compatibility
Primary Lithium
Battery
CR123A 3V Y(Compatible)
Rechargeable
Li-ion Battery
RCR123A 3.6V/3.7V Y(Compatible)
FL1 STANDARD HIGH LOW
320 Lumens 35 Lumens
3h 15h
74m 24m
1,390cd 145cd
1m(ImpactResistance)
IP68,2m(WaterproofandSubmersible)
Note: The stated data is measured in accordance with the
internationalashlighttestingstandardsANSI/PLATOFL1-2019,
using1xCR123Alithiumbattery(1,600mAh)underlaboratory
conditions.Thedatamayvaryinrealworlduseduetodierent
battery usage or environmental conditions.
Operating Instructions
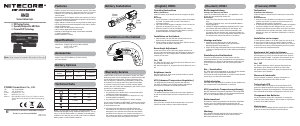
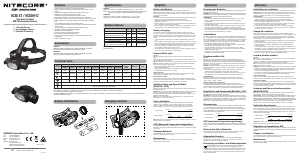
Battery Installation
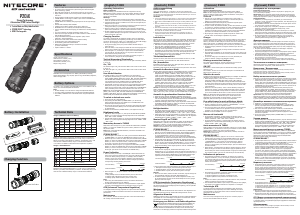
Insert the battery as illustrated and screw to tighten the light
head.
Warnings:
1. Ensure the battery is inserted with the positive end towards
the head. The product will not work if the battery is
incorrectly inserted.
2. CAUTION! Possible dangerous radiation! Don't look into the
light! May be dangerous for your eyes.
3. When the product is kept in a backpack or left unused
for prolonged time, please remove the battery to prevent
accidental activation or battery leakage.
Installation on the Helmet
1. Slide the base onto the ARC Rail until the limit screw is
aligned with the desired attachment point.
2. Screw clockwise to tighten the limit screw with the hex key
(φ2.5mm)untilthebaseisfullyxed.
Beam Angle Adjustment
Loosen the screws on the 3D Pivoting System with the hex
key(φ1.5mm)andtightenthemafteradjustingthebeamtoa
desired angle. The 3D Pivoting System is available with 360°
rotation on both ends.
On / O
On:Whenthelightiso,longpressthePowerButtontoturnit
on and access the LOW Level.
O:Whenthelightison,longpressthePowerButtontoturnit
o.
Brightness Levels
When the light is on, short press the Power Button to switch
between HIGH and LOW.
ATR (Advanced Temperature Regulation)
The integrated ATR technology regulates the output of
the HM01 according to the working condition and ambient
environment to maintain the optimal performance.
Changing Batteries
The batteries should be replaced when the output appears to
be dim or the helmet light becomes unresponsive due to low
power.
Maintenance
Every 6 months, threads should be wiped with a clean cloth
followed by a thin coating of silicon-based lubricant.
Instructions
Installation des batteries
Insérez la batterie comme illustré et vissez pour serrer la tête
de lampe.
Avertissements:
1. Assurez-vous que la batterie est insérée avec l'extrémité
positive vers la tête. Le produit ne fonctionnera pas si la
batterie n'est pas insérée correctement.
2. ATTENTION! Rayonnement dangereux possible! Ne regardez
pas dans la lampe! Peut être dangereux pour vos yeux.
3. Lorsque le produit est conservé dans un sac à dos ou laissé
inutilisé pendant une période prolongée, veuillez retirer la
batterie pour éviter une activation accidentelle ou une fuite
de batterie
Installation sur le casque
1. Faites glisser la base sur le rail ARC jusqu'à ce que la vis de
ndecoursesoitalignéeaveclepointdexationsouhaité.
2. Vissez dans le sens des aiguilles d'une montre pour serrer la
visdendecourseaveclacléhexagonale(φ2,5mm)jusqu'à
cequelabasesoitcomplètementxée
Ajustement de l’angle du faisceau
Desserrez les vis du système de pivotement 3D à l'aide de la
cléhexagonale(φ1,5mm)etserrez-lesaprèsavoirajustéle
faisceau à l'angle souhaité. Le système de pivotement 3D est
disponible avec une rotation de 360 ° aux deux extrémités.
On / O
On: quand la lampe est éteinte, appuyez longuement sur
l’interrupteur pour l'allumer et accéder au niveau LOW.
O:Quandlalampeestallumée,appuyezlonguementsur
l’interrupteur pour l'éteindre.
Niveaux de luminosité
Lorsque la lampe est allumée, appuyez brièvement sur
l’interrupteur pour basculer entre HIGH et LOW.
Technologie ATR
Lesystèmeavancéderégulationdelatempérature(ATR)
permet à la lampe d’ajuster de façon dynamique son niveau
d’éclairage en fonction de sa température. Cela permet d’éviter
toutesurchauedelalampeetd’augmentersaduréedevie
Changement des Batteries
Les piles /batteries doivent être remplacées ou rechargées
lorsque la sortie semble faible ou que la lampe ne répond plus
en raison d'une faible puissance.
Maintenance
Touslessixmois,leletagedoitêtreessuyéavecunchion
propreetrecouvertd’unlubriantàbasedesilicone.
Bedienungsanleitung
Einlegen der Batterie/des Akkus
Legen sie die Batterie/den Akku ein – wie abgebildet – und
drehen Sie den Lampenkopf wieder fest.
Warnungen:
1. Stellen Sie sicher, dass der positive Pol zum Lampenkopf
zeigt.
Die HM01 funktioniert nicht, wenn der Akku/die Batterie
falsch eingelegt ist.
2. VORSICHT! Mögliche gefährliche Strahlung! NICHT in das
Licht blicken! Dies kann gefährlich für Ihre Augen sein.
3. Wenn das Produkt in einem Rucksack aufbewahrt oder
für längere Zeit nicht benutzt wird, entfernen Sie bitte die
Batterie/den Akku, um eine versehentliche Aktivierung oder
ein Auslaufen der Batterie/des Akkus zu verhindern.
Montage am Helm
1. Schieben Sie die Halterung auf die ARC-Schiene,
bis die Begrenzungsschraube auf den gewünschten
Befestigungspunkt ausgerichtet ist.
2. Ziehen Sie die Begrenzungsschraube mit dem Inbusschlüssel
(2,5mm)imUhrzeigersinnfest,bisdieHalterungvollständig
xiertist.
Einstellung des Strahlwinkels
Lösen Sie die Schrauben am 3D-Pivot-System mit dem
Sechskantschlüssel(1,5mm)undstellenSiedengewünschten
Abstrahlwinkel ein. Ziehen Sie die Schrauben wieder fest. Das
3D-Pivot-System ermöglicht eine 360°-Drehung an beiden
Enden.
Ein- / Ausschalten
Ein: Wenn das Licht ausgeschaltet ist, drücken Sie den Schalter
lange, um das Licht im LOW-Mode einzuschalten.
Aus: Wenn das Licht eingeschaltet ist, drücken Sie den Schalter
erneut lange, um das Licht auszuschalten.
Helligkeitsstufen
Wenn das Licht eingeschaltet ist, drücken Sie den Schalter kurz,
um zwischen HIGH- und LOW-Mode zu wechseln.
ATR (erweiterte Temperaturregulierung)
Mit dem "Advanced Temperature Regulation"-Modul regelt die
HM01 ihre Leistung und passt sich der Umgebungstemperatur
an, um so die optimale Leistung zu erhalten.
Batteriewechsel
Die Batterien sollten ausgetauscht oder die Akkus aufgeladen
werden, wenn der Lichtkegel dunkel erscheint oder die
Taschenlampe aufgrund geringer Batterieleistung nicht mehr
reagiert.
Wartung
Alle 6 Monate sollte das Gewinde mit einem sauberen Tuch
abgewischt und anschließend mit einer dünnen Schicht
Silikonfett geschmiert werden.
All NITECORE
®
products are warranted for quality. Any DOA /
defective product can be exchanged for a replacement through
a local distributor/dealer within 15 days of purchase. After
that, all defective / malfunctioning NITECORE
®
products can
be repaired free of charge within 60 months from the date
of purchase. Beyond 60 months, a limited warranty applies,
covering the cost of labor and maintenance, but not the cost of
accessories or replacement parts.
Thewarrantywillbenulliedif
1. theproduct(s)is/arebrokendown,reconstructedand/or
modiedbyunauthorizedparties.
2. theproduct(s)is/aredamagedduetoimproperuse.(e.g.
reversedpolarityinstallation)
3. theproduct(s)is/aredamagedduetobatteryleakage.
For the latest information on NITECORE
®
products and services,
please contact a local NITECORE
®
distributor or send an email
※Allimages,textandstatementsspeciedhereinthis
user manual are for reference purpose only. Should any
discrepancy occur between this manual and information
speciedonwww.nitecore.com,SysmaxInnovationsCo.,
Ltd. reserves the rights to interpret and amend the content
of this document at any time without prior notice.
SYSMAX Innovations Co., Ltd.
TEL: +86-20-83862000
FAX: +86-20-83882723
E-mail: info@nitecore.com
Web: www.nitecore.com
Address: Rm2601-06,CentralTower,No.5XiancunRoad,
TianheDistrict,Guangzhou,510623,Guangdong,
China
Please nd us on facebook : NITECORE Flashlight
Thanks for purchasing NITECORE!
HM30040121
Made in China
Note: Pleaseremovetheinsulationlmbeforetherstuse.

Praat mee over dit product
Laat hier weten wat jij vindt van de Nitecore HM01 Zaklamp. Als je een vraag hebt, lees dan eerst zorgvuldig de handleiding door. Een handleiding aanvragen kan via ons contactformulier.