
EN
INTRODUCTION
5IBOLZPVGPSTFMFDUJOHUIF0SFHPO4DJFOUJmD1SPKFDUJPO*O0VU5IFSNP
$MPDL5IJTEFWJDFCVOEMFTQSFDJTFUJNFLFFQJOHBMBSNBOEUFNQFSBUVSF
NPOJUPSJOHGFBUVSFTJOUPBTJOHMFUPPMZPVDBOVTFGSPNUIFDPOWFOJFODF
PG ZPVS IPNF ,FFQ UIJT NBOVBM IBOEZ BT ZPV VTF ZPVS OFX QSPEVDU
*U DPOUBJOT QSBDUJDBM TUFQCZTUFQ JOTUSVDUJPOT BT XFMM BT UFDIOJDBM
TQFDJmDBUJPOTBOEXBSOJOHTZPVTIPVMELOPX
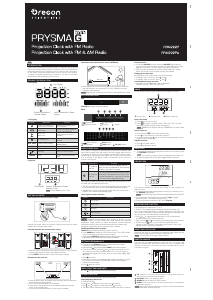
PRODUCT INTRODUCTION
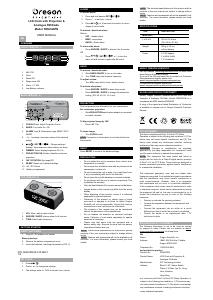
LCD Display
Time Display
Outdoor Temperature
/ Volume Display
Indoor Temperature / Radio
Display
LCD Display
Symbol Description Function
Radio signal reception to
outdoor unit (RTHN129)
Indicates the strength of the
radio reception
Low battery
Indicates low battery power of
outdoor unit (RTHN129)
Alarm 1 on
Alarm 2 on
Appears when an alarm is
activated
RF antenna icon
Appears when RF clock data
received
OUT 12345
Outdoor sensor reading
Shows outdoor temperature of
selected sensor.
IN
Indoor sensor reading Shows indoor temperature
ZONE
Time zone Indicates selected time zone
Snoozing Alarm is in snooze mode
FM/AM
Radio
Shows selected frequency
band
Projection
Time Display Outdoor Temperature Display
(channel 1 only)
NOTE
Focus length (1.5m – 2m)
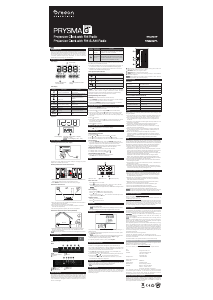
GETTING STARTED
Connecting the main unit to power supply
$POOFDU UIF QPXFS DBCMF UP UIF .JDSP 64# KBDL BOE QMVH UIF QPXFS
BEBQUPS JOUP B TVJUBCMF QPXFS PVUMFU
Inserting batteries into remote thermo sensor
t 4MJEF UIF CBUUFSZ DPNQBSUNFOU DPWFS PQFO BOE JOTFSU i"""w CBUUFSJFT
NBUDIJOH UIF QPMBSJUZ BT TIPXO UIFO SFQMBDF UIF DPWFS
t 1SFTT RESET inside the sensor after each battery change.
Placement of the main unit
t 1Mace the deWice as far as QossibMe froN coNQVters and NicroXaWes to
aWoid interference Xith receQtion.
t Only use this device indoors in a dry location.
t -eave sQace around the device for ventilation QurQoses so that the
XarN air can escaQe freely.
t 5o ensure for good sound Ruality do not cover the sQeaLer.
Placement of the remote thermo sensor (RTHN129)
Max 1.5m
Max 50m
t *deal QlaceNents for the sensor Xould be in any location outside the
hoNe at a height of not Nore than ft . N shielded froN direct
sunlight or Xet conditions.
NOTE
%eQending on conditions the NaYiNuN radio signal reach is N.
KEY DESCRIPTIONS
Top
SNOOZE #acLlight 1roKection button
Back
3adio #utton Clock button
4et"larN button button button
.icro 64# Kack Reset button
°C / °F button Light button Flip 180° button
RADIO RECEPTION
5his Qroduct is designed to autoNatically synchroni[e its calendar and
clock Xhen brought Xithin the range of the radio signal. 8hen the unit
is receiving the signal the radio receQtion syNbol 3CC starts to blink.
%eQending on the strength of the signal the connection Qrocess takes
to Ninutes. *f the signal is Xeak it could take uQ to hours to
receive a valid signal.
Symbol Description Function
RF antenna
icon off
The icon is turned off to indicate that the
main unit has not received RF clock data for
at least 1 hour and 15 minutes.
RF antenna
icon on
The icon is turned on when the main unit has
received RF clock data.The icon will turn off if
no data is received for 1 hour and 15 minutes,
or the clock time is adjusted manually.
5he Nain unit is able to receive 3' clock data froN reNote sensor in %C'
&6 .4' 6, and 887# 64 forNat
t %C' &6 and .4' 6, 5he tiNe [one settings Xithin the range of
to reference to tiNe [one of the %C'.4' broadcasting signal.
t 887# 64 5he tiNe [one settings reference to tiNe [ones
1.C& of the 887# broadcasting signal.
Clock signal reception indicator:
Symbol Description
Strong signal
Weak signal
No signal
Receiving signal
Radio reception disabled
NOTE
3eceQtion can be affected by a nuNber of factors. 'or best
receQtion Qlace the device aXay froN Netal obKects and electrical
appliances. Other causes of signal interference include electrical
transNission toXers steel reinforced construction and Netal siding.
3eception is ideal Xhen the unit is placed near a XindoX.
Enabling/disabling radio reception
SEARCH button located inside the outdoor receiver
t 1ress SEARCH to enable the 3CC search function. 5he -&% Xill nash
tXice to indicate that search function is enabled.
t 1ress and hold SEARCH to disable the 3CC search function. 5he -&% Xill
nash three tiNes to indicate that search function is disabled.
SETTING TIME MANUALLY
t 1ress and hold SEARCH button is located inside the outdoor
receiver to disable signal reception.
t 1ress and hold
. The screen displays ZONE and the nuNber nashes.
t 1ress once or press and hold
and to adKust the setting. 'or &6
6, the tiNe[one offset sets the clock up to hours froN the
received clock signal tiNe. 'or 64 the tiNe[one setting is 01 1.
2C 3&.
t 1ress
to conmrN.
t 1ress once or press and hold
and to adKust the setting for h
hour forNat hour Ninute year calendar forNat Nonthdayday
Nonth Nonth and date.
t 1ress
again to conmrN.
DISPLAYING TIME AND DATE
t 1ress to toggle betXeen tiNe and date display.
ALARM FUNCTION
:ou can set tXo different alarN tiNes Xith this clock.
Setting/adjusting alarm time
t 1ress and hold
.
t 6se
and to adKust the hour and press to conmrN.
t 6se
and to adKust the Ninute and press to conmrN.
t The alarN tiNe is displayed. The alarN sound Xill stop after Ninutes.
Snooze function
t To use the SNOOZE function press the SNOOZE light button on
top of the clock Xhen the alarN sounds. The alarN Xill stop and start
again after Ninutes. :ou can repeat this function three tiNes.
t 1ress to enable sleeping tiNer function Nins in 3adio
Node. The radion Xill turn off after the tiNe has elapsed.
Displaying the alarm time
#y default the clock Xill shoX the current tiNe and date.
t To display "larN for sec press
and .
t To display "larN for sec press
and .
Activating/deactivating the alarm
t 1ress
to activatedeactivate alarN in seRuence
"larN "larN #oth O/ #oth O''.
RADIO
*n radio Node the sound level freRuency and '.". Xill display.
Current TiNe 7oluNe -evel 3adion 'reRuency
Enter radio mode
t 1ress
to turn on the radio.
t 1ress
to toggle in seRuence O/ ". '. O'' .The last
last radio channel selected Xill be reNeNbered.
NOTE
33.1 Xill support '. only. 33.1" Xill support both
'. "..
Select frequency
t 1ress and hold
to enter radio setting Node.
t 1ress
or to increase or decrease frequency.
t *n setting Node press
or for seconds to autoNatically search
higher or loXer frequencies.
Adjusting volume
t 1ress
to inrease voluNe.
t 1ress
to decrease voluNe.
BACKLIGHT
t To activate the backlight and proKection function for seconds press
the SNOOZE light button.
NOTE
This function only Xorks Xhen the backlight level is set to -O.
t To adKust backlight level press -ight to toggle betXeen )* and -O.
PROJECTION
The proKector displays the tiNe on your ceiling for easy vieXing in a
darkened rooN.
t To activate the backlight and proKection function for seconds press
the SNOOZE light button.
NOTE
This function only Xorks Xhen the proKection function is turned O''.
t To turn proKection O/ and O'' press and hold Light to toggle
betXeen options. The default setting is O/
t To nip the proKection content by ¡ press Flip 180¡.
TEMPERATURE FUNCTION
The teNperature is Neasured in ¡C or ¡'.
t 1ress ¡C ¡' to toggle betXeen Centigrade ¡C and 'ahrenheit ¡'.
The current indoor teNperature is alXays displayed in the loXer right
corner of the -C% display. To receive outdoor teNperature inforNation you
can connect up to reNote sensors to the Nain unit
t 1ress
to toggle betXeen channels to and display the
outdoor teNperature of different sensors.
t 1ress and hold
and for seconds to start searching for reNote sensors.
t 1ress and hold and for seconds to enable autoscan
function for the channels. *nforNation froN Channel Xill
autoNatically be displayed in sequence.
RESETTING THE CLOCK
8henever the clock is not behaving as eYpected press 3eset Xith the
point of a blunt obKect such as a stylus or ball point pen.
NOTE
This Xill return all settings to default values.
REMOTE SENSOR
The Nain unit can collect teNperature data froN up to sensors and
should be placed Xithin ft N of the Nain unit. The aNber -&%
*ndicator on the front of the sensor Xill blink to indicate that the unit is
transNitting a signal.
s
CH Channel . *f Nore than one sensor is being used Nake sure
each one has a different channel nuNber.
EU/UK/US 4elect your region for 3CC.
SEARCH 1ress to search for 3CC function.
RESET 1ress if the sensor is not Xorking correctly or if the batteries
have been replaced.
NOTE
#efore placing the reNote sensor outdoors check that the battery
coNpartNent door is closed properly.

Praat mee over dit product
Laat hier weten wat jij vindt van de Oregon RRM 222P Wekkerradio. Als je een vraag hebt, lees dan eerst zorgvuldig de handleiding door. Een handleiding aanvragen kan via ons contactformulier.