English
Important
• In general, we advise you to leave replacement of
TL tube lamps and starters to your dealer or Philips
authorised service personnel.
If you open the appliance yourself during the
guarantee period, your guarantee expires.
• The HPA lamp for facial tanning (in the appliances
HB 574 and HB 577) must be replaced by authorised
service personnel exclusively.
• First remove the mains plug from the wall socket.
• For replacement of the TL tube lamps and/or cleaning
the protective shields you need about half a meter of
free space on both ends of the appliance.
• Have at least one person helping you when removing
the protective shield of the solarium. Support the
protective shield all the time to prevent it from
possible cracking, splitting or damage due to falling.
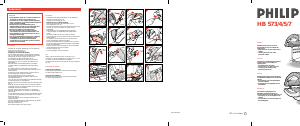
Solarium
- Remove the four plastic caps from the end cap and loosen
the screws (fig. 1).
- Remove the end cap (fig. 2).
- Repeat this for the second end cap.
- Pull the two side panels loose from the aluminium profiles (fig.
3). Prevent the protective shield from falling out.
- Remove the four plastic bars from between the protective
shield and the side panel (fig. 4).
- With one person helping you, remove the protective shield
(fig. 5). The TL tube lamps and starters are now accessible.
- Rotate the lamps a quarter turn to the right or to the left.
- The lamps can now easily be removed from their fittings.
- The starters can be removed by turning them to the left.
(On either side of the solarium you will find half the amount of
the starters.)
- Placing the new lamps and starters is in reversed order and
direction.
- Reposition the protective shield. The protective shield has a
plastic ridge by which it hangs from the aluminium profile
(fig. 6).
Ensure to position the protective shield correctly. (Do not mix
up the head end and the foot end!)
- Press the strip back into the spacing of the aluminium profile
(fig. 7).
- Reposition the four plastic bars between the protective shield
and the side panel (fig. 8). Please note that the plastic bars
should be on the outside of the protective shield.
Slide the plastic bars completely inwards: they should not
protrude. It may be necessary to rotate the bars a little while
sliding them.
- To fix the end cap back to the solarium, first slide the
section closest to the front side around the other parts (fig. 9)
- Screw this section of the end cap hand tight to the appliance
(fig. 10)
- By and by, starting from this point, slide the end cap into
place (fig. 11).
- Tighten the screws.
- Place the plastic caps back.
Sun couch
Remove the four plastic caps from the end cap and loosen
the screws (fig. 12).
- Remove the end cap (fig. 13).
- Repeat this for the second end cap.
- Pull to loosen the strip (side panel) from the two sides of the
protective shield (fig. 14).
- With one person helping you, remove the protective shield
from the sun couch (fig. 15). The TL tube lamps and starters
are now accessible.
- Rotate the lamps a quarter turn to the right or to the left.
- The lamps can now easily be removed from their fittings.
- The starters can be removed by turning them to the left.
(On either side of the sun couch you will find half the amount
of the starters.)
- Placing the new lamps and starters is in reversed order and
direction.
- Reposition the protective shield. Ensure to position it correctly.
(Do not mix up the head end and the foot end!)
- Press the strip back onto the two sides of the protective
shield.
- Reposition the end caps.
- Tighten the screws.
- Place the plastic caps back.
Tip
If merely one lamp needs replacement, it is advisable to remove
the end caps (fig. 1, 2, 12 and 13), but to leave the protective
shield in place.
Then you can replace the lamp with one person helping you
(fig. 16).
Tube lamps and starters
Types HB 573 and HB 574
12 tube lamps (type Philips "Cleo Professional" 90W-S)
12 starters (type Philips S11)
Types HB 576 and HB 577
24 tube lamps (type Philips "Cleo Professional" 90W-S)
24 starters (type Philips S11)
Français
Important
• Nous conseillons en général de confier le
remplacement des tubes fluorescents TL et des
amorceurs à votre fournisseur ou à un réparateur
agréé par Philips.
Si vous ouvrez vous-même l’appareil pendant la
période de garantie, votre garantie expire.
• La lampe HPA utilisée pour le bronzage facial
(équipant les appareils HB 574 et HB 577) devra être
remplacée uniquement par une personne du service
après-vente agréée.
• Retirez tout d'abord la fiche secteur de la prise murale.
• Pour le remplacement des tubes TL et/ou le nettoyage
du panneau protecteur, vous aurez besoin d'un
espace libre d'environ 50 cm, aux deux extrémités de
l'appareil.
• Faites en sorte d’être aidé d’au moins une personne
lorsque vous retirez le panneau protecteur du
solarium. Maintenez soulevé le panneau protecteur le
temps de l’intervention afin d’éviter qu’il ne se fende,
se fissure ou se casse s’il venait à tomber.
Solarium
- Retirez les quatre capuchons en plastique recouvrant le
cache d'extrémité et desserrez les vis (fig. 1).
- Retirez le cache d'extrémité (fig. 2).
- Procédez de même pour l'autre cache d'extrémité.
- Tirez sur les deux côtés du panneau latéral pour le détacher
du profilé en aluminium (fig. 3). Veillez à ce que le panneau
protecteur ne tombe pas.
- Retirez les quatre barrettes en plastique se trouvant entre le
panneau protecteur et le panneau latéral (fig. 4).
- Faites vous aider par une autre personne pour retirer le
panneau protecteur (fig. 5). Les tubes fluorescents TL et les
amorceurs sont alors accessibles.
- Faites tourner les lampes d'un quart de tour dans l'un ou
l'autre sens.
- Les lampes peuvent maintenant être facilement retirées de
leurs culots.
- Pour retirer les amorceurs, il suffit de les faire pivoter dans le
sens contraire des aiguilles d'une montre.
(Les amorceurs sont répartis en quantités égales sur les deux
extrémités du réflecteur).
- Pour la mise en place de nouvelles lampes et de nouveaux
amorceurs, procédez dans l'ordre inverse.
- Remettez en place le panneau protecteur. Le panneau
protecteur est suspendu au profilé en aluminium par un
rebord en plastique (fig.6).
La remise en place doit être effectuée correctement
(n'inversez pas les extrémités “tête” et “pieds”).
- Repoussez la languette dans l'évidement du profilé en
aluminium (fig. 7)
- Réinstallez les quatre barrettes en plastique entre le panneau
protecteur et le panneau latéral (fig.8). Les barrettes se
trouvent donc à l’extérieur du panneau protecteur.
Faites glisser les barrettes complètement vers l’intérieur :
elles ne doivent pas dépasser. Il se peut que vous deviez
faire tourner les barrettes tout en les glissant.
- Pour fixer le cache d'extrémité sur le réflecteur, faites tout
d'abord glisser la partie avant autour des autres éléments
(fig. 9).
- A la main, vissez cette partie du cache d'extrémité sur
l'appareil (fig. 10).
- Faites ensuite glisser progressivement le cache d'extrémité
pour le mettre en place (fig. 11).
- Serrez les vis.
- Remettez en place les capuchons en plastique.
Banc solaire
- Retirez les quatre capuchons en plastique recouvrant le
cache d'extrémité et desserrez les vis (fig. 12).
- Retirez le cache d'extrémité (fig. 13).
- Procédez de même pour l'autre cache d'extrémité.
- Tirez sur la languette (panneau latéral) des deux côtés pour la
détacher du panneau protecteur (fig. 14).
- Faites vous aider par une autre personne pour retirer le
panneau protecteur (fig. 15) de la couchette. Les tubes
fluorescents TL et les amorceurs sont alors accessibles.
- Faites tourner les lampes d'un quart de tour dans l'un ou
l'autre sens.
- Les lampes peuvent maintenant être facilement retirées de
leurs culots.
- Pour retirer les amorceurs, il suffit de les faire pivoter dans le
sens contraire des aiguilles d'une montre.
(Les amorceurs sont répartis en quantités égales sur les deux
extrémités du banc solaire).
- Pour la mise en place de nouvelles lampes et de nouveaux
amorceurs, procédez dans l'ordre inverse.
- Le remise en place du panneau protecteur doit être effectuée
correctement (N'inversez pas les extrémités “tête” et “pieds”).
- Repoussez la languette sur les deux côtés du panneau
protecteur.
- Remettez en place les caches d'extrémité.
- Serrez les vis.
- Replacez les capuchons en plastique.
Conseil
S'il ne s'agit que de remplacer une seule lampe, il sera conseillé
de retirer les caches d'extrémité (fig. 1, 2, 12 et 13), mais de
laisser en place le panneau protecteur.
Avec l'aide d'une autre personne, vous pourrez alors remplacer
la lampe (fig. 16).
Tubes fluorescents et amorceurs
Types HB 573 et HB 574
12 tubes fluorescents (type Philips “Cleo Professional” 90W-S)
12 amorceurs (type Philips S11)
Types HB 576 et HB 577
24 tubes fluorescents (type Philips “Cleo Professional” 90W-S)
24 amorceurs (type Philips S11)
Deutsch
Wichtig:
• Wir raten Ihnen im allgemeinen, das Auswechseln
von TL-Lampen und Startern der Lieferfirma oder
einer Vertragswerkstatt von Philips zu überlassen.
• Wenn Sie das Gerät innerhalb des Garantiezeitraums
selbst öffnen, erlischt der Garantieanspruch.
• Die HPA-Lampe für Gesichtsbräunung (in den
Geräten HB 574 und HB 577) darf ausschließlich vom
Fachpersonal des Vertragskundendienstes
ausgewechselt werden.
• Ziehen Sie zuerst den Netzstecker aus der
Steckdose.
• Für das Auswechseln von TL-Lampen und/oder die
Reinigung der Schutzplatten benötigen Sie an beiden
Enden des Geräts ungefähr 50 cm Bewegungsraum.
• Es empfiehlt sich, beim Entfernen der Schutzplatten
des Bräunungsgerätes mindestens eine zweite
Person als Helfer hinzuzuziehen. Unterstützen Sie die
Schutzplatten ständig, um zu vermeiden, daß sie
herunterfallen und zu Bruch gehen, zerspringen oder
auf andere Weise beschädigt werden.
Sonnenhimmel
- Entfernen Sie die vier Kunststoffkappen von der
Abschlußkappe und lösen Sie die Schrauben (Abb. 1).
- Nehmen Sie jetzt die Abschlußkappe ab (Abb. 2).
- Verfahren Sie mit der zweiten Abschlußkappe ebenso.
- Ziehen Sie die beiden Seitenplatten aus den
Aluminiumprofilen (Abb. 3). Achten Sie darauf, daß die
Schutzplatte nicht herausfällt.
- Nehmen Sie die vier Kunststoffstäbchen heraus, die sich
zwischen Schutzplatte und Seitenplatte befinden (Abb. 4).
- Nehmen Sie die Schutzplatte ab. Hierzu benötigen Sie einen
Helfer (Abb. 5). Nun kommen Sie an die TL-Lampen und die
Starter heran.
- Drehen Sie die Lampen eine Vierteldrehung nach links oder
rechts.
- Die Lampen lassen sich jetzt leicht aus den Fassungen
herausnehmen.
- Die Starter werden durch Drehung nach links frei zum
Abnehmen.
(An den beiden Enden des Sonnenhimmels befindet sich
jeweils die Hälfte der Starter.)
- Das Einsetzen der neuen Lampen und Starter geschieht
genau in umgekehrter Reihenfolge und Richtung wie das
Herausnehmen.
- Schutzplatte wieder anbringen. Die Schutzplatte ist mit
einem Kunststoffrand versehen, mit dem sie in das
Aluminiumprofil eingehängt wird (Abb. 6).
Achten Sie darauf, daß sie nicht umgekehrt angebracht wird
(Kopf- und Fußende vertauscht)!
- Drücken Sie den Streifen wieder in die Aussparung des
Aluminiumprofils (Abb. 7).
- Setzen Sie die vier Stäbchen wieder zwischen Schutzplatte
und Seitenplatte ein (Abb. 8). Beachten Sie dabei, daß sich
die Kunststoffstäbchen an der Außenseite der Schutzplatte
befinden müssen.
Schieben Sie die Kunststoffstäbchen ganz hinein; sie sollten
nicht herausragen. Gegebenenfalls sollten Sie die Stäbchen
etwas drehen, während Sie sie hineinschieben.
- Um die Abschlußkappe wieder anzubringen, schieben Sie
zunächst nur den Teil in der Nähe der Vorderseite über die
übrigen Teile (Abb. 9).
- Schrauben Sie diesen Teil der Abschlußkappe handfest am
Gerät an (Abb. 10).
- Schieben Sie die Abschlußkappe dann allmählich von dieser
Stelle aus auf den Sonnenhimmel (Abb. 11).
- Ziehen Sie die Schrauben fest.
- Bringen Sie die Abdeckkappen wieder an.
Sonnenliege
- Entfernen
Abschlußk
- Nehmen S
- Verfahren
- Ziehen Sie
Schutzpla
- Heben Sie
benötigen
die TL-La
- Drehen S
rechts.
- Sie lassen
herausneh
- Die Starte
Abnehme
(An den b
die Hälfte
- Das Einse
genau in u
Herausne
- Schutzpla
nicht umg
vertausch
- Drücken S
Schutzpla
- Bringen S
- Ziehen Sie
- Bringen S
Hinweis
Wenn nur ein
sich, wohl die
nicht aber die
Sie können d
auswechseln
Röhrenlamp
Typ HB 573
12 Röhrenlam
12 Starter (T
Typ HB576 u
24 Röhrenlam
24 Starter (T


Praat mee over dit product
Laat hier weten wat jij vindt van de Philips HB577 Zonnebank. Als je een vraag hebt, lees dan eerst zorgvuldig de handleiding door. Een handleiding aanvragen kan via ons contactformulier.