
Before use
This baby monitor is intended as an aid. It is not a
substitute for proper adult supervision, and should
not be used as such.
Test your baby monitor
You should test the baby monitor before initial
use, and at regular times thereafter.
For hearing protection, make sure the
parent unit is more than 1 metre (3 feet)
away from the baby unit. If you hear any
high-pitched noise, move the parent unit
further away until the noise stops. You
can also adjust the parent unit volume to a
lower level until the noise stops.
>
1m (3ft)
Make sure your baby unit and parent unit
are on.
The parent unit displays images from the
baby unit.
Speak towards the baby unit microphone.
You will hear the sound at the parent
unit.
Increase the parent unit speaker volume if you
cannot hear the sounds transmitted from the baby
unit.
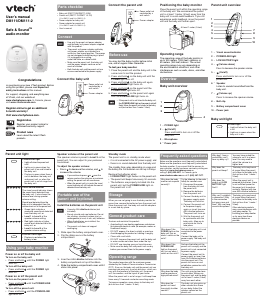
Positioning the baby monitor
Keep the baby unit out of the reach of your baby.
Never place or mount the baby unit inside the
baby’s cot or playpen.
To avoid interference from other electronic
devices, place your baby monitor far away from
devices such as wireless routers, microwaves,
mobile phones and computers.
•
•
1.
2.
•
•
•
•
Place the baby unit more than 1 metre
(3 feet) away from your baby.
Adjust the angle of the baby unit camera to
aim at your baby.
Place the parent unit more than 1 metre
(3 feet) away from the baby unit.
6
3
ē
6
3
ē
< 1m (3ft)
> 1m (3ft)
>
1m (3ft)
<
1m (3ft)
6
3
ē
6
3
ē
< 1m (3ft)
> 1m (3ft)
6
3
ē
6
3
ē
< 1m (3ft)
> 1m (3ft)
The default volume of your parent unit is level 4.
If you experience high-pitched screeching noise
from your baby monitor while positioning:
Make sure your baby unit and parent unit are
more than 1 metre (3 feet) apart, OR
Turn down the volume of your parent unit.
Operating range
The operating range of the baby monitor is
up to 300 metres (1,000 feet) outdoors or
50 metres (160 feet) indoors. The actual
operating range may vary depending on
the environmental conditions and other
interferences such as walls, doors and other
obstructions.
1.
2.
3.
•
-
-
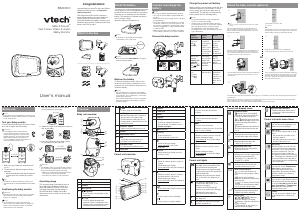
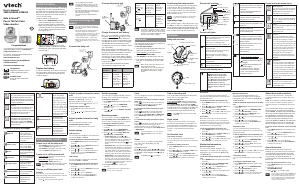
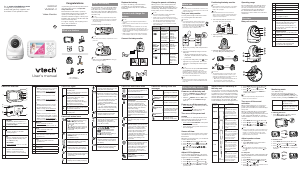
Overview
Baby unit overview
1
Light sensor
2
Infrared LEDs
3
Camera
4
Microphone
5
Play/Stop
Press to play or stop lullaby on the
baby unit.
•
6
/
Press to adjust the baby unit
speaker volume. It determines the
lullaby volume and talkback volume
transmitted from the parent unit.
•
7
Skip
Press to play the next lullaby.•
8
ON/OFF light
On when the baby unit is turned on
and is paired to the parent unit.
Flashes when the baby unit is not
being viewed; or when the link to the
parent unit is lost.
•
•
9
ON/OFF switch
Slide to turn the baby unit on or off.•
10
Speaker
11
Temperature sensor
12
PAIR
Your baby unit and parent unit
provided are already paired.
•
13 Threaded socket
For wall mount installation use.•
14
Power jack
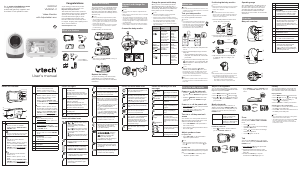
Parent unit overview
1
Speaker
2
Power jack
3
Stand
4
Antenna
5
LED lights
Indicate the different statuses of
the parent unit. For details, refer to
Parent unit lights.
•
6
Microphone
7
On/off
Press to power on.
Press and hold to power off.
•
•
8
Whilst viewing an image,
press and hold to talk to the
baby unit.
•
9
Zoom
Whilst viewing an image, press to
zoom in or out.
•
10
Whilst in a menu, press to select a
feature.
Whilst viewing an image,
press and hold to move the image to
the right.
•
•
11
Whilst in a menu, press to return to
the main menu or idle screen.
Whilst viewing an image,
press and hold to move the image to
the left.
•
•
12
Press and hold to turn the parent unit
screen off.
Press to skip to the next lullaby.
Press to play or stop the lullaby.
•
•
•
13
+
Press to increase the speaker
volume.
•
14
–
Press to decrease the speaker
volume.
•
15
Press to enter the menu.
Whilst in a menu, press to choose an
item or save a setting.
•
•
16
Whilst in a menu, press to scroll up.
Whilst viewing an image,
press and hold to move the image
upwards.
•
•
17
Whilst in a menu, press to scroll
down.
Whilst viewing an image,
press and hold to move the image
downwards.
•
•
Parent unit lights
On when moderate or high signal
strength is detected between the
parent unit and the baby unit.
Flashes when low signal strength
is detected between the parent unit
and the baby unit.
Off when the parent unit is turned
off, or the link to the baby unit is
lost.
On when the parent unit is
connected to AC power, or the
battery is charging.
Flashes when the parent unit
battery is low and needs charging.
Off when the parent unit is
disconnected from AC power.
On when the parent unit is talking to
the baby unit.
On when the parent unit speaker
volume is turned off.
Parent unit display icons
Connection status
displays when strong signal
strength is detected between the
baby unit and the parent unit.
or displays when moderate
or low signal strength is detected
between the baby unit and the
parent unit.
displays when the link between
the baby unit and the parent unit
is lost.
•
•
•
Night vision
Displays when the baby unit has
activated the night vision feature.
•
Zoom
Displays when the baby unit
camera has zoomed in.
•
Temperature alert tone
Displays when the temperature
alert tone is set on.
•
o
F or
o
C
Real-time temperature
Displays the real-time temperature
detected by the baby unit in
Fahrenheit (
o
F) or Celsius (
o
C)
(e.g. 57
o
F or 14
o
C).
•
Mute alert
Displays when the parent unit
speaker volume is set to off.
•
9-level sound indicator
(1 to 3 bars) indicates low
sound level detected by the baby
unit.
(4 to 6 bars) indicates
moderate sound level detected by
the baby unit.
(7 to 9 bars) indicates high
sound level detected by the baby
unit (e.g. baby crying loudly).
•
•
•
Speaker volume
Displays the parent unit speaker
volume level while adjusting.
•
Battery status
animates
when the battery is charging.
displays solid when the battery
is fully charged.
displays when the battery is
low and needs charging.
•
•
•
AC power without battery
Displays when the parent unit is
connected to AC power without
the battery.
•
Parent unit main menu icons
Language
You can select the language to be
used in all screen displays.
Alert Tone
You can set the parent unit to beep
when
the parent unit operates in low
battery condition;
the link between the parent unit
and the baby unit is lost.
•
•
Sensitivity
With this feature, you can choose
to hear sounds from the baby unit
all the time, or to hear sounds that
exceed a certain level. You can
use the parent unit to adjust the
microphone sensitivity of your baby
unit. The higher the sensitivity level,
the more sensitive the baby unit is
in detecting sounds for transmitting
to the parent unit.
Temperature
You can turn on the Temperature
alert tone so that the parent
unit beeps whenever the room
temperature detected by the baby
unit falls outside of the desired
temperature range.
Vibration
You can turn on the vibration alert so
that the parent unit vibrates when it
receives Low battery tone, No link
alert, Sound alert or Temperature
alert tone after turning on the
respective alert tones.
Lullaby
You can choose the lullaby to play
on the baby unit to comfort your
baby.
Congratulations
on purchasing your new VTech product. Before
using this product, please read Important
safety instructions.
This manual has all the feature operations
and troubleshooting necessary to install and
operate your new VTech product. Please
review this manual thoroughly to ensure proper
installation and operation of this innovative and
feature rich VTech product.
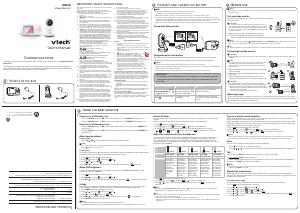
What’s in the box
Install the battery
You can power on the parent unit by connecting
it to AC power or to the rechargeable battery
provided. Even if the parent unit is connected to
AC power, we recommend you also install the
battery. This guarantees continual operation in
case of a power outage.
Install the battery as shown below.
Press down on the large tab of the battery
compartment cover to pull it out.
THIS SIDE UP
Make sure the label THIS SIDE UP is facing up
while inserting the battery.
Replace the battery
To replace the battery, press down on the
large tab of the battery compartment cover
and pull it out, then follow the steps above to
install the battery.
The operating time for using the rechargeable
battery is short. If you want to monitor your baby
for a long time, we recommend you connect the
parent unit to AC power.
If the parent unit will not be used for a long time,
disconnect and remove the battery to prevent
possible leakage.
•
•
•
•
Connect and charge the
battery
Use only the battery supplied with this product.
Use only the power adaptors supplied with this
product.
Make sure the electrical outlets are not controlled
by wall switches.
The power adaptors are intended to be correctly
oriented in a vertical or floor mount position. The
prongs are not designed to hold the plug in place
if they are plugged into a ceiling, under-the-table
or cabinet outlet.
Make sure the parent unit, the baby unit and the
power adaptor cords are out of reach of children.
Connect the baby monitor
•
•
•
•
•
Charge the parent unit battery
When you have connected the parent unit and
installed its battery for the first time or after a
power outage, the parent unit will power on
automatically. The battery icon indicates the
battery status (see the following table).
The parent unit battery is fully charged after
3 hours of continuous charging.
It takes longer to charge the battery when the
parent unit is turned on. To shorten the charging
time, turn the parent unit off while charging.
The standby time varies depending on the
sensitivity level you set, your actual use and the
age of the battery.
Battery
indicators
Battery
status
Action
The battery
icon is off
and
displays.
No battery
is installed
but operates
using AC
power, or the
battery has
been installed
incorrectly.
Install the
parent unit
battery.
Charge
without
interruption
(at least
30 minutes).
The screen
displays
Battery low
at Parent
Unit and .
The light
flashes.
The battery
has very little
charge and
may be used
for only a
short time.
Charge
without
interruption
(about
30 minutes).
The battery
icon
becomes
solid .
The battery is
fully charged.
To keep
the battery
charged,
connect it to
AC power
when not in
use.
•
•
•
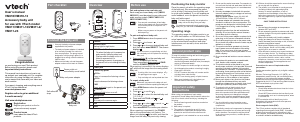
Mount the baby monitor (optional)
User’s manual
BM4300
Safe & Sound
®
Owl Colour Video & Audio
Baby Monitor
Insert the screws into the holes and tighten the
screws until only 1/4 inch of the screws is exposed.
If you drill the holes into a stud,
go to step 3.
-OR-
If you drill the holes into an object other than a stud, insert
the raw plugs into the holes. Tap gently on the ends with a
hammer until the raw plugs are flush with the wall.
OR
Place the wall mount bracket on a wall and then use a
pencil to mark the top and the bottom holes as shown.
Remove the wall mount bracket and drill two holes in the
wall (7/32 inch drill bit).
Check for reception strength and camera angle before drilling
the holes.
•
Align the wall mount bracket and screws with the holes in
the wall as shown. Tighten the screw in the middle hole
first, so that the wall mount bracket position is fixed. You
can tighten the other screw in the top hole.
Place the baby unit on the wall mount bracket. Tighten the
screw into the threaded socket at the bottom to secure
the baby unit.
The default angle of the wall mount bracket is 90 degrees. You can maximise your baby unit’s viewing angles by tilting the wall
mount bracket.
Hold the baby unit, and then rotate the knob in an anticlockwise direction. This will loosen the joint of the wall mount bracket.
Tilt your baby unit up or down to adjust to your preferred angle.
Then, rotate the knob in a clockwise direction to tighten the joint and secure the angle.
Place the baby unit on the wall mount bracket. Tighten the
screw into the threaded socket at the bottom to secure the
baby unit. Align the holes on the wall mount bracket with
the screws on the wall, and slide the wall mount bracket
down until it locks into place.
>
1m (3ft)


Praat mee over dit product
Laat hier weten wat jij vindt van de Vtech BM4300 Babyfoon. Als je een vraag hebt, lees dan eerst zorgvuldig de handleiding door. Een handleiding aanvragen kan via ons contactformulier.