GB/IE GB/IE GB/IE GB/IE
GB/IE GB/IE GB/IE GB/IE GB/IE GB/IE GB/IE GB/IE GB/IE GB/IE GB/IE
GB/IE GB/IE GB/IE GB/IE GB/IE GB/IE GB/IE GB/IE GB/IE GB/IE PL
Licznik kroków z radiem
Zastosowanie zgodne
z przeznaczeniem
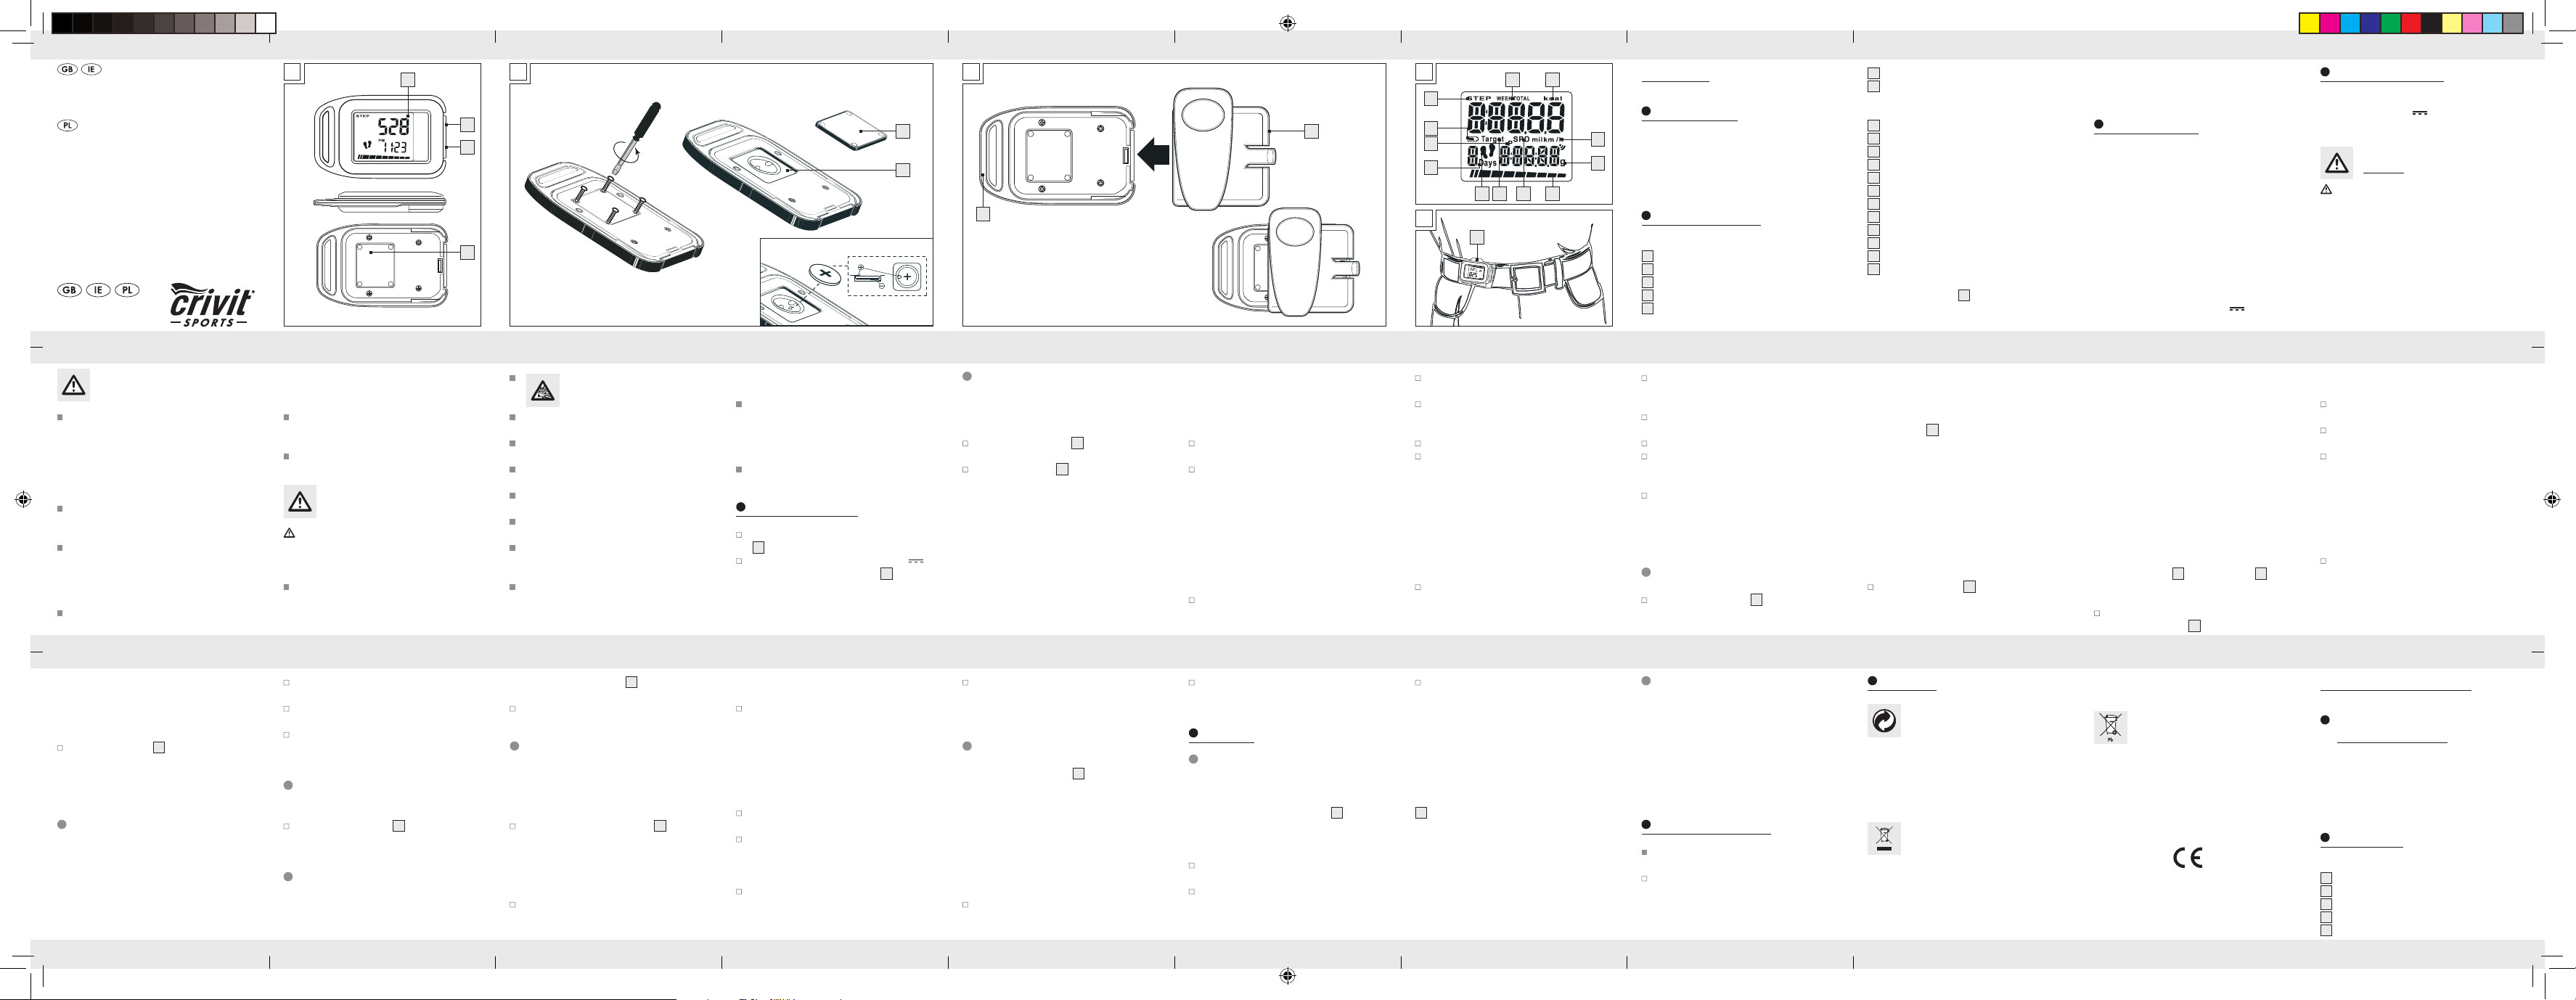
Krokomierz rejestruje liczbę wykonanych kroków,
pokonany dystans, wymagany czas oraz liczbę
spalonych kalorii. Urządzenie nie nadaje się do
rejestracji danych medycznych.
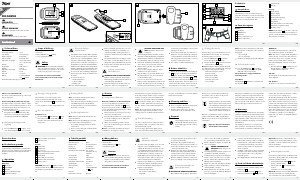
Opis części
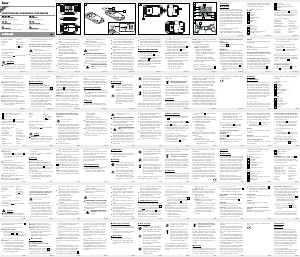
Urządzenie:
1
Wyświetlacz LC
2
Przycisk MODE
3
Przycisk „SET“
4
Pokrywa komory na baterię
5
Komora baterii
batteries and / or the device to the provided recy-
cling facilities.
Improper disposal of batteries
can harm the environment!
Never dispose of batteries in your household waste.
They may contain toxic heavy metals and are sub-
ject to hazardous waste regulations. The chemical
symbols of the heavy metals are: Cd = cadmium,
Hg = mercury, Pb = lead. Therefore, dispose of used
batteries through your municipal collection site.
EMC
ber of steps, 10,000 steps, appear on the
LC display.
Keep the SET button pressed in order to switch
to the SET mode.
Press the SET button in order to select the
respective next number position.
After you have set the desired number of steps
with the MODE button, press the SET button
once again in order to confi rm the entered
number of steps.
KCAL Mode:
The calories used and fat burnt (in g) on the current
day are displayed accourding to the defaults.
Press the SET button repeatedly to browse
through Average Speed/ Maximum Speed in
KCAL mode.
Trip time
The activity time of the pedometer for the current
day is displayed.
Trip distance
The distance covered on the current day (in km), as
well as the current time are displayed.
Current Speed
The current speed (in km / h) can be displayed.
Training target “TARGET”
You may enter the number of steps (between 100
and 99999 steps) that you would like to complete
in the course of a day. Your progress is displayed
on the progress bar
12
on the LC-display
1
. After
you have reached your target, the progress bar blinks
until you re-set the training goal.
In the STEP mode, press the SET button until
the TARGET symbol
14
and the default num-
Scope of delivery
1 Pedometer
1 Battery CR1620 (3 V
, Lithium)
1 Set of operating instructions
Safety
WARNING! Please read all the safety infor-
mation and instructions. Failure to observe the
safety information and instructions can result in
electric shock, fi re and / or serious injury.
PLEASE KEEP ALL SAFETY INSTRUCTIONS
AND INSTRUCTIONS FOR USE FOR FUTURE
REFERENCE!
quired to operate the LCD is very low and compa-
rable to that of a wristwatch.
Technical Data
Measuring method: sensor
Step display: 0–99999 steps
Distance display: 0–9999 km
Calorie display: 0–99999 kcal
Pre-setting step length: 150 cm / 59 inch
Adjustable user weight: 30–219 kg (can be
set to 1 kg accuracy)
Default: 50 kg
Body height: 100–249 cm
Default: 150 cm
Time unit: 12 / 24 hr
Battery: 1 battery CR1620
(3 V
, Lithium)
Permissable temperature range: 0–50 °C
Disposal
The packaging is made of environmen-
tally friendly materials, which may be
disposed through your local recycling
facilities.
Contact your local waste disposal authority for
more details on how to dispose of the product
when it is no longer required.
To help protect the environment, please
dispose of the product properly, and not
in household waste, when it has reached
the end of its useful life. Please contact
your local authority for information on
collection points and their opening hours.
Defective or used batteries must be recycled in ac-
cordance with Directive 2006 / 66 / EC. Return
Troubleshooting
The device contains electronic components. There-
fore, interference may occur when it is near devices,
which transmit radio signals.
If error messages appear in the display, remove
these devices from the proximity of the product. In
the event of such malfunctions, remove the batteries
briefl y and reinsert them.
Cleaning and Care
Never use liquids or abrasive cleaning agents
as they could damage the device.
Only the exterior of the device should be
cleaned with a soft, dry and lint-free cloth.
Add a cord to hang the pedometer around
your neck. Use the fastening eye on the left of
the pedometer.
Note: Do not hang the pedometer around your
neck when you are jogging or running.
The pedometer now registers the impacts of the
body and records the number of steps covered, the
distance covered, the calories burnt and the time
required. You can read the values in the LC display
1
, as described in chapter „Prior to start-up“. You
can also read the data from the last 7days and
the entire number of steps walked during the last
7 days.
Note: The recorded values are approximate. A
varying step length and external factors such as
clothing, terrain etc. can hinder exact measurement.
Ensure correct polarity. This is indicated in the
battery compartment.
Start-up
Using the pedometer
Wear the pedometer as described below:
You can securely attach the pedometer to your
trouser belt by means of the belt clip
7
(see fi g.
C, E), put in your trouser pocket, or hang it around
your neck. Read the following instructions to obtain
an accurate measurement:
Put the pedometer in your front trouser pocket
and not in your back pockets.
Ensure that the pedometer lies securely against
your body / clothing in order to obtain an ac-
curate measurement.
To change the weight, proceed as described in
the chapter „Set mode“. The other units (height
and calibration) follow subsequently.
Replacing batteries
Note: When „low battery“
18
appears on the LC-
display, the batteries must be changed. Before you
change the batteries, note the value of the total
completed distance so that you can re-enter it sub-
sequently in the basic settings as described in the
chapter „Odometer Save“.
Note: All stored data will be deleted when you
remove the batteries.
Note: Please ensure the LC-Display is protected
from scratches when replacing batteries.
Proceed with changing the batteries as illus-
trated in Ill. B.
data of trip time / trip distance / current speed
which you want to re-set.
Keep the SET button pressed. The data in trip
time / trip distance / calories used / fat burnt /
completed target step count / average speed /
maximum speed will reset to 0. Personal settings
and calibration are retained.
Note: You may also change the time without los-
ing the stored training data.
In the time mode, keep the SET button pressed
until TIME is displayed on the LC-display.
To change the time, proceed as described in
the chapter „Set mode“.
Note: Weight / height / calibration can be re-set
in the STEP mode.
In the step counting mode, press the SET but-
ton until the weight appears on the LC-display.
savings mode. The LC-display
1
only indicates the
time.
Press any button to end the energy savings mo
de.
Re-set pedometer
After completing the basic settings, there are two
ways of re-setting the pedometer.
Complete re-set
Keep the MODE and SET button
3
simultane-
ously pressed. All stored data will be deleted.
The device then switches back into the set-up
mode.
Re-setting individual settings
Press the MODE button until you are in the STEP
mode. Then press the SET mode to display the
In ODO, hold the SET button and the fi rst digit
will fl ash.
Press the MODE button to select the desired
digit and then press the SET button to confi rm.
Repeat this procedure until desirable distance
is entered.
Activating background
lighting
Press the MODE button
2
for approx. 3 sec-
onds. The backlight illuminates for 3 seconds.
Energy savings mode
If the pedometer is not used for approx. three
minues, it switches automatically to the energy
Previous Day Mode and 7-day storage:
The number of steps, exercise time, distance comple-
ted, calorie counter and fat burnt per day is saved
automatically by the device. The values are re-set
respectively at 0:00 o‘clock.
Press the SET button
3
repeatedly to browse
through the saved data from the last 7 days,
total week record for the last 7 days and the
accumulated total trip distance ODO (km).
Odometer Save
You can save the total trip distance ODO manually
by re-entering the value back to the device.
Before you change the batteries, note the value of
the total completed distance so that you can re-en-
ter it back to the device because ODO data will
be reset to zero in Complete re-set or battery
change.
The pedometer is equipped with the
following modes:
Time Mode
The LC-Display
1
indicates the current time and
the day of the week.
STEP Mode:
The number of the measured steps of the current
day, as well as the time, are displayed.
Note: This device is equipped with 10-step-fi lter to
enhance the step count accuracy. This requires at
least 10 steps for the sensor to gather user’s trip
behavior for speed and distance calculation.
Hence the initial display of the step count will be
above 10.
Press the SET button
3
repeatedly to browse
through Trip time / Trip distance / Current
Speed / Training target in STEP mode.
Press the SET button. Press the MODE button
to enter the length of walk - extended by 100
metres.
Press the SET button. The device is now ready
to calibrate the length of your walking steps.
Press the SET button and begin to walk.
Press the SET button again when you have
completed the previously entered distance. The
calibration is saved.
Press the SET button again. The device is now
ready for use.
Note: The device will only be ready for use when
both Run and Walk calibration are completed.
Selecting the mode
Press the MODE button
2
repeatedly to
browse through the diff erent modes (TIME,
STEP, KCAL and 7-day storage modes).
Press the MODE button to enter the length of
run - extended by 100 metres (100-1000 m).
Confi rm the entry by pressing the SET button.
The device is now ready to calibrate the length
of your steps.
Press the SET button and begin to run.
Press the SET button again when you have
completed the previously entered distance. The
calibration is saved.
Note: The display will show “FAIL” if the step count
to be saved is not feasible with respect to the entered
distance. Re-calibration is required.
Note: You can stop the calibration and re-adjust
the calibration distance by holding the MODE but-
ton during running / walking; or press the MODE
button once in the PRESS START screen.
After the run calibration is saved, you can
either press the SET button or wait for awhile
to enter walk calibration.
Note: Ensure when entering that you take addi-
tional weight into consideration such as clothing or
a backpack.
- Set your height.
- Calibrate the pedometer.
Press the MODE button and select either the
option YES or NO:
Confi rm your setting by pressing the MODE
button.
Note: We strongly recommend calibrating the de-
vice to your personal movement rhythm. Otherwise,
the device uses static data based on the entered
body height and does not perform at its highest
level. You may select YES or NO during calibration.
Note: If you select no during calibration, you will
switch to the step mode. If you select yes, you will
switch to the run calibration mode.
In the calibration start screen, confi rm your
selection by pressing the SET button.
Setting the mode
You must enter your personal data before you use
the pedometer for the fi rst time. You can change
the following values successively:
Press the MODE button
2
repeatedly to
browse through the diff erent modes.
Press the SET button
3
to set the desired value.
- Set the distance unit (km / mile).
Note: Changing the distance unit (km / mile) will
also change the unit for weight (kg / lb) and height
(cm / inch) accordingly.
- Set the time format (12 / 24 hr).
- Set the hour (HR).
- Set the minutes (MIN).
- Set the seconds (SEC).
- Set the day of the week.
- Set your weight.
should remove it immediately in order to prevent
damage to the device!
Avoid contact with the skin, eyes and mucous
membranes. Any part of the body coming into
contact with battery acid should be rinsed off
with a large amount of water and / or a doctor
should be contacted if necessary!
Use only the recommended battery type.
Before Initial Use
Remove the protective fi lm from the LC display
1
before you use the device for the fi rst time.
Then place a battery type CR1620 (3 V ,
lithium) in the battery compartment
5
(see Ill. B).
Note: The device will now perform a brief display
check. All displays will be shown for approx.1sec-
ond. The device then switches into the set-up mode.
Your pedometer is now ready to be confi gured.
CAUTION! EXPLOSION HAZ-
ARD! The batteries may never be
recharged!
When inserting the battery ensure the correct po-
larity! This is indicated in the battery compart
ment.
Clean the battery and device contact before you
insert the battery with a dry cloth if necessary.
Remove the dead battery immediately from the
device. There is an increased risk of leaks!
Batteries may not be disposed of with normal
domestic waste!
Every consumer is legally obliged to dispose
of batteries in the proper manner!
Keep the battery out of reach of children, do not
throw the battery into fi re, do not short-circuit
or take the battery apart.
If you do not observe these instructions, the
battery could be discharged beyond the cut-off
voltage. This will then pose a risk of leaking. If
the battery has leaked inside your device, you
non-compliance with the operating instructions
or interference with the device by unauthorised
individuals.
Never disassemble the device. Improper repairs
may result in considerable danger for the user.
Always have repairs performed by a professional.
Keep the device dry. Never immerse the device
in water or other liquids.
Safety instructions
for batteries
WARNING! RISK OF FATAL INJURIES!
Batteries could be swallowed, which may be
life-threatening. If a battery has been swallowed,
seek medical help immediately.
Remove the battery from the device if it is not
going to be used for a prolonged period.
General Safety
Instructions
Children or persons lacking knowledge or ex-
perience in handling the device or who have
limited physical, sensory or mental abilities,
may not use the device without supervision or
instruction by a person responsible for their
safety. Children must be supervised at all times
to prevent them from playing with the device.
Do not use the device if damaged. Damaged
devices represent a danger of death from elec-
tric shock!
Do expose the device to
– extreme temperatures,
– to direct sunlight,
– humidity / rain.
Otherwise it may be damaged.--
Please note that the guarantee does not cover
damage caused by incorrect handling,
6
Anti-shock ring
7
Belt clip
Display:
8
Week display
9
Calorie display
10
km / m per hour
11
Grams symbol (fat burn)
12
Progress bar
13
Speed
14
TARGET symbol
15
Pedometer on / off
16
Day display
17
PM symbol (afternoon in 12hr format)
18
Display for low battery warning
19
Number of steps
NOTE: The LC display
1
of the device cannot be
switched off . However, the power consumption re-
Pedometer
Intended use
This pedometer records the number of steps you
have taken, the distance covered, the required time
and the calorie consumption. The device is not suit-
able for the recording of medical data.
Parts description
Device:
1
LC display
2
MODE button
3
SET button
4
Battery compartment cover
5
Battery compartment
PEDOMETER
Operation and Safety Notes
LICZNIK KROKÓW Z RADIEM
Wskazówki dotyczące obsługi i bezpieczeństwa
Z31351
A B
C
1
4
2
3
4
5
7
6
E
D
7
19
10
11
8
18
17
16
9
12131415


Praat mee over dit product
Laat hier weten wat jij vindt van de Crivit IAN 78999 Stappenteller. Als je een vraag hebt, lees dan eerst zorgvuldig de handleiding door. Een handleiding aanvragen kan via ons contactformulier.