
GBGBGBGB
GBGBGBGBGB
GBGB
Congratulations!
You have chosen to purchase a
high-quality product. Familiarise
yourself with the product before
using it for the first time.
Read the following
operating
instructions
carefully.
Use the product only as de-
scribed and only for the given
areas of application. Store
these operating instructions
carefully. When passing the
product on to third parties,
please also hand over all
accompanying documents
Package Contents
1 x pedometer
1 x battery (3V CR2032)
1 x operating instructions
Technical data
Battery type: 3V CR2032
Date of manufacture
(month/year): 10/2019
Symbol for DC voltage
Measurement method: Sensor
Step display: 0-99999 steps
Distance display: 0-9999 km
Calorie display: 0-99999 kcal
Adjustable user weight display:
30-220kg (adjustable to an
exactitude of 1kg)
Default setting: 50kg
Height: 100-250cm
Default setting: 150cm
Adjustable step length: 25-250cm
Default setting: 62-104cm
(as per body size)
Time format: 12/24 hours
Battery: 1 Battery CR2032
(3V (direct current), lithium)
permitted temperature: 0-50°C
Intended use
The product has been devel-
oped as a step counter for
private use. Not suitable for the
collection of medical data.
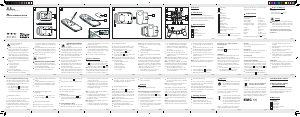
Parts description
Product:
1
LC Display
2
MODE button
3
SET button
4
Anti-shock ring
5
Belt clip
6
Battery housing lid
7
Battery housing
Display:
8
Step mode
9
Weekly display
10
Daily display
11
Low battery indicator
12
PM symbol (12-hour
format)
13
Number of steps
14
Calorie display
15
Gram symbol (fat-burning)
16
Activity step counter
17
Temperature display
18
km/m per hour
19
Average speed
20
Current speed
21
7-day storage
NOTE: You cannot switch off
the display (1). The electricity
used to power the display is
very low and can be compared
with that of a wristwatch.
Safety informa-
tion!
Important: Please read
the operating instructions
carefully and keep them
for future reference!
• The product is not a toy!
• Check the product for
damage or wear before
each use. The product may
only be used when in perfect
condition!
• The product may not be
modified in any way!
• This product may be used
by children from 8 years
of age upwards, as well
by persons with diminished
physical, sensory or mental
abilities, or those with little
experience and knowledge,
if they are supervised or
instructed with regard to its
safe use, and provided they
also understand the potential
associated risks.
• Do not expose the product
– to direct sunlight,
– extreme temperatures,
– moisture/rain.
Otherwise, the product may
be damaged.
• Protect the product from wet
and moist conditions. Do
not submerge the product in
water or other fluids!
• Only use the battery type:
3V / CR2032.
Warnings on batteries!
• Remove the batteries if they
are empty or if the product is
not going to be used for an
extended period.
• Do not use different
battery types or brands,
new and used batteries in
combination, or batteries
with different capacities, as
they leak and can thus cause
damage.
• Observe the polarity (+/-)
when inserting batteries.
• Change all batteries at the
same time and dispose of the
old batteries properly.
• Warning! Batteries may not
be charged or reactivated in
any way. They may not be
dismantled, thrown into fire,
or short-circuited.
• Always keep batteries out of
the reach of children.
• Do not use rechargeable
batteries!
• The cleaning and user-main-
tenance may not be carried
out by children without
supervision.
• Clean the batteries and the de-
vice contacts as necessary and
before inserting the batteries.
• Do not expose the batteries
to extreme conditions (e.g.
radiators or direct sunlight).
Otherwise there is an
increased risk of leaks.
• Batteries can endanger life
if swallowed. Keep batteries
out of the reach of small
children for this reason. Seek
medical help immediately if
a battery is swallowed.
Danger!
• Handle a damaged or
leaking battery with extreme
care and dispose of it prop-
erly and immediately. Wear
gloves to handle the battery.
• If you come into contact with
battery acid then wash the
affected area with soap and
water. If battery acid gets
in your eye rinse it out with
water and seek medical help
immediately!
• Do not short-circuit the
terminals.
Initial setup
Remove the protective foil from
the display.
Remove the belt clip (5) by
pressing the fastener upwards
and pushing the belt clip
(Fig. B).
Inserting the battery
CAUTION! Observe the
following instructions to
avoid mechanical and
electrical damage.
Before using for the first time,
insert the included battery.
1. Slide the battery compartment
lid (6) off the battery compart-
ment (7), on the underside of
the product (Fig. C).
2. Carefully insert the batteries
into the battery compart-
ment. The battery must be
completely fitted into the
battery compartment.
GB GBGBGBGBGB
GBGBGBGBGBGB GBGB
Note: Set the time and day
of the week again after you
replace the batteries.
Use
Fasten the product with the belt
clip, or put it into one of your
front trouser pockets. The prod-
uct must fit snugly to measure
data accurately.
Storage, cleaning
When not in use, always
store the product dry, clean,
without batteries and at room
temperature.
Wipe clean with a dry cloth
only.
IMPORTANT! Never clean the
product with harsh cleaning
agents.
To do this, keep the MODE
button and the SET button
pressed down at the same
time for approx. 3 seconds. All
saved data will be deleted. The
device then switches back into
the setting mode.
Note: This function is only
available to you after you input
your personal information and
after you have pressed the SET
button.
Setting the time
You can change the time without
deleting the saved training data.
In the time mode, keep the SET
button pressed down until the
TIME indicator appears on the
display.
- Press the SET button several
times to scroll through the
stored data of the last 7 days,
as well as the overall total
distance ODO (odometer).
Switching on the backlight
Press the MODE button for
approx. 3 seconds. The back-
light will switch on for around
3 seconds.
Energy saving mode
If the product is not used for ap-
prox. 3 minutes, it automatically
switches into energy saving
mode. The display simply
shows the time.
Resetting the product
To change the personal set-
tings, you must reset the device
completely.
Speed
The calories (Calorie = “C”)
used and fat burned (Fat-burn-
ing = “F”) on a given day are
displayed in g.
Temperature
The current temperature (17)
is shown.
Previous-day mode
and 7-day storage
Press the MODE button twice to
reach this mode. The number of
steps, exercise timer, distance
covered, calorie-counter,
fat-burning values and average
speed each day is automat-
ically stored by the product.
The values are reset each day
at 0:00.
Activity duration
Activity duration (Time = „T“) of
the product on the given day is
displayed.
Distance
The distance covered (Distance
= „D“) on a given day is
displayed (in km).
Calories used and fat
burned
The calories (Calorie = “C”)
used and fat burned (Fat-burn-
ing = “F”) on a given day are
displayed in g.
Note: The calories used infor-
mation is only an approximate
value.
Divide the distance by the
number of steps, and you will
obtain your step length.
Confirm your selection by press-
ing the SET button again.
Operation
Press the MODE button several
times, to switch through the
various modes (Time, STEP, as
well as the 7-day storage).
Time Mode
The current time and the day
of the week is displayed in the
display.
Step mode
The amount of steps measured
on the given day, as well as
the duration of activity, are
displayed.
Note: The product has been
fitted with a 10-step filter, to
ensure a higher level of accura-
cy. The sensor requires at least
10 steps, to record the active
behaviour of the user, with
regard to speed and distance
calculation. The initial display
of the number of steps will
therefore be higher than 10.
- Press the SET button several
times to switch through activi-
ty duration, distance, calories
used, fat-burning, current
speed, average speed, and
temperature in STEP mode.
(Fig. E-F).
Note: When inputting your
weight, make sure to take
additional weight, such as
your clothing or rucksack, into
account.
- Set your height (“Height”,
Fig. K).
- Set your step length (“Step-
Length”, Fig. L).
Note: The product shows an
average step-length, which is
ascertained via your body size
entry. For more accurate meas-
urements, you can ascertain
your personal step-length, and
change it manually. Measure
a short distance of 10 metres,
and count the steps required for
this distance.
Note: If you decide to set
the distance unit in “KM”, the
weight unit will be in “kg” for-
mat, and the length unit will be
in “cm” format. If you decide
to use “Miles”, the product will
show weight in “lb” format and
length in “inch”.
- Set the time format (“Time”,
Fig. H) (12/24 hours).
- Set the hours (22) (Fig. I).
- Set the minutes (23) (Fig. I).
- Set the seconds (24) (Fig. I).
- Set the day of the week (25)
(Fig. I).
- Set your weight (“Weight”,
Fig. J).
Disposal
In the interest of
protecting the
environment, do not
throw your product into the
household waste once you are
finished with it, but rather take it
to a specialty disposal facility.
Find out about collection sites
and their hours of operation
from your local authority.
Defective or used batteries must
be recycled pursuant to Directive
2006/66/EC and changes to it.
Return batteries and/or the product
via the collecting sites provided.
Packaging materials, such as
plastic bags, must be kept away
from children. Keep the packaging
materials out of reach of children.
Note: Check the plus/minus
poles of the batteries and insert
them correctly.
Note: The product now
performs a quick display check.
All products on the display
appear for approx. 1 second.
The product then switches to the
setting mode.
3. Slide the battery compart-
ment lid onto the battery
compartment.
4. Fasten the belt clip to the
product.
Replacing the batteries
CAUTION! Observe the
following instructions to
avoid mechanical and
electrical damage.
When the battery is no longer
functioning properly, replace
it as described in the insertion
instructions above. Remove the
battery in the product before
inserting a new one.
Note: All saved data remains
stored when the battery is
changed, except time, day of
the week and daily values.
Please be sure not to scratchthe
display while changing the
battery.
Setting the step counter
The display uses words and abbre-
viations in English. The following
steps are for the initial setup:
• Unit = distance unit (km/mile)
(Fig. G)
• Time = time format
(24hr/12hr) (Fig. H)
• Set the hours (22) (Fig. I).
• Set the minutes (23) (Fig. I).
• Set the seconds (24) (Fig. I).
• Set the day of the week (25)
(Fig. I).
MO = Monday
TU = Tuesday
WE = Wednesday
TH = Thursday
FR = Friday
SA = Saturday
SU = Sunday
• Weight (“WEI”) = body
weight
(30 - 220kg) (Fig. J)
• Height (“HEI”) = body height
(100 - 250cm) (Fig. K)
• Step-length (“STP-L”)
(25 - 250cm) (Fig. L)
You need to enter some person-
al data, before you can use the
product.
Press the MODE button (2)
several times, to switch between
the various settings. Press the
SET button (3) to confirm the
setting you require.
- Set the distance unit (“Unit”,
Fig. G) (KM/Mile).
GB GBGBGB
Notes on the guarantee
and service handling
The product was produced
with great care and under
constant supervision. You
receive a three-year warranty
for this product from the date
of purchase. Please retain your
receipt.
The warranty applies only to
material and workmanship and
does not apply to misuse or im-
proper handling. Your statutory
rights, especially the warranty
rights, are not affected by this
warranty.
With regard to complaints,
please contact the following
service hotline or contact us
by e-mail.
Note the label on the
packaging materials
when separating
waste, as these are labelled
with abbreviations (a) and
numbers (b) with the following
meaning: 1–7: plastics/20–22:
paper and cardboard/80–98:
composite materials.
The product and the packaging
materials can be recycled,
dispose of them separately for
better treatment of waste. The
Triman logo only applies to
France. Find out how to dispose
of the used product from your
municipal or city administration.
Environmental
damage caused by
improper disposal of
batteries! Batteries may not be
disposed of with household
waste. They may contain toxic
heavy metals and are subject to
hazardous waste treatment. The
chemical symbols of the heavy
metals are as follows: Cd =
cadmium, Hg = mercury, Pb =
lead. Dispose of used batteries
at a municipal collection site.
Dispose of the product
and packaging in an
environmentally
friendly manner.
Our service employees will
advise as to the subsequent pro-
cedure as quickly as possible.
We will be personally available
to discuss the situation with you.
Any repairs under the warranty,
statutory guarantees or through
goodwill do not extend the war-
ranty period. This also applies
to replaced and repaired parts.
Repairs after the warranty are
subject to a charge.
IAN: 326844_1904
Service Great Britain
Tel.: 0800 404 7657
IT/CH IT/CH IT/CHIT/CHIT/CHIT/CH
• Conservare le batterie
sempre fuori dalla portata
dei bambini.
• Non utilizzare batterie
ricaricabili!
• La pulizia e la manutenzione
dell’utente non possono
essere condotte dai bambini
non sorvegliati.
• Se necessario e prima di
inserire le batterie, pulire i
contatti delle batterie e delle
apparecchiature.
• Non esporre le batterie a
condizioni estreme (ad es.
termosifoni o radiazione
solare diretta). Altrimenti sus-
siste un pericolo maggiore
che fuoriesca del liquido.
Avviso: Ora il dispositivo
esegue un breve controllo
del display. Tutti i testi delle
indicazioni sul display vengono
visualizzati per circa 1 secon-
do. Adesso il dispositivo passa
in modalità di impostazione
delle funzioni.
3. Richiudere il vano della
batteria, spostando su di
esso l’apposito coperchio.
4. Fissare il gancetto della cintu-
ra al dispositivo.
Sostituzione della
batteria
ATTENZIONE! Per evitare
danni meccanici ed elettri-
ci, attenersi alle seguenti
istruzioni.
Se la batteria non funziona più,
è possibile sostituirla, seguendo
le stesse istruzioni dell’inseri-
mento. Prima di inserire una
nuova batteria rimuovere dal
dispositivo quella precedente-
mente usata.
Nota: Durante la sostituzione
della batteria tutti i dati memo-
rizzati rimangono conservati,
compresi data, ora e giorno
della settimana.
Assicurarsi di non graffiare il
display durante la sostituzione
delle batterie.
Impostazione
Il display utilizza parole e
abbreviazioni in lingua inglese.
I seguenti passi servono per la
prima impostazione:
Inserimento della
batteria
ATTENZIONE: Per evitare
danni meccanici ed elettri-
ci, attenersi alle seguenti
istruzioni.
Prima di usare il prodotto per
la prima volta inserire in esso la
batteria a corredo.
1. Spostare il coperchio del
vano della batteria (6) dal
vano della batteria (7) sul
retro del dispositivo. (Fig. C).
2. Inserire con cautela la
batteria nel vano. La batteria
deve trovarsi completamente
nell’apposito vano.
Avviso: Prestare attenzione
al polo positivo/negativo della
batteria e all’inserimento corretto.
Se l’acido delle batterie
dovesse venire a contatto con
gli occhi, lavarli con acqua e
affidarsi quanto prima a delle
cure mediche!
• I morsetti di collegamento
non devono essere collegati
in corto circuito.
Messa in funzione
Rimuovere la pellicola protetti-
va dal display.
Levare il gancetto della cintura
(5), premendo la serratura ver-
so l’alto e spostando il gancetto
(Fig. B).
• Se inghiottite, le batterie pos-
sono causare la morte. Con-
servare quindi le batterie in
un luogo non raggiungibile
per i bambini piccoli. In caso
di ingestione di una batteria
è necessario sottoporsi subito
a cure mediche.
Pericolo!
• Maneggiare con estrema
cautela una batteria
danneggiata o dalla quale
è fuoriuscito del liquido, e
smaltirla come previsto dalle
normative. Indossare dei
guanti durante l’operazione.
• Se si dovesse venire a contat-
to con l’acido delle batterie,
lavare la parte interessata
con acqua e sapone.
IT/CHIT/CHIT/CHIT/CH
Nota: L’articolo mostra una
lunghezza media della falcata
basata sulle informazioni
inserite relative alla dimensione
del tuo corpo.
Per risultati di misurazione più
precisi, è possibile determinare
la lunghezza della falcata
personale e modificarla ma-
nualmente. Misurare una breve
distanza di max. 10 metri e
contare i passi necessari a co-
prire questa distanza. Dividere
la distanza per il numero dei
passi per ottenere la sua lun-
ghezza del passo. Confermare
la propria scelta, premendo
nuovamente il tasto SET.
- Impostare il formato dell’ora
(“Time”, fig. H), (12/24 ore).
- Impostare l’ora (22) (fig. I).
- Impostare i minuti (23)
(fig. I).
- Impostare i secondi (24)
(fig. I).
- Impostare il giorno della
settimana (25) (fig. I).
- Impostare il proprio peso
(“Weight”, fig. J).
Nota: Immettendo il proprio
peso, tenere conto di ulteriori
carichi, quali i vestiti o uno
zainetto.
- Impostare la propria altezza
(“Height”, fig. K).
- Impostare la lunghezza del
passo. (“Step-Length”, fig. L).
• Step-Length (“STP-L”) =
lunghezza passo
(25 - 250 cm) (fig. L)
Prima di poter usare il disposi-
tivo occorre immettere alcuni
dati personali.
Premere ripetutamente il tasto
MODE (2) per passare ai di-
versi valori. Premere il tasto SET
(3) per confermare il valore
richiesto.
- Impostare l’unità del percorso
(“Unit”, fig. G), (KM/Mile).
Nota: Se si sceglie di visualiz-
zare l’unità di distanza in “KM”,
l’unità di peso viene visualizzata
in “kg” e l’unità di lunghezza
in “cm”. Se si seleziona “Mile”,
l’articolo mostra il peso in “lb” e
la lunghezza in “inch”.
• Unit = unità di distanza
(km/mile) (fig. G)
• Time = formato dell’ora
(24hr/12hr) (fig. H)
• Impostare l’ora (22) (fig. I).
• Impostare i minuti (23) (fig. I).
• Impostare i secondi (24) (fig. I).
• Impostare il giorno della
settimana (25) (fig. I).
MO = lunedì
TU = martedì
WE = mercoledì
TH = giovedì
FR = venerdì
SA = sabato
SU = domenica
• Weight (“WEI”) = peso
corporeo
(30 - 220 kg) (fig. J)
• Height (“HEI”) = altezza
(100 - 250 cm) (fig. K)
IT/CH
I materiali di imballaggio, ad es.
i sacchetti, non devono giungere
nelle mani dei bambini. Tenere
il materiale di imballaggio fuori
dalla portata dei bambini.
Danni ambientali
dovuti a un errato
smaltimento delle
batterie! Le batterie non
devono essere smaltite come
rifiuti domestici. Possono
contenere metalli pesanti tossici
e sono soggetti a un
trattamento speciale dei rifiuti. I
simboli chimici dei metalli
pesanti sono i seguenti: Cd =
cadmio, Hg = mercurio, Pb =
piombo. Pertanto, restituire le
batterie usate in un punto di
raccolta comunale.
IT/CH IT/CH
Tenere il tasto SET premuto fino
a quando sul display non verrà
visualizzata la parola TIME.
Nota: Dopo aver sostituito la
batteria nell’articolo, imposta
l’ora e il giorno della settimana.
Uso
Fissare il dispositivo alla cintura,
usando l’apposito gancetto op-
pure inserirlo in una delle tasche
anteriori dei pantaloni. Per assicu
-
rare una misurazione accurata il
dispositivo deve aderire al corpo.
Conservazione,
pulizia
In caso di mancato utilizzo,
riporre l’articolo a temperatura
ambiente senza batterie in un
luogo asciutto e pulito.
Pulire solo con un panno asciutto.
IMPORTANTE! Non utilizzare
mai detergenti aggressivi.
Smaltimento
Una volta che
l’articolo diventa
inutilizzabile, non
gettarlo nei rifiuti domestici, ma
smaltirlo correttamente nel pieno
rispetto dell’ambiente. È
possibile ottenere informazioni
sui punti di raccolta e sui loro
orari di apertura presso l’ufficio
amministrativo competente.
Le batterie difettose o usate
devono essere riciclate in confor-
mità alla direttiva 2006/66/CE
e successive modifiche. Restituire
le batterie e/o l’articolo attraver-
so i centri di raccolta offerti.
IT/CH
IT/CH
IT/CH
IT/CH
IT/CHIT/CH
Funzione
Premere ripetutamente il tasto
MODE per passare alle diverse
modalità (ora, STEP e memoria
di 7 giorni).
Modalità dell’ora
Sul display viene visualizzata
l’ora attuale e il giorno della
settimana.
Modalità STEP
Viene visualizzato il numero dei
passi misurato per il giorno attua-
le, nonché la durata dell’attività.
Avviso: Il dispositivo è dotato
di un filtro di 10 passi per
aumentare l’accuratezza del
conteggio del numero dei
passi.
- Premere ripetutamente il
tasto SET per sfogliare i dati
memorizzati per gli ultimi 7
giorni, nonché la distanza
ODO (odometro) percorsa
totale.
Accensione della
retroilluminazione
Tenere il tasto MODE premuto
per circa 3 secondi. La retroil-
luminazione si accenderà per
circa 3 secondi.
Modalità di risparmio
energetico
Se il dispositivo non viene
utilizzato per circa 3 minuti,
passa automaticamente in mo-
dalità di risparmio energetico.
Sul display viene visualizzata
solo l’ora.
Temperatura
Viene visualizzata la temperatu-
ra (17) attuale.
Modalità del giorno
precedente e memoria
di 7 giorni
Premere due volte il tasto
MODE per passare in questa
modalità. Il dispositivo memoriz-
za automaticamente il numero
dei passi, la durata dell’attività,
la distanza percorsa, le calorie
consumate, i grassi bruciati e la
velocità media per ogni giorno.
Ogni giorno alle ore 0:00 i
valori vengono azzerati.
Percorso
Viene visualizzata la distanza
(Distance = „D“) percorsa nel
giorno attuale (in km).
Calorie consumate e grassi
bruciati
Vengono visualizzate le calorie
(Calorie = “C”) consumate e
i grassi bruciati (Fatburning =
“F”) in g nel giorno attuale.
Avviso: L’indicazione delle ca-
lorie bruciate è solo un valore
orientativo.
Velocità
Vengono visualizzate la
velocità attuale (Current Speed
= “CUS”) e quella media (Ave-
rage Speed = “AVS”) in km/h.
Il sensore richiede almeno 10
passi per registrare l’attività
dell’utente e procedere alla mi-
surazione della velocità e della
distanza percorsa. L’indicazio-
ne iniziale del numero dei passi
sarà quindi al di sopra di 10.
- Premere ripetutamente il
tasto SET per passare nella
modalità STEP alla durata
dell’attività, alla distanza
percorsa, al consumo di
calorie, ai grassi bruciati,
velocità attuale, velocità
media e alla temperatura.
(Fig. E - F).
Durata dell’attività
Viene visualizzata la durata
dell’attività (Time = „T“) fisica
per il giorno attuale.
Reset del dispositivo
Per poter effettuare delle
modifiche alle impostazioni
personali, si deve resettare
completamente l’articolo.
Premere contemporaneamente
i tasti MODE e SET per circa
3 secondi. I dati salvati verranno
eliminati. Il dispositivo tornerà in
modalità d’impostazione.
Nota: Questa funzione è
disponibile solo dopo aver in-
serito le informazioni personali
e aver confermato premendo il
tasto SET.
Impostazione dell’ora
E’ possibile cambiare l’ora
senza perdere i dati degli
allenamenti memorizzati.
IT/CHIT/CHIT/CHIT/CH
Lo stesso vale anche per le
parti sostituite o riparate.
Le riparazioni dopo la scaden-
za della garanzia verranno
effettuate a pagamento.
IAN: 326844_1904
Assistenza Svizzera
Tel.: 0842 665566
(0,08 CHF/Min.,
telefonia mobile max.
0,40 CHF/Min.)
Il logo Triman è valido solo per
la Francia. Per informazioni su
come smaltire l’articolo non
più utilizzabile, rivolgersi alle
autorità locali o comunali.
Avvertenze sulla
garanzia e sulla
gestione dei servizi di
assistenza
Questo prodotto è stato fabbri-
cato con grande attenzione e
sottoposto a costanti controlli.
La garanzia è di tre anni dalla
data d’acquisto. Conservi lo
scontrino fiscale.
La garanzia vale solo su difetti
di materiale o di fabbricazione
e decade in caso di uso errato
o non conforme.
Questa garanzia non costitu-
isce una limitazione ai Suoi
diritti legali e in particolare al
diritto di garanzia.
Per eventuali reclami vi preghia-
mo di contattare il seguente
servizio hotline o mettervi in co-
municazione con noi via e-mail.
I nostri addetti all‘assistenza
concorderanno con voi come
procedere nel modo più rapido
possibile. In qualsiasi caso vi
consiglieremo per le vostre
esigenze specifiche.
Il periodo di garanzia non
viene prolungato a seguito
di riparazioni effettuate in
garanzia, secondo il diritto di
garanzia o per correntezza
commerciale.
Smaltire l’articolo e il
materiale di
imballaggio nel pieno
rispetto dell’ambiente.
Si noti la marcatura
dei materiali di
imballaggio durante
la separazione dei rifiuti, questi
sono contrassegnati da
abbreviazioni (a) e numeri (b)
con il seguente significato: 1-7:
materiali plastici/20-22: carta
e cartone/80-98: materiali
compositi.
L’articolo e i materiali di
imballaggio sono riciclabili,
smaltirli separatamente per una
migliore gestione dei rifiuti.
FR/CH IT/CHFR/CHFR/CHFR/CHFR/CH
Article 1648 1er alinéa du
Code civil
L‘action résultant des vices
rédhibitoires doit être intentée
par l‘acquéreur dans un délai
de deux ans à compter de la
découverte du vice.
Les pièces détachées indispen-
sables à l’utilisation du produit
sont disponibles pendant la du-
rée de la garantie du produit.
IAN : 326844_1904
Service Suisse
Tel. : 0842 665566
(0,08 CHF/Min.,
mobile max. 0,40
CHF/Min.)
7
Vano della batteria
Display:
8
Modalità Step
9
Indicatore settimane
10
Indicatore giorni
11
Indicatore di livello
basso della batteria
12
Simbolo PM (formato di
12 ore)
13
Conteggio dei passi
14
Indicatore di calorie
15
Simbolo dei grammi
(combustione dei grassi)
16
Attività del contapassi
17
Indicatore di tempe-
ratura
18
km/m per ora
Article L217-12 du Code de
la consommation
L‘action résultant du défaut de
conformité se prescrit par deux
ans à compter de la délivrance
du bien.
Article 1641 du Code civil
Le vendeur est tenu de la
garantie à raison des défauts
cachés de la chose vendue qui
la rendent impropre à l‘usage
auquel on la destine, ou qui
diminuent tellement cet usage
que l‘acheteur ne l‘aurait pas
acquise, ou n‘en aurait donné
qu‘un moindre prix, s‘il les avait
connus.
Il répond également des
défauts de conformité résultant
de l‘emballage, des instructions
de montage ou de l‘installation
lorsque celle-ci a été mise à sa
charge par le contrat ou a été
réalisée sous sa responsabilité.
Article L217-5 du Code de
la consommation
Le bien est conforme au
contrat :
1° S´il est propre à l‘usage ha-
bituellement attendu d‘un bien
semblable et, le cas échéant :
• s‘il correspond à la descrip-
tion donnée par le vendeur
et posséder les qualités
que celui-ci a présentées
à l‘acheteur sous forme
d‘échantillon ou de modèle ;
• s‘il présente les qualités
qu‘un acheteur peut légiti-
mement attendre eu égard
aux déclarations publiques
faites par le vendeur, par le
producteur ou par son repré-
sentant, notamment dans la
publicité ou l‘étiquetage ;
2° Ou s‘il présente les caracté-
ristiques définies d‘un commun
accord par les parties ou être
propre à tout usage spécial
recherché par l‘acheteur, porté
à la connaissance du vendeur
et que ce dernier a accepté.
Indépendamment de la garan-
tie commerciale souscrite, le
vendeur reste tenu des défauts
de conformité du bien et des
vices rédhibitoires dans les
conditions prévues aux articles
L217-4 à L217-13 du Code de
la consommation et aux articles
1641 à 1648 et 2232 du
Code Civil.
Article L217-4 du Code de
la consommation
Le vendeur livre un bien
conforme au contrat et répond
des défauts de conformité exis-
tant lors de la délivrance.
IT/CH IT/CHIT/CH IT/CHIT/CH IT/CHIT/CH IT/CH
Peso dell’utente impostabile:
30–220 kg (impostabile con
l’accuratezza di 1 kg)
Preimpostazione: 50 kg
Altezza: 100–250 cm
Preimpostazione: 150 cm
Lunghezza dei passi impostabile:
25–250 cm
Preimpostazione: 62 - 104 cm
(a seconda dell’altezza)
Formato dell’ora: 12/24 ore
Batteria: 1 batteria CR2032
(3 V (corrente continua), litio)
Gamma di temperatura
consentita: 0–50 °C
– a temperature estreme;
– all’umidità/alla pioggia.
Altrimenti il prodotto potreb-
be subire danni.
• Proteggere il prodotto
dall’umidità. Non immergere
il dispositivo in acqua o altri
liquidi.
• Utilizzate solo questo tipo di
batteria: 3 V / CR2032.
Avvertenze sulle batterie!
• Togliere le batterie una volta
scariche oppure se non si
utilizza l’articolo per lungo
tempo.
Contenuto della
fornitura
1 x contapassi
1 x batteria (3 V
CR2032)
1 x istruzioni operative
Dati tecnici
Tipo di batteria:
3 V
CR2032
Data di produzione
(mese/anno): 10/2019
Simbolo di corrente continua
Metodo di misurazione:
Sensore
Indicatore dei passi:
0–99999 passi
Indicatore di distanza:
0–9999 km
Indicatore di calorie:
0–99999 kcal
• Prima di ogni uso, controllare
se l’articolo presenta danni
o segni d’usura. Utilizzare
l’articolo solo se in perfette
condizioni!
• Non apportare modifiche
all’articolo.
• Il dispositivo può essere
usato da bambini di età
superiore a 8 anni e da
persone con abilità fisiche,
sensoriali o cognitive limitate
o scarsa esperienza e/o
conoscenza solo sotto
sorveglianza, oppure se
sono state istruite sul relativo
uso sicuro e hanno compreso
i rischi derivanti dallo stesso.
• Non esporre il prodotto:
– a luce diretta del sole;
Congratulazioni!
Avete acquistato un articolo di
alta qualità. Consigliamo di fa-
miliarizzare con l’articolo prima
di cominciare ad utilizzarlo.
Leggere attenta-
mente le seguenti
istruzioni operative.
Utilizzare l’articolo solo nel
modo descritto e per gli ambiti
di applicazione indicati. Con-
servare accuratamente queste
istruzioni operative. In caso di
trasferimento dell’articolo a ter-
zi, consegnare tutti i documenti
insieme all’articolo.
19
Velocità media
20
Velocità attuale
21
Memoria di 7 giorni
AVVISO: Il display (1) non
può essere spento. Il consumo
di energia elettrica per l’uso
del display è molto ridotto,
paragonabile a quello di un
orologio da polso.
Indicazioni di
sicurezza!
Importante: Leggere
attentamente le istruzioni
per l’uso e conservarle
assolutamente!
• L’articolo non è un giocattolo.
Uso conforme a
destinazione
L’articolo è stato sviluppato
come contapassi per uso
privato. Non è adatto per il
rilevamento dei dati medici.
Descrizione del
pezzo
Articolo:
1
Display LCD
2
Tasto MODE (Modalità)
3
Tasto SET (Impostazioni)
4
Anello anti-shock
5
Gancetto per la cintura
6
Coperchio del vano
della batteria
• Non utilizzare batterie di tipo
diverso o di marca diversa,
né utilizzare assieme batterie
nuove e scariche oppure
batterie con capacità differen-
te, poiché da esse potrebbe
fuoriuscire del liquido e
causare quindi dei danni.
• Quando si inseriscono le bat-
terie, osservare la polarità
(+/-).
• Sostituire contemporane-
amente tutte le batterie e
smaltire le batterie scariche
nel rispetto delle normative.
• Attenzione! Le batterie non
devono essere caricate né
riattivate in altro modo, smon-
tate, gettate nel fuoco oppure
collegate in corto circuito.


Praat mee over dit product
Laat hier weten wat jij vindt van de Crivit IAN 26844 Stappenteller. Als je een vraag hebt, lees dan eerst zorgvuldig de handleiding door. Een handleiding aanvragen kan via ons contactformulier.